

3218 Plate Presentation and Culinary Photography
Plate Presentation and Its Importance
Definition and History
Plate presentation is the art of arranging and styling food on the plate to enhance the visual appeal, ultimately impacting the dining experience. Rooted in ancient traditions, food presentation began with the basic arrangement of ingredients on communal platters, eventually evolving alongside culinary arts. Notably, the Renaissance period marked a shift towards more elaborate plating as European royalty embraced feasts adorned with intricate displays of food. French chef Marie-Antoine Carême considered the father of haute cuisine, is credited with formalizing food presentation in the 19th century, emphasizing the importance of aesthetics in a dish. Today, modern chefs continue to push boundaries, incorporating elements from various cultures and artistic influences to create visually compelling plates that captivate diners.
Gastronomic Impact of Food Presentation
The presentation of food is closely tied to gastronomy, the art and science of food and flavor. Gastronomy emphasizes the multisensory nature of eating, where appearance plays a crucial role. Research in culinary science shows that food presentation affects flavor perception, where a well-presented dish can heighten the dining experience. For instance, clean lines, balance, and vibrant colors can make a dish appear more appetizing. Additionally, visual cues such as portion size and ingredient arrangement can impact a person’s perception of the dish’s complexity, quality, and taste. Therefore, modern gastronomy integrates aesthetics with flavor, treating food presentation as an essential component of creating memorable culinary experiences.
Contribution to Customer Experience
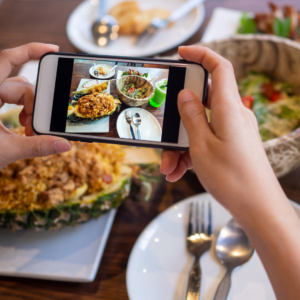
Food presentation plays a pivotal role in shaping the customer’s dining experience, as it is often the first impression of a dish. Visually appealing dishes create anticipation and engage the senses even before the first bite. This not only elevates the perceived value of a dish but also creates an emotional connection between the customer and the culinary experience. In a world where social media platforms like Instagram encourage people to share their meals, presentation is more important than ever in enhancing customer satisfaction and restaurant reputation. A well-plated dish tells a story, showcases the chef’s creativity, and adds to the overall ambiance of the dining experience, ultimately contributing to customer loyalty and memorable moments.
Different Presentation Styles
Classic Style
The classic style of plating is rooted in tradition and emphasizes precision, elegance, and balance. This style is often seen in high-end dining and fine-dining establishments, where each element on the plate has a specific place and purpose.
In the classic style, food placement adheres to strict rules of symmetry and structure, creating a sense of harmony on the plate. Ingredients are often grouped by type, with a clear focal point—usually the main protein—highlighted and supported by sides, sauces, and garnishes. A typical classic plating might feature the main component in the center, surrounded by complementary sides placed at equal distances, creating visual balance.
Key techniques in classic plating include:
- Layering: Often, ingredients are stacked or layered to create height, adding visual intrigue. A tall presentation can signal sophistication, while careful layering showcases each ingredient individually.
- Saucing Techniques: Sauces are typically drizzled or pooled in precise, controlled amounts. Classic plating avoids “sauce smears” or large pools of sauce; instead, sauces are often applied using squeeze bottles or spoons for maximum control. A small spoonful of sauce on the side of the plate, called a “quenelle,” or intricate brushstrokes can add sophistication.
- Symmetry and Proportions: The classic style avoids overcrowding, giving each ingredient room to stand out while maintaining a cohesive look. The portion sizes are meticulously controlled, with a focus on achieving a visually balanced arrangement that appears satisfying without excess.
This style also respects traditional flavor pairings and ingredient placements, following timeless culinary rules. Every element contributes to a structured, elegant aesthetic that reflects the refinement of haute cuisine.
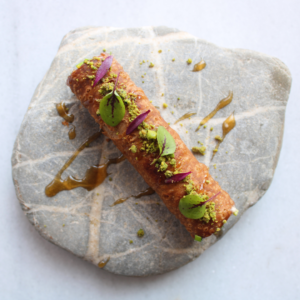
Minimalist Style
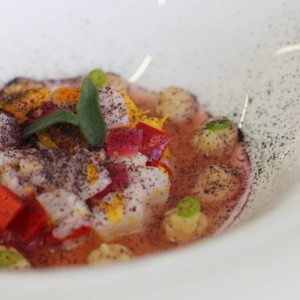
Minimalist plating embodies the “less is more” philosophy, focusing on simplicity, elegance, and space. Inspired by modern art and minimalism in design, this style uses very few elements, strategically placed to create maximum impact. Minimalist plating often features one main ingredient with a supporting component, garnish, or sauce, allowing each element to shine on its own.
Key characteristics and techniques of minimalist plating include:
- Intentional White Space: White space, or negative space, is integral to minimalist plating, drawing attention to the food rather than the plate itself. White plates are commonly used, as they emphasize color contrast and create a clean background, allowing the eye to focus on the ingredients.
- Clean Lines and Precision: Minimalist plating values clean lines, careful placement, and symmetry. Precision tools such as tweezers, squeeze bottles, and molds are often used to ensure that each element is perfectly placed.
- Highlighting Individual Ingredients: Minimalist style places emphasis on high-quality ingredients, presenting them in their most natural form. Ingredients are often left unadorned or minimally seasoned, with simple garnishes like microgreens, edible flowers, or a drizzle of oil or reduction to accentuate the dish. This allows the beauty of the ingredients to be the focal point.
- Controlled Portioning: In minimalist plating, less food is often placed on the plate, which gives an upscale, refined look. This is particularly popular in tasting menus, where diners are served a series of small, exquisitely plated courses that highlight individual flavors without overwhelming the palate.
The minimalist approach allows chefs to communicate purity and elegance in their creations. The carefully selected, limited ingredients and thoughtful presentation encourage diners to appreciate each flavor fully and enjoy the visual simplicity.
Rustic Style
Rustic plating is warm, and inviting, and emphasizes a more natural and earthy look. This style aims to evoke a sense of home-cooked comfort, often seen in farm-to-table restaurants and casual eateries that prioritize simplicity and natural presentation. Rather than following strict rules, rustic plating celebrates the organic beauty of ingredients.
Key techniques and characteristics of rustic plating include:
- Natural Presentation: Rustic plating often incorporates ingredients in their most recognizable forms, maintaining the natural shapes and textures of food. For example, instead of cutting vegetables into precise shapes, they might be left whole or roughly chopped, emphasizing a more casual, authentic feel.
- Use of Earthy Serving Vessels: Bowls, wooden boards, cast iron skillets, and earthenware plates are common in rustic plating, enhancing the homey, unrefined aesthetic. The choice of serving vessel plays an essential role in reinforcing the rustic look, creating a connection to nature and tradition.
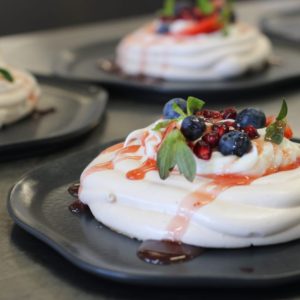
- Textural Variety and Layering: The rustic style embraces texture, whether it’s a crunchy crust, creamy sauce, or charred vegetables. Layering of textures—crispy bread next to a soft stew, for instance—adds depth and richness to the dish. Elements are often layered or piled together in a slightly unstructured manner, creating a sense of abundance and generosity.
- Messy Elegance: Rustic plating allows for a bit of “organized messiness,” where food is arranged loosely rather than in strict formations. This approach can include dripping sauces, herb sprigs, and slightly imperfect garnishes. Unlike the refined precision of the classic or minimalist styles, rustic plating captures the charm of an honest, hearty meal.
- Color and Contrast: While rustic dishes often include earthy, warm tones—such as browns, greens, and reds—chefs may add pops of color with fresh herbs, seasonal vegetables, or edible flowers. This mix of colors and textures creates visual richness, appealing to diners who enjoy a more comforting and hearty presentation.
Rustic plating is about connecting diners to the raw beauty of food, celebrating its authenticity, and creating a warm, satisfying experience. It appeals to those who appreciate food presented in a way that feels natural and unpretentious, where the focus is on flavor and comfort over strict aesthetics.
Each of these plating styles—classic, minimalist, and rustic—caters to different dining experiences and moods, offering chefs diverse ways to communicate their culinary vision. Understanding these techniques allows a professional chef to adapt to various settings and audiences, enhancing both the visual impact and the emotional connection of their creations.
Plate and Food Compatibility
Plate Selection and Material Compatibility
Plate selection is crucial in enhancing the presentation and perceived quality of a dish. Each plate’s shape, size, and material should complement the food it holds. The plate should neither overwhelm the food nor make it appear sparse, maintaining a balance that emphasizes the ingredients while providing sufficient negative space to frame the dish attractively. Different materials can convey different dining atmospheres: porcelain and ceramic plates are often chosen for fine dining due to their elegance and durability, while wooden or cast-iron options suit more rustic and earthy presentations.
Material compatibility is equally essential for functionality. For example, ceramic and porcelain plates maintain heat well, keeping hot dishes warm longer. Glass plates can offer a minimalist and modern look but may not retain heat effectively, which is better suited for cold dishes like salads or desserts. Wooden boards or slate plates bring texture and warmth to rustic or casual dishes but may absorb liquids or oils. Choosing the right plate material enhances not only the aesthetic but also the functionality, ensuring the dish remains appealing and at the optimal temperature throughout the dining experience.
Aesthetic Harmony Between Food and Plate Color
A harmonious relationship between the color of the food and the plate is essential for creating a visually appealing dish. Generally, white plates are a favorite in many kitchens because they provide a clean, neutral background that emphasizes the vibrant colors of the ingredients. White plates highlight the natural tones of vegetables, proteins, and garnishes, ensuring the dish is visually engaging without color interference.
However, the plate color can also be deliberately chosen to create contrast and set a particular mood. For example, dark-colored plates, like black or deep blue, can add drama and sophistication to a dish, enhancing the brightness of lighter-colored foods such as fish, rice, or bright vegetables. Earth-toned plates, such as beige or olive, complement rustic or natural presentations, creating an organic feel suitable for farm-to-table dishes. Meanwhile, using colored plates that match the dish’s elements should be avoided, as this can make ingredients visually blend in, reducing the appeal. Therefore, selecting a plate color that complements but contrasts with the food enhances visual harmony and draws attention to each ingredient’s unique beauty.
Geometric Arrangements
Geometric arrangements provide structure and organization on the plate, creating a visually satisfying layout that guides the diner’s eye across the elements. Arrangements such as lines, circles, or triangles are commonly used, depending on the style and type of dish. Linear arrangements often work well for modern, minimalist dishes, where ingredients are aligned in straight or slightly staggered lines, creating a sense of movement and flow. This approach is particularly effective for dishes with uniform components, like sushi or finger foods.
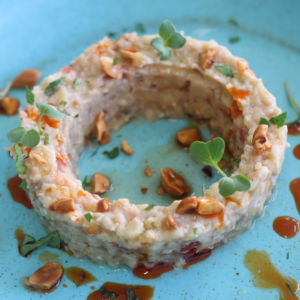
Circular arrangements, where ingredients are placed in a round or spiral pattern, can bring a sense of balance and elegance to the dish. The circular arrangement is especially suitable for round plates, as it echoes the plate’s shape and allows each ingredient to complement the next in a seamless flow. Triangular placements, often with the main protein as the focal point at the top, are popular for classic plating styles. This geometric shape provides balance and ensures a clear hierarchy among the ingredients, with sides and garnishes positioned as supporting elements.
Effective geometric arrangement ensures that the elements are organized in a way that is both pleasing to the eye and easy for the diner to navigate. When done thoughtfully, these arrangements enhance the plate’s structure, harmonizing with the ingredients and the overall plating style to create a visually engaging and balanced dining experience.
Modern Presentation Techniques
Artistic Expressions with Food: Creative Compositions
Modern plating has evolved into an art form where chefs use food as their canvas. Artistic expressions in food presentation involve creating visually compelling compositions that evoke emotion, tell a story, or highlight specific ingredients in unique ways. Chefs play with color, form, and texture, arranging ingredients thoughtfully to create a piece of edible art. These creative compositions often include intricate patterns, brushstrokes of sauces, and carefully arranged elements that lead the eye through the plate. Techniques borrowed from abstract art, such as splattering sauces or incorporating geometric patterns, contribute to a memorable dining experience. Moreover, dishes are designed to be photographed, making aesthetic appeal even more significant in the digital age, where sharing food photos has become part of the dining experience.
Edible Garnishes Used in Dishes
Edible garnishes add both visual appeal and subtle flavors to dishes, enhancing the overall composition without distracting from the main components. Common garnishes include microgreens, edible flowers, herbs, and vegetable chips, each selected to complement the dish’s flavors and textures. Garnishes are chosen based on color, size, and shape to add contrast or complement the main ingredients on the plate. For instance, edible flowers like nasturtium or violets can introduce bright pops of color to a monochromatic dish, while microgreens provide a touch of freshness and a slight bitterness that balances richer flavors. Garnishes should be applied with restraint; the goal is to enhance rather than overwhelm, ensuring each garnish has a purpose beyond aesthetics.
Vertical Presentation Techniques and Use of Negative Space
Vertical presentation, or stacking, is a technique used to build height in a dish, adding dimension and drama to the plate. This approach involves layering ingredients or stacking them strategically to draw the eye upward, creating a more dynamic and sophisticated look. For example, proteins may be layered over a bed of vegetables or grains, or layered desserts might showcase different textures and flavors in a visually appealing tower. Height adds interest and can make portions appear more substantial, even in small quantities, often seen in fine dining and contemporary cuisine.
Negative space, or intentional empty areas on the plate, plays a crucial role in modern presentation by providing balance and focus. It allows each component to be appreciated individually without visual clutter. This minimalist approach helps emphasize the colors and textures of the main ingredients while creating a sense of elegance and refinement. Negative space can also be used to lead the diner’s gaze around the plate, directing attention to the focal point of the dish, whether it’s the protein, a sauce drizzle, or a garnish. Combined with vertical presentation, negative space ensures that the plate remains clean, structured, and visually striking, enhancing the dining experience with an element of refined simplicity.
Modern Presentation Techniques and New Trends
- Vertical Presentation
- Description: Building height by stacking or layering ingredients to create dimension and drama on the plate.
- Example: Placing proteins atop layers of vegetables or grains, or creating a “dessert tower” with layered components.
- Use of Negative Space
- Description: Leaving intentional empty areas on the plate to achieve a clean, eye-catching look.
- Example: A minimalist plate featuring only the main element and a few garnishes, with clean lines of sauce for decoration on a white porcelain plate.
- Use of Edible Flowers and Microgreens
- Description: Adding visual appeal and subtle flavors with edible garnishes that enhance the overall composition without overpowering the dish.
- Example: Bright flowers like nasturtiums or violets for desserts or fresh microgreens to add color and texture to salads.
- Abstract Art-Inspired Sauces and Patterns
- Description: Using sauce splashes or brushstrokes to add artistic touches to the plate.
- Example: Brushing sauce across the plate or creating decorative patterns with drops and strokes of sauce.
- Geometric Arrangements
- Description: Arranging foods symmetrically or in shapes like triangles, circles, or lines to create a visual flow on the plate.
- Example: A triangular formation of the main dish, sides, and sauces, or arranging vegetables or protein in a circular pattern.
- Natural and Simple Presentation
- Description: Highlighting the natural textures and forms of ingredients for a rustic, warm presentation.
- Example: Serving vegetables in their natural form or presenting appetizers on wooden serving boards.
- Interactive Presentations
- Description: Engaging diners by allowing them to participate in finalizing or assembling the dish.
- Example: Desserts completed tableside, such as pouring sauce over the dish or using mini culinary tools to add final touches.
- Transparent Plates and Glass Presentations
- Description: Use transparent plates or glassware to showcase the colors and layers of the dish.
- Example: Serving cold starters or layered desserts on clear glass plates to emphasize color contrasts.
- Micro Compositions
- Description: Creating small, delicate, and detailed compositions on the plate for a minimalist effect.
- Example: Minimalistic garnishes and tiny details arranged with precision on the plate to add subtle aesthetic emphasis.
- Natural Material Serving Vessels
- Description: Using serving vessels made from materials like wood, stone, or cast iron to add an organic touch.
- Example: A cheese platter served on a wooden board or seafood on a stone plate, adding to the dish’s natural appeal.
Introduction to Food Photography
Importance of Food Photography
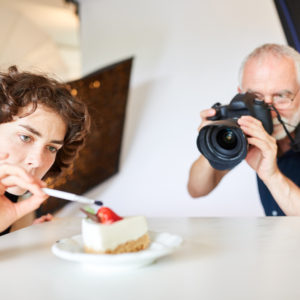
Food photography is essential in today’s culinary world, serving as a bridge between the chef’s creation and the viewer’s senses. With the rise of social media, food photography has become a powerful tool for restaurants, food bloggers, and chefs to communicate the quality, taste, and creativity of their dishes. A well-composed food photograph can evoke emotions, inspire cravings, and convey the essence of a dish, turning it into an experience that entices people to try it for themselves. High-quality food photos also play a vital role in brand identity, as they reflect a restaurant’s or chef’s style and standards.
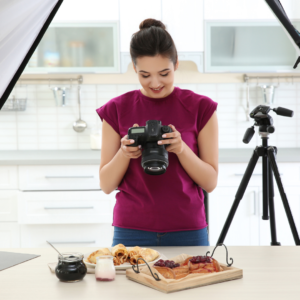
Relationship Between Photography and Styling
In food photography, styling is as important as capturing the shot itself. Photography and styling work in harmony, as the way a dish is arranged, garnished, and lit directly impacts its appeal on camera. Food styling involves selecting props, arranging elements, and making adjustments to ensure that the food appears fresh, vibrant, and visually inviting. Even minor details—like the way a sauce drips, the placement of garnishes, or the use of color contrasts—can elevate a photo, making it more appetizing and aesthetically pleasing. Photography techniques such as choosing the right angle, adjusting lighting, and focusing on specific details enhance the stylistic choices and bring the composition to life.
Telling the Story of the Dish
Food photography goes beyond merely showcasing the food; it tells the story of the dish. A thoughtfully captured image can convey the dish’s origin, ingredients, flavors, and even the chef’s intent. Through elements like props, background, and lighting, photographers create a scene that complements the dish’s narrative, whether it’s the rustic comfort of a homestyle stew or the sophistication of a fine-dining dessert. Storytelling in food photography adds depth to the image, making it not just a picture of food but a portrayal of the emotions, culture, and experiences tied to that meal. This storytelling aspect captivates viewers and connects them emotionally to the dish, making it more memorable and appealing.
Lighting and Perspective Usage in Food Photography
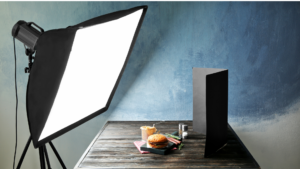
Use of Natural and Artificial Light
Lighting is one of the most critical elements in food photography, as it can drastically alter the way food appears. Natural light is highly valued for its soft, diffused quality, making food look fresh and vibrant. It works especially well in daylight settings, where softer shadows and a warm glow enhance the food’s natural colors. Many photographers prefer to shoot near a window, using indirect sunlight to achieve a balanced look that doesn’t wash out the colors or textures.
Artificial light, on the other hand, provides greater control over the lighting conditions and can be used when natural light isn’t available or in low-light environments. Softbox lights and LED panels are commonly used to mimic natural light, allowing the photographer to adjust brightness and color temperature to match the mood of the shoot. Artificial lighting also enables consistency across multiple shots, especially in studio settings, and can be directed to highlight specific aspects of the dish, adding depth and dimension.
Natural Light
- Softness of Natural Light: Natural light, especially indirect daylight, is one of the most frequently preferred light sources in food photography due to its soft and diffused qualities, which highlight the food’s natural colors and textures without harsh shadows.
- Golden Hour: The “golden hour” period, just after sunrise or before sunset, provides a warm, soft-toned light ideal for food photography. Shooting during this time enhances the food’s colors and details, making it look more vibrant.
- Window Light Usage: Shooting near a window allows photographers to utilize indirect sunlight for balanced lighting without glare or color distortion. Curtains or diffusers can be used to soften strong sunlight, creating a more controlled lighting environment.
 Artificial Light
- Softbox and LED Lights: Softbox and LED panels are commonly used to mimic natural light, providing a soft glow and enhancing the shadows for depth in food photography.
- Color Temperature and Light Settings: When using artificial light, paying attention to color temperature is crucial. Typically set to around 5000K (daylight), this color temperature reflects the natural colors of the food, ensuring an authentic appearance.
- Reflectors help bounce light into shadowed areas, providing balance and depth to the composition. They are especially useful for filling in darker areas and maintaining a well-lit shot.
Light Direction and Shadow Effects
The direction of light plays a significant role in food photography, as it creates shadows and highlights that add texture and depth to the image. Side lighting, where light is directed from one side of the food, is widely used as it brings out the textures and contours, making the dish look more three-dimensional. This technique is ideal for showcasing layered foods or dishes with varied textures, such as salads, sandwiches, or desserts.
Backlighting, where light is positioned behind the food, enhances translucency and is particularly effective for beverages, soups, and dishes with liquids or sauces. This technique can add a dramatic glow and make elements like steam or bubbles stand out. However, backlighting requires careful handling to avoid overexposing the image, so using a diffuser or reflector can help balance the light.
Top-down lighting, where the light source is directly above the food, creates minimal shadows and provides an even illumination. It works well for flat-lay shots, where minimal shadows are desired, and is ideal for capturing details in overhead shots.
Light Direction
- Side Lighting: Directing light from the side of the dish enhances textures, making food appear more three-dimensional. This technique is ideal for foods with various textures, such as salads, sandwiches, and desserts, as it brings out the natural details.
- Backlighting: Positioning the light source behind the food creates a translucent effect, making it especially effective for liquids, sauces, and beverages. Soups or drinks can gain a dramatic appearance with backlighting, highlighting elements like steam or bubbles. A diffuser or reflector is often used to balance the backlight and prevent overexposure.
- Top Lighting: Top lighting, where the light source is directly above the food, minimizes shadows and provides even illumination. It works well for overhead (flat-lay) shots, allowing all elements to be visible without shadow interference.
Shadow Effects
- Soft Shadows: Soft shadows add depth and volume to the food without overwhelming the composition. Diffusers or indirect lighting can help achieve soft shadows, creating a natural and pleasing aesthetic.
- Hard Shadows: Hard shadows create a more dramatic and defined look, often used in abstract or artistic shots. Hard lighting can emphasize shape and structure but should be applied carefully to avoid making the food appear overly bright or too dark.
Perspective: Overhead, Side Angle, and Detail Shots
 Overhead Perspective
- Overview Presentation: The overhead perspective is ideal for foods arranged on a flat surface with multiple components, such as salads, pizzas, or cheese boards. This angle provides a clean, organized view and allows all elements to be seen in a cohesive layout.
- Balance and Composition: For an overhead shot, it’s essential to maintain balance among all elements on the plate. Leaving enough space between components avoids a cluttered look and helps achieve visual harmony.
Side Angle
- Emphasis on Height: Side angles, typically between 0 and 45 degrees, work well for dishes with height, such as burgers, layered pancakes, or desserts. This angle captures layers and textures, adding depth and making the dish appear more substantial.
- Composition Details: In side-angle shots, attention to background details is essential. Using a slightly blurred background (bokeh effect) helps draw attention to the dish while creating a visually appealing frame around it.
Detail Shots
- Focus on Texture: Detail shots, or close-ups, emphasize the fine details and textures of the food. For example, the crisp edges of a pastry or the smooth consistency of a sauce can be highlighted in close-up shots.
- Connection with the Viewer: Detail shots help the viewer feel the quality of the food. These shots showcase the freshness, texture, and delicious qualities, creating a closer, more intimate connection.
Harmonizing Lighting and Perspective with Composition
Enhancing Composition with Lighting
- Light and shadow are essential in creating a focal point within the composition. The main element can be highlighted with light to create visual hierarchy, allowing secondary elements to support the overall image.
- Color Harmony: The color temperature of the light should complement the food’s natural colors. Warm light emphasizes yellow and orange tones, while cool light brings out blue and green hues, making food look more appetizing.
Storytelling with Perspective
- Different perspectives can convey a story about the food. Overhead shots show the food as a whole, allowing viewers to see all the details, while side angles emphasize the food’s height and layers.
- Detail shots bring the viewer closer, highlighting the textural richness and establishing a personal connection with the food. Each perspective provides a unique visual experience that immerses viewers and enhances the overall narrative of the dish.
Background, Color, and Texture Usage in Food Photography
 Considerations for Background Selection
The background in food photography is a crucial element that can either enhance or distract from the main dish. A thoughtfully chosen background helps set the tone of the image and complements the food’s visual appeal.
- Simple and Neutral Backgrounds: Neutral backgrounds, like white, gray, or soft beige, are commonly used as they do not compete with the food but subtly enhance it. These backgrounds are ideal when the focus is solely on the food and its colors, textures, and details.
- Textured and Rustic Surfaces: Backgrounds with textures, such as wood, marble, or slate, add depth and create a more dynamic visual. Rustic or earthy surfaces work particularly well for dishes with natural, organic ingredients or comfort foods, adding warmth and an inviting feel to the composition.
- Thematic Backgrounds: Some backgrounds can align with the food’s theme or origin, like a bamboo mat for sushi or a checkered tablecloth for a homestyle meal. Thematic backgrounds provide context, helping to tell the story of the dish and enhancing the viewer’s connection with the food.
Creating Color Harmony and Contrast
 Color plays a significant role in creating a visually appealing food photograph. Using color harmoniously or creating contrast can elevate the image’s impact, making it more engaging and memorable.
- Color Harmony: Color harmony involves using complementary colors that align naturally, creating a pleasing aesthetic. For example, using a green background or garnishes with a vibrant red dish (as green and red are complementary colors) makes the food stand out while maintaining balance. Muted or pastel colors in the background can also provide harmony, allowing the dish’s colors to be the focal point.
- Color Contrast: Contrast helps draw attention to the main dish by making it pop against the background. For instance, a bright orange or yellow dish on a dark slate background creates a striking visual that attracts the viewer’s eye. High-contrast colors, like white and black or red and green, can emphasize the food’s appearance and make the dish look more vibrant and appetizing.
- Seasonal and Mood-Driven Colors: Colors can reflect the season or mood of the dish. Warmer tones like browns, oranges, and yellows are suitable for autumnal or cozy settings, while cool tones like blues and greens work well for fresh, summery dishes. Choosing colors that resonate with the dish’s intended season or ambiance creates a more immersive experience.
Contribution of Textures to the Photograph
Texture adds depth and realism to food photography, enhancing the visual richness of both the food and the overall composition. The combination of textures in the food, props, and background gives a sense of touch and dimension that can make the image feel more tangible.
- Food Textures: Highlighting the texture of the food itself is essential, whether it’s the crispiness of a crust, the smoothness of a sauce, or the juiciness of a fruit. Lighting and focus play a big role in bringing out these textures, inviting the viewer to “feel” the food visually.
- Background Textures: Backgrounds with rough, polished, or grainy textures can add contrast to the food’s textures. For example, a smooth and creamy soup stands out on a rustic wooden surface, while a crunchy dish might look appealing on a sleek marble background.
- Props and Additional Elements: Props with various textures, like a linen napkin, a wooden spoon, or a ceramic bowl, add layers of depth to the photograph. When chosen carefully, props should not overshadow the food but support the overall texture story, giving the image a cohesive, tactile feel.
Food Styling Techniques
 Aesthetic Arrangement of Plates
The arrangement of food on a plate is key to creating a visually engaging composition in food photography. The way each component is placed influences the overall appeal and tells a story about the dish.
- Balance and Symmetry: Balancing ingredients and considering symmetry can help guide the viewer’s eye across the plate. For example, placing the main protein in the center with side ingredients arranged around it creates a harmonious look. Asymmetry can also work well when done purposefully, adding a sense of movement and dynamism to the composition.
- Use of Negative Space: Leaving intentional empty areas on the plate—negative space—can make the main elements stand out and prevent the image from feeling cluttered. This minimalist approach works particularly well in modern or fine-dining presentations.
- Layering and Height: Building height or layering ingredients adds dimension to the dish. For example, stacking a piece of meat on top of a bed of vegetables or grains not only adds visual interest but also gives the image a sense of depth. Using a small ring mold or placing garnishes at different heights can achieve an elegant, three-dimensional effect.
 Garnishes and Decorations Used in Dishes
Garnishes and decorations add color, texture, and flavor to dishes, enhancing the visual appeal without overwhelming the main elements.
- Edible Flowers and Herbs: Edible flowers, like nasturtium or pansies, bring vibrant colors and a touch of elegance. Fresh herbs, such as basil or cilantro, not only add color but can also complement the flavors of the dish. Using small, fresh garnishes ensures that they don’t dominate but enhance the main ingredients.
- Microgreens and Sprouts: Microgreens and sprouts, like pea shoots or radish sprouts, add a subtle freshness and are often used to bring a touch of green that adds both contrast and texture. They work especially well with colorful dishes, adding a natural feel.
- Sauce Drizzles and Dusting: Carefully drizzled sauces or sprinkled powders (such as cocoa or powdered sugar) provide a finishing touch that enhances the plate’s aesthetics. This can create an artistic flair, especially when applied using squeeze bottles or fine sieves for even distribution.
Impact of Ingredient Freshness on Photography
The freshness of ingredients is essential for capturing an appetizing image. Fresh ingredients not only look more vibrant but also photograph better, as they retain their natural colors, textures, and form.
- Color and Vibrancy: Fresh ingredients display brighter colors that catch the viewer’s eye. Vegetables and fruits, for example, appear crisp and juicy when fresh, whereas wilted or dull ingredients can make the dish look unappetizing. Bright, fresh colors bring life to the image, making it more appealing.
- Texture and Detail: Fresh ingredients maintain their texture and form, which is important in close-up shots. For instance, the crisp edges of fresh lettuce or the glossy sheen on a ripe tomato enhance the dish’s visual appeal. Freshly cooked proteins, such as fish or meat, also have a better texture and color, with a natural shine that adds depth to the image.
- Longevity in Front of the Camera: Fresh ingredients can withstand the lights and time spent during a photo shoot without wilting or drying out too quickly. For example, fresh herbs and greens remain lively, whereas older ones may lose color and droop. Keeping ingredients fresh throughout the shoot, either by misting them lightly or keeping them cool, helps maintain the dish’s visual integrity.
Advanced Food Styling Techniques
- Highlighting Moisture and Freshness with Sprays and Oils
- Use of Glycerin Spray: A mixture of glycerin and water sprayed lightly over fruits, vegetables, or even glassware gives a fresh, dewy look, making ingredients appear recently washed or freshly cut. This trick is especially effective for salads or fresh produce, as it enhances juiciness.
- Applying Edible Oils: A thin brush of edible oil (like olive or sesame oil) overcooked proteins or roasted vegetables creates a slight sheen that enhances their colors and textures on camera. For instance, a grilled steak brushed with oil will have a shiny, juicy appearance that is more enticing.
- Controlled Melting and Drizzling
- Strategic Melting of Cheese or Ice Cream: To capture that perfect melted cheese shot on a burger or a soft ice cream drip, careful timing and placement are essential. Slight warming of the cheese or ice cream just before shooting achieves an appetizing melt without losing shape.
- Pour Shots: Adding movement with pouring shots—such as pouring syrup over pancakes or sauce over a dessert—can create a sense of indulgence. This technique captures the flowing motion, often using slow shutter speeds, to enhance the dish’s appeal.
- Enhanced Depth with Layers and Background Blurring (Bokeh)
- Layered Backgrounds: Positioning additional elements, such as plates, glassware, or ingredients, in the background adds depth to the image, creating a multi-dimensional effect. The background items should be carefully chosen to complement the main dish without drawing attention away.
- Bokeh and Blurred Backgrounds: Using a shallow depth of field (lower f-stop setting) focus on the main dish while softly blurring the background. This technique highlights the textures of the food while creating a professional, polished effect.
- Use of Small Props for Proportion and Balance
- Miniature Cutlery and Dishware: Smaller-sized utensils or plates can make portions appear larger and more luxurious, especially useful when photographing items like desserts or appetizers. This creates an illusion of abundance without overwhelming the viewer.
- Selective Garnishing: Instead of crowding the plate, placing a single sprig of herbs, a dusting of spice, or one or two small garnishes allows the main element to shine. By reducing visual clutter, the eye is naturally drawn to the focal point.
- Lighting Tricks for Enhanced Contrast and Drama
- Directional Lighting with Reflectors: Using side lighting with reflectors on the opposite side creates shadows that define the textures and shapes of the food, giving the image a three-dimensional effect. Reflectors help control and soften these shadows, preventing harsh contrasts.
- Using Colored Light Filters: Light filters in warm or cool tones can change the mood of the photo. Warm filters give a cozy, inviting feel to comfort foods, while cooler filters can be used for fresh, summery dishes. This small lighting adjustment brings the viewer closer to the intended ambiance of the dish.
- Highlighting Specific Ingredients for Visual Interest
- Spotlight Ingredient Shots: For complex dishes, isolating key ingredients, such as a slice of tomato in a sandwich or a single noodle strand in a pasta bowl, draws attention to the ingredients’ freshness and quality. Using tweezers or small brushes helps arrange these ingredients with precision.
- Partial Dishes in Frame: Showing only part of the dish, like a quarter slice of cake or half a burger, can create a sense of mystery and visual intrigue. This technique works well with close-up shots and adds a stylized, artistic touch to the image.
Tricks for Enhanced Aesthetic Appeal in Food Photography
- Using “Fake” Food Elements for Stability
- Shaving Cream for Whipped Cream: Shaving cream, which does not melt or lose shape quickly, can be used as a stand-in for real whipped cream in long photoshoots.
- Glue for Milk or Yogurt in Cereal Shots: White glue doesn’t soak into cereal the way real milk does, keeping the cereal crunchy and preventing sogginess during extended shooting sessions.
- Simulating Steam for Hot Food
- Cotton Ball Steam Effect: Placing a dampened cotton ball in the microwave and positioning it just behind the dish creates a subtle, realistic steam effect for hot dishes without drying out the food.
- Incense Sticks: For more controlled steam lines, an incense stick can be placed discreetly behind the food to simulate rising steam, adding a fresh, “just-cooked” appeal.
- Freshness Longevity with Preservative Techniques
- Ice Baths for Herbs and Greens: Keeping herbs, greens, or other delicate garnishes in an ice bath until just before use helps them retain their freshness, color, and structure on set.
- Misting Spray: A simple misting spray bottle with water can be used to keep delicate ingredients, like berries or herbs, looking fresh and dewy throughout the shoot.
 Creative Angles and Cropping for Visual Storytelling
- 45-Degree Angles for Depth: Shooting at a 45-degree angle captures both the top and side of a dish, showing its structure and depth. This angle is perfect for multi-layered dishes like parfaits or lasagna, showcasing every element.
- Close-Up Crops for Detail: Tight cropping focuses on the details of a dish, such as the grains in a steak or the texture of a cream layer. This creates an intimate, textural experience, pulling the viewer into the dish itself.
Equipment and Techniques for Food Photography
Food photography requires the right equipment and techniques to capture visually appealing and professional-quality images. Selecting suitable gear, understanding its use, and applying effective post-production techniques can significantly enhance the final output.
Camera and Lens Options
Camera Choices
- DSLR and Mirrorless Cameras: DSLR and mirrorless cameras are ideal for food photography due to their versatility, high resolution, and ability to capture fine details. They allow full manual control over settings like aperture, shutter speed, and ISO, essential for creating sharp, well-exposed images. Mirrorless models are often lighter and more compact, making them easier to handle for prolonged shoots.
- Smartphone Cameras: With advancements in smartphone technology, high-end phones now feature excellent cameras with wide aperture settings and high resolutions. While not as versatile as DSLRs or mirrorless cameras, they are convenient and can be paired with portable lenses or external apps for improved control over exposure and focus.
Lens Options
- 50mm Prime Lens: The 50mm lens, often called the “nifty fifty,” is a popular choice in food photography due to its natural perspective, which closely resembles human vision. It offers a wide aperture (such as f/1.8 or f/1.4) that allows for beautifully blurred backgrounds (bokeh) and excellent low-light performance.
- 100mm Macro Lens: Macro lenses are ideal for close-up shots, as they capture intricate details with remarkable clarity. A 100mm macro lens allows for tight crops, revealing textures in dishes, garnishes, and individual ingredients. This lens is also useful for achieving beautiful depth-of-field effects.
- 24-70mm Zoom Lens: A versatile choice, the 24-70mm lens offers a range of focal lengths suitable for different compositions, from wide shots of table settings to close-ups of individual dishes. This lens provides flexibility in framing and distance, especially useful when working in confined spaces or capturing diverse shots quickly.
Use of Tripod and Reflector
Tripod
- Stability and Sharpness: A tripod is essential for keeping the camera steady, especially in low-light conditions or when using slower shutter speeds to avoid camera shaking. Tripods are particularly helpful for long shooting sessions, as they reduce hand fatigue and allow for consistency in framing.
- Overhead Shots: Many tripods come with an adjustable center column or a boom arm, making it easier to capture stable overhead shots. This is particularly useful for flat-lay food compositions, where every element is carefully arranged from a bird’s-eye view.
- Precise Adjustments: Tripods allow photographers to make small, incremental adjustments in angle and height without disturbing the entire composition, ensuring each shot is consistently framed.
Reflector
- Light Balance: Reflectors bounce light onto shadowed areas of the dish, creating a balanced look. Reflectors can be silver, white, gold, or even black, each providing a different effect. Silver reflectors create a brighter, sharper reflection, while gold adds warmth, and white softens the light.
- Natural and Controlled Lighting: Reflectors are particularly effective when working with natural light, as they help control the light’s intensity and distribution. Positioning a reflector opposite the primary light source softens harsh shadows, making the food appear more evenly lit and visually appealing.
Digital Editing and Post-Production Techniques
Digital editing and post-production techniques are essential for polishing food photography, ensuring images appear as vibrant, appetizing, and high-quality as possible. Advanced editing can enhance colors, adjust lighting, bring out textures, and create a cohesive aesthetic. Here are expanded techniques and tools that go beyond basic adjustments, allowing photographers to elevate their food photography to a professional level.
Basic Adjustments and Enhancements
- Exposure and Contrast Adjustments
- Fine-Tuning Exposure: Adjusting exposure ensures that the image isn’t too dark or overly bright. This step enhances the visibility of textures and colors. Slight overexposure can make some dishes appear fresh and clean, especially lighter-colored foods, while underexposure may work for creating a moody, dramatic effect with dark or rustic dishes.
- Increasing Contrast: Contrast adjustment separates highlights from shadows, adding depth and dimension. High contrast can make elements appear more dynamic, but for soft dishes like desserts, a lower contrast may create a gentler, more inviting look.
- White Balance and Color Temperature
- Correcting White Balance: White balance adjustments help the colors in the dish appear natural under various lighting conditions. Warmer tones (more yellow/orange) make comfort foods look cozy and inviting, while cooler tones (more blue) are ideal for fresh, crisp foods like salads and seafood.
- Color Temperature Tweaks: Small tweaks to color temperature can impact the entire mood of an image. Warmer temperatures add richness and make warm-colored ingredients (like pumpkin or spices) more appealing, while cooler tones work well with green or blue elements to emphasize freshness.
 Advanced Editing Techniques
- Selective Adjustments and Localized Edits
- Radial and Graduated Filters: These tools allow for selective brightness, clarity, or exposure adjustments in specific areas without affecting the entire image. For example, a radial filter around the main dish can subtly brighten it while keeping the background softer.
- Adjustment Brushes: These brushes let you “paint” enhancements onto particular areas of the image. Increasing brightness on specific ingredients, like garnishes or sauces, can highlight details, creating focal points that draw the viewer’s eye.
- Clarity, Texture, and Structure Adjustments
- Increasing Texture and Clarity: Carefully increasing texture and clarity can make food textures, like crispy crusts or juicy surfaces, more pronounced and engaging. Overuse, however, can create an unnatural or harsh look, so applying these adjustments selectively is key.
- Structure Adjustments for Depth: Many editing software options provide a “structure” or “micro-contrast” tool, which enhances fine details without affecting overall contrast. This works well for intricate foods like pastries or layered dishes.
- Color Grading and Saturation
- Boosting Color Saturation: Enhancing color saturation makes ingredients more vibrant and visually appealing. Selective color adjustments allow you to target specific hues—for instance, intensifying reds in a berry dessert or greens in a salad.
- Color Grading for Cohesive Aesthetic: Color grading can be applied to add an overarching mood to the image. Warmer color grading is often used for comfort foods, while cooler, desaturated tones are effective for creating a minimalist or clean aesthetic.
Detailed Retouching Techniques
- Spot Healing and Blemish Removal
- Removing Imperfections: Tools like the spot healing brush or clone stamp help eliminate minor imperfections, such as crumbs, dust, or blemishes on the plate. This step ensures a polished, clean image where the focus is on the food, without distractions.
- Smoothing and Refining Elements: For ingredients that may have imperfections (e.g., bruises on fruit or smudges on a plate), the healing tool can smooth these areas, enhancing the overall aesthetic.
- Sharpening and Enhancing Details
- Selective Sharpening: Applying sharpening selectively to the main focal points ensures the subject stands out without adding noise to the background. This technique is ideal for close-up shots, emphasizing textures like flaky pastries or juicy fruits.
- Edge Sharpening: Emphasizing edges without oversharpening other parts of the image can enhance details without creating an artificial look. This technique is particularly useful in macro food photography.
- Dodging and Burning
- Dodging: Dodging is the process of selectively lightening specific areas of an image to bring focus to particular elements. Lightening the top of a salad, for instance, can make the greens appear fresher and livelier.
- Burning: Burning involves darkening specific areas to add depth or draw attention to focal points. Darkening the outer edges of the frame subtly directs the viewer’s attention toward the center, enhancing the composition without distracting from the main dish.
 Advanced Color and Light Adjustments
- Color Selective Adjustments
- Hue/Saturation/Luminance (HSL) Adjustments: The HSL tool allows fine-tuning of individual colors in the image. For example, boosting the luminance (brightness) of greens in a salad or adjusting the hue of yellows in a pasta dish can make the image more appealing.
- Split Toning: Split toning allows color to be added to the highlights or shadows. Adding a subtle warm tone to the highlights and a cool tone to the shadows creates a harmonious, sophisticated look, enhancing the mood of the image.
- Lightroom and Photoshop Layer Techniques
- Using Layers for Fine Control: In Photoshop, using layers allows for more intricate adjustments, enabling precise control over each edit. Layers allow you to experiment without affecting the original image and adjust elements like brightness, color, and contrast independently.
- Masking and Blending: Layer masks are powerful for applying edits to specific areas. For example, adjusting the brightness of a sauce while keeping other elements unchanged adds depth and visual interest without over-editing the entire dish.
Final Touches for High-Quality Output
- Cropping and Framing
- Aspect Ratio Adjustments: Cropping allows you to perfect the composition and aspect ratio to fit the intended platform (e.g., 4:5 for Instagram or 16:9 for web banners). It also helps eliminate distracting edges, bringing focus back to the food.
- Rule of Thirds and Golden Ratio: Using compositional guides like the rule of thirds or golden ratio while cropping can improve balance and visual flow, making the image more engaging.
- Output Sharpening for Web and Print
- Web Sharpening: Exporting for the web requires optimizing sharpness and resolution without losing quality. Tools like “Output Sharpening” in Lightroom can help fine-tune sharpness for online viewing.
- High-Resolution Print Output: For print, saving in TIFF format with high resolution ensures details remain intact. Adjusting DPI (dots per inch) for print quality (usually 300 DPI or higher) enhances clarity for print publications.
- Consistent Color Profiles
- Color Space: Ensuring the color space (such as sRGB for web and Adobe RGB for print) is consistent and avoids color shifts between devices. This step is essential for maintaining the integrity of the colors as intended across platforms.
- Calibration: Monitor calibration ensures that the colors on the screen match those in the final output, which is especially important for print media.
Additional Tips for Post-Production Efficiency
- Presets and Custom Profiles
- Presets for Workflow Efficiency: Creating or using presets for common adjustments can streamline editing, maintaining a consistent look across a set of images. This is useful for social media profiles or portfolios aiming for a cohesive aesthetic.
- Custom Profiles for Consistent Aesthetic: Building custom color and contrast profiles creates a distinct style and enhances brand recognition. For instance, using a warm, rustic preset for comfort food photography helps convey a specific mood and look.
- Batch Processing for Volume Projects
- Applying Batch Edits: For multiple similar images, batch processing in software like Lightroom applies consistent settings to a series of photos, saving time while ensuring uniformity.
- Fine-Tuning Individual Images Post-Batch: After batch editing, minor tweaks on individual images can perfect each shot, retaining consistency without compromising the unique aspects of each dish.
By utilizing suitable camera and lens options, applying stabilization tools like tripods and reflectors, and performing thoughtful post-production edits, food photographers can create high-quality, aesthetically pleasing images. These tools and techniques not only enhance the visual appeal but also help convey the flavor, texture, and essence of the food, making each shot as inviting as possible.
 Business 5300 – Chef de Cuisine