Shocking, also known as shocking or shocking, is a culinary technique used to quickly stop the cooking process, usually after blanching. This process involves rapidly cooling the food, which helps preserve texture, color, and nutrients. Here are the different types of shocking methods:
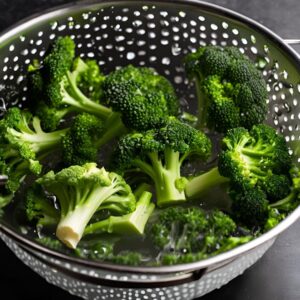
Ice Water Bath Shocking
Ice water bath shocking is a technique used to quickly cool blanched foods by submerging them in a bath of ice and water. This method is highly effective in stopping the cooking process, preserving the texture, color, and nutrients of vegetables and fruits.
How to Do It:
Prepare the Ice Water Bath:
Fill a large bowl with cold water and add plenty of ice cubes to create an ice water bath. The bowl should be large enough to fully submerge the blanched food.
Transfer the Food:
After blanching the food, immediately remove it from the boiling water using a slotted spoon or strainer.
Quickly transfer the blanched food into the ice water bath. This rapid cooling process stops the cooking and sets the vibrant color of the food.
Cool the Food:
Let the food sit in the ice water bath until it is completely cooled. This usually takes the same amount of time as the blanching process.
Drain the Food:
Once cooled, remove the food from the ice water bath and drain thoroughly. You can use a colander or pat the food dry with a clean kitchen towel.
Proceed with Your Recipe:
The food is now ready for use in your recipe or for storage.
Best for:
Vegetables (e.g., green beans, broccoli, carrots)
Fruits (e.g., tomatoes, peaches)
Cold Running Water Shocking
For smaller batches or when ice is scarce, running cold tap water over the food until it cools can also effectively stop the cooking process. This method is more water-intensive and generally less efficient than an ice water bath.
How to Do It:
Place the Food in a Colander:
Put the blanched food into a colander.
Run Cold Water:
Run cold tap water over the food, ensuring that all pieces are cooled evenly.
Continue Cooling:
Keep the water running until the food is completely cooled.
Drain and Proceed:
Drain the food thoroughly and proceed with the next steps in your recipe.
Best for:
Small batches of vegetables or fruits
Situations where ice is not available
Refrigeration or Freezing Shocking
This less common method is used for specific culinary needs, such as quickly chilling doughs, batters, or pre-cooked meals. It involves placing the hot food directly into a refrigerator or freezer to rapidly reduce its temperature.
How to Do It:
Cool Slightly at Room Temperature:
After cooking, allow the food to cool slightly at room temperature to prevent drastic temperature changes that might affect the texture or safety of the food.
Transfer to a Suitable Container:
Place the food in a container that is appropriate for refrigeration or freezing. Ensure the container is covered or sealed to prevent moisture loss or contamination.
Refrigerate or Freeze:
Place the container in the refrigerator or freezer until the food is thoroughly chilled.
Best for:
Doughs and batters
Pre-cooked meals that need rapid cooling
Alcohol Shocking
Alcohol shocking is a specialized technique occasionally used in professional kitchens for certain desserts or delicate foods. This method involves dipping hot items into an alcohol-based mixture to rapidly cool them while simultaneously adding flavor.
How to Do It:
Prepare an Alcohol-Based Mixture:
Choose an alcohol like vodka or another neutral spirit that pairs well with the flavors of the dish.
Pour the alcohol into a shallow bowl or container.
Dip the Hot Food:
Briefly dip the hot food into the alcohol mixture. The alcohol rapidly cools the food and adds a subtle flavor.
Remove and Proceed:
Remove the food from the alcohol mixture and proceed with the next steps in your recipe.
Best for:
Certain desserts
Delicate foods requiring rapid cooling and flavor enhancement.
Key Aspects of Shocking
Rapid Cooling
The primary goal of shocking is to cool food quickly to prevent overcooking. Rapid cooling helps preserve the desired doneness achieved during blanching or cooking.
Benefits:
Prevents Overcooking: Ensures food stops cooking immediately, maintaining the perfect texture and doneness.
Speeds Up Processing: Quickly prepares food for the next step in your recipe or for storage.
Color Preservation
Shocking helps lock in the vibrant colors of vegetables and fruits that are often lost through prolonged cooking. The quick transition from hot to cold stabilizes the pigments.
Benefits:
Maintains Visual Appeal: Keeps food looking fresh and appetizing.
Enhances Plate Presentation: Adds visual appeal to dishes, making them more attractive.
Texture Maintenance
By stopping the cooking process immediately, shocking ensures that foods retain their crisp, tender texture rather than becoming soft and mushy.
Benefits:
Preserves Crunch: Maintains the desired crispness of vegetables.
Prevents Mushiness: Keeps food from becoming overly soft or soggy.
Nutrient Retention
Rapid cooling reduces the time food spends at high temperatures, helping to preserve heat-sensitive nutrients such as vitamins C and B.
Benefits:
Maintains Nutritional Value: Preserves essential vitamins and minerals.
Supports Healthy Eating: Ensures that nutrient-rich foods retain their health benefits.
Use of Shocking
Preserving Vegetable Quality
Color and Texture: Shocking is crucial for maintaining the vibrant color and crisp texture of vegetables. After blanching, vegetables like green beans, carrots, and broccoli are immediately submerged in an ice-water bath. This process stops enzyme actions that can lead to softening, wilting, and color loss.
Preparing Seafood
Texture Retention: Delicate seafood items, such as shrimp and lobster, often benefit from shocking. Once they have been blanched or boiled to the desired doneness, shocking them in ice water stops the cooking process instantly, preventing them from becoming tough and rubbery.
Enhancing Fruit Applications
Firmness and Color: Fruits that require some form of cooking before being used in desserts or other dishes are often shocked to retain firmness and color. This method is particularly useful for fruit dishes where aesthetic presentation is important.
Pasta and Noodle Preparation
Preventing Overcooking: Shocking pasta and noodles after boiling ensures they retain a desirable al dente texture, especially useful in preparing dishes where the pasta will be cooked again, such as in baked pasta dishes or stir-fries.
Peeling Ease
Simplifying Processing: Shocking can help in easing the peeling process for items like tomatoes and peaches. The rapid cooling after a brief boil loosens the skins, making them easy to remove without further cooking the flesh.
Food Safety
Rapid Cooling for Storage: Shocking is often employed in commercial kitchens to rapidly cool cooked foods before storage to prevent bacterial growth. This technique is aligned with food safety protocols to quickly reduce the temperature of food items.
Preparatory Step for Freezing
Freezing Vegetables and Fruits: Before freezing, many types of produce are blanched and then shocked. This process helps to preserve flavor, nutritional value, texture, and color, extending their shelf life while maintaining quality.
Tips for Effective Shocking
Prepare in Advance:
Have your ice-water bath ready before you begin cooking, especially if you are blanching multiple batches or working with foods that cook very quickly.
Use Plenty of Ice:
Ensure there is enough ice in your water bath to maintain a cold temperature even after adding hot food. This might mean refreshing the ice as needed.
Fully Submerge:
Make sure the food is completely submerged in the ice water to cool it evenly and quickly. Use a strainer or spider to keep the items under water.
Drain Well:
Once the food has cooled completely, remove it from the ice water and let it drain thoroughly. Excess water can dilute flavors or affect the texture if the food is to be cooked further.
Time Efficiently:
Limit the time food spends in the ice water. Prolonged exposure to water can start to leach flavors and make the food soggy. Typically, the duration in the ice bath should be the same as the time spent blanching.
Shocking is a crucial technique in preserving the quality of ingredients, especially when preparing dishes that require vibrant, visually appealing presentations. By mastering the use of shocking, you can elevate the texture, color, and nutritional content of your culinary creations.
Slow cooking is a culinary technique that involves cooking food at low temperatures over extended periods, allowing flavors to develop and ingredients to become tender.
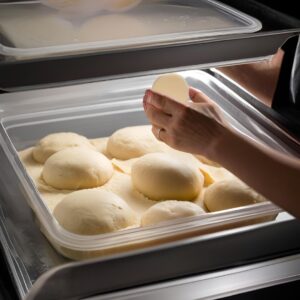
Crock-Pot or Slow Cooker
A Crock-Pot or slow cooker is a kitchen appliance designed for cooking food at a low temperature over an extended period. It’s ideal for preparing stews, soups, braised meats, and other dishes that benefit from slow, gentle cooking. The appliance typically consists of a ceramic or metal pot encased in a heating element, with a tight-fitting lid to retain moisture.
How to Use a Crock-Pot or Slow Cooker:
Prepare Ingredients:
Chop vegetables, season meats, and gather other ingredients as required by your recipe.
Layer Ingredients:
Place the ingredients into the slow cooker. Typically, root vegetables and tougher cuts of meat go on the bottom, where the heat is more direct.
Add Liquid:
Pour in broth, water, wine, or other liquids as specified by the recipe. The liquid helps to create steam and keeps the food moist during cooking.
Set the Temperature:
Most Crock-Pots or slow cookers have low, high, and sometimes medium settings. Choose the appropriate setting based on your recipe.
Low setting: Cooks at approximately 200°F (93°C).
High setting: Cooks at approximately 300°F (149°C).
Cover and Cook:
Place the lid on the slow cooker and cook for the time specified in your recipe. This can range from 4-6 hours on high to 8-10 hours on low.
Finish and Serve:
Once cooking is complete, remove the lid, stir if necessary, and serve. Some recipes may require you to thicken the sauce or finish the dish with fresh herbs or other garnishes.
Best For:
Stews and soups: The slow cooking process is perfect for developing deep flavors in stews, chili, and soups.
Braised meats: Tougher cuts of meat, such as beef brisket, pork shoulder, or chicken thighs, become tender and flavorful after slow cooking.
One-pot meals: Combine protein, vegetables, and grains or legumes in the slow cooker for a complete meal.
Batch cooking: Make large batches of food that can be portioned and frozen for later use.
Tips:
Avoid lifting the lid: Each time you lift the lid, heat escapes, and cooking time is extended.
Plan ahead: Start your slow cooker in the morning so your meal is ready by dinnertime.
Use the right cut of meat: Tougher cuts of meat, such as chuck roast or pork shoulder, work best in a slow cooker because they become tender with long, slow cooking
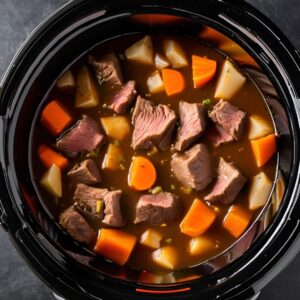
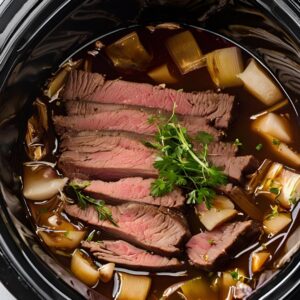
Slow Cooker Beef Stew Recipe
Ingredients:
900 grams (2 pounds) beef stew meat, cubed
300 grams (10.6 oz) carrots, sliced (4 medium carrots)
600 grams (1.3 pounds) potatoes, diced (4 medium potatoes)
150 grams (5.3 oz) onion, chopped (1 medium onion)
10 grams (0.35 oz) garlic, minced (2 cloves)
1 liter (1000 mL / 4 cups / 32 oz) beef broth
400 grams (14 oz) canned diced tomatoes
1 gram (0.035 oz) thyme (1 teaspoon)
5 grams (0.18 oz) salt
5 grams (0.18 oz) black pepper
Instructions:
Place the beef, carrots, potatoes, onion, and garlic in the slow cooker.
Add the beef broth, diced tomatoes, thyme, salt, and pepper.
Cover and cook on low for 7-8 hours or until the beef is tender.
Serve hot.
Oven Slow Cooking
Oven slow cooking is a method that replicates the slow cooking process of a slow cooker by using a conventional oven. This technique allows you to achieve tender, flavorful dishes by cooking at low temperatures over an extended period. It’s ideal for braising meats, casseroles, and stews.
How to Do It:
Preheat the Oven:
Set your oven to a low temperature, typically between 150°C and 160°C (300°F and 325°F). For very low and slow cooking, you can go as low as 120°C (250°F).
Prepare the Ingredients:
Season and sear your meat if necessary, then place it in an oven-safe pot or Dutch oven with a tight-fitting lid.
Add vegetables, herbs, and liquids (such as broth, wine, or water) as required by your recipe.
Cover and Cook:
Place the lid on the pot to keep moisture in, and place the pot in the oven.
Cook for the recommended time, usually 2-4 hours depending on the recipe. Check occasionally to ensure the liquid hasn’t evaporated, and add more if necessary.
Finish and Serve:
Once the cooking time is complete, remove the pot from the oven.
Let the dish rest for a few minutes before serving to allow the flavors to meld.
Best for:
Braising meats: Tough cuts of meat, like brisket, pork shoulder, or lamb shanks, benefit greatly from this method.
Casseroles and stews: The slow cooking process enhances the flavors and textures of these dishes.
One-pot meals: Combines proteins, vegetables, and grains for a complete meal.
Tips:
Use an oven-safe pot: A heavy-bottomed Dutch oven is ideal for oven slow cooking as it retains heat well and distributes it evenly.
Monitor liquid levels: Check the dish periodically to ensure it doesn’t dry out.
Low and slow: The key to oven slow cooking is maintaining a consistent low temperature for an extended period.
Oven slow cooking is a versatile and effective method for creating tender, flavorful dishes with minimal hands-on time. It’s perfect for busy days when you want to prepare a hearty meal with little effort.
Oven-Braised Short Ribs Recipe
Ingredients:
1.8 kg (4 pounds) beef short ribs
Salt and pepper, to taste (about 5 grams / 0.18 oz each)
30 mL (2 tablespoons) olive oil
1 onion, chopped (150 grams / 5.3 oz)
2 carrots, chopped (200 grams / 7 oz)
2 cloves garlic, minced (10 grams / 0.35 oz)
480 mL (2 cups) beef broth
240 mL (1 cup) red wine
15 grams (1 tablespoon) tomato paste
Fresh rosemary and thyme (2-3 sprigs each)
Instructions:
Preheat your oven to 160°C (325°F).
Season the short ribs generously with salt and pepper.
Heat the olive oil in a large oven-safe pot or Dutch oven over medium heat. Brown the short ribs on all sides, then remove them from the pot and set aside.
Add the chopped onion, carrots, and minced garlic to the pot. Cook until the vegetables are softened, about 5 minutes.
Stir in the beef broth, red wine, and tomato paste, mixing well. Add the fresh rosemary and thyme.
Return the browned short ribs to the pot, ensuring they are submerged in the liquid.
Cover the pot with a lid and transfer it to the preheated oven.
Cook for 3-4 hours, or until the short ribs are tender and easily pull apart.
Serve the short ribs hot, with the braising liquid spooned over the top.
Stovetop Slow Cooking
Stovetop slow cooking is a method of cooking food over low heat on the stove for an extended period, mimicking the slow-cooking process of a Crock-Pot or oven. This technique is ideal for dishes like stews, soups, and braised meats, allowing flavors to develop deeply while tenderizing tougher cuts of meat.
How to Do It:
Prepare Ingredients:
Season and sear meats if necessary, chop vegetables, and gather any other ingredients required for your recipe.
Use a Heavy-Bottomed Pot:
Choose a large, heavy-bottomed pot or Dutch oven with a tight-fitting lid. These types of pots retain heat well and distribute it evenly, which is crucial for slow cooking on the stovetop.
Layer Ingredients:
Add your ingredients to the pot, typically starting with tougher vegetables and meat on the bottom, then layering in liquids like broth, wine, or water.
Bring to a Simmer:
Place the pot on the stove over medium heat and bring the contents to a gentle simmer. Avoid boiling, as this can cause the meat to toughen.
Reduce Heat and Cover:
Once simmering, reduce the heat to the lowest setting. Cover the pot with a lid to retain moisture.
Cook Slowly:
Allow the dish to cook slowly for several hours, typically 2-4 hours, depending on the recipe. Check periodically to ensure the liquid hasn’t evaporated and the food is not sticking to the bottom.
Adjust as Needed:
Stir occasionally, add more liquid if necessary, and taste for seasoning towards the end of cooking.
Finish and Serve:
Once the food is tender and the flavors are well-developed, remove the pot from the heat. Let the dish rest briefly before serving.
Best for:
Stews and soups: Slowly simmering on the stovetop enhances the depth of flavors.
Braised meats: Tough cuts like beef brisket, pork shoulder, or lamb shanks benefit from slow stovetop cooking.
Chili and curries: These dishes develop richer flavors with extended cooking time.
Tips:
Use a low flame: Keep the heat as low as possible to prevent scorching and to ensure even cooking.
Check periodically: Since stovetop cooking can vary depending on the stove and pot, keep an eye on the dish to prevent it from drying out or burning.
Maintain moisture: If the liquid reduces too much during cooking, add more broth or water to maintain the desired consistency.
Stovetop slow cooking is a versatile and effective method for creating flavorful, tender dishes without the need for specialized appliances. It’s perfect for home cooks who prefer a hands-on approach to their cooking.
Stovetop Chicken Stock Recipe
Ingredients:
1 whole chicken or chicken carcass (approximately 1.5-2 kg / 3.3-4.4 lbs)
2 carrots, chopped (200 grams / 7 oz)
2 celery stalks, chopped (200 grams / 7 oz)
1 onion, quartered (150 grams / 5.3 oz)
4 cloves garlic, crushed (20 grams / 0.7 oz)
2.4 liters (10 cups) water
2 bay leaves (1 gram / 0.035 oz)
Salt and pepper to taste (approximately 5 grams / 0.18 oz each)
Instructions:
Place the chicken, carrots, celery, onion, and garlic in a large pot.
Add the water, bay leaves, salt, and pepper to the pot.
Bring the mixture to a boil over medium-high heat, then reduce the heat to low.
Simmer the stock gently for 3-4 hours, occasionally skimming off any foam or impurities that rise to the surface.
Once the stock has developed a rich flavor, strain it through a fine-mesh sieve or cheesecloth into a clean container. Discard the solids.
Use the stock immediately in your recipes, or let it cool and refrigerate for later use. The stock can also be frozen for longer storage.
Sous Vide
Sous vide, a cooking technique that became popular in the 1970s in professional kitchens, involves placing food in vacuum-sealed bags and cooking it at a consistent, controlled temperature in a water bath. The term “sous vide” is French for “under vacuum.” This method ensures that food is cooked to perfection, with even temperature distribution across the entire surface. In restaurant kitchens, sous vide allows for precise cooking, achieving the ideal doneness while offering flexibility in timing during busy service periods.
Advantages of Sous Vide in Professional Kitchens
Precision and Consistency: In restaurant kitchens, achieving consistent cooking results is crucial. Sous vide allows for precise cooking of everything from meats to seafood, vegetables, and desserts, ensuring that every dish is cooked to the exact desired temperature. This is one of the most reliable ways to maintain the same quality across every plate served.
Workflow Flexibility: Sous vide enables the preparation of food in advance, which can then be quickly reheated before service. This reduces the workload during peak service hours and allows the kitchen team to respond quickly to customer orders.
Minimized Waste: Cooking food at low temperatures slowly often results in less shrinkage and moisture loss. This is particularly beneficial with expensive proteins, such as filet mignon or scallops, leading to less waste and higher cost efficiency.
Intensified Flavor and Aroma: Since food is cooked in vacuum-sealed bags, marinades or aromatics penetrate the food more effectively, resulting in richer and more intense flavors.
Ideal for Delicate Foods: Delicate foods such as seafood, eggs, and foie gras can be perfectly cooked using sous vide. These items, which are prone to overcooking at higher temperatures, maintain their ideal texture when cooked at a low, controlled temperature.
How to Sous Vide:
Prepare the Ingredients:
Season and prepare the food as needed. In professional kitchens, this often involves marinating or infusing the food with herbs or aromatics to enhance flavor.
Seal the Food:
Place the food in vacuum-sealed bags using industrial-grade vacuum sealers. These machines remove all air from the bags, ensuring the food is cooked under optimal conditions.
Set Up the Water Bath:
Attach the sous vide immersion circulator to a large-capacity water bath or gastronorm containers. Set the desired temperature based on the food being cooked. In professional kitchens, multiple water baths might be used for different temperatures.
Steak: 130°F – 140°F (54°C – 60°C)
Chicken: 145°F – 150°F (63°C – 66°C)
Fish: 122°F – 131°F (50°C – 55°C)
Vegetables: 185°F (85°C)
Cook the Food:
Submerge the vacuum-sealed bags in the water bath and cook for the required time, which can range from 1 hour to several hours, depending on the type and thickness of the food.
Steak: 1-4 hours
Chicken: 1.5-4 hours
Fish: 30 minutes – 1 hour
Vegetables: 1-2 hours
Finish the Food:
After cooking, remove the bags from the water bath. Typically, meats are quickly seared at high heat (in a pan, on a grill, or under a salamander) to develop a flavorful crust. For example, a steak might be seared in a hot cast-iron pan for 1-2 minutes per side.
Serve:
The cooked and finished food is plated using professional presentation techniques. Sous vide-cooked dishes are typically tender and juicy on the inside, with a perfectly seared exterior.
Applications of Sous Vide in Professional Kitchens
Steaks and Meats: In restaurants, sous vide is commonly used to cook steaks, lamb chops, and pork tenderloin to perfection. The meats are quickly seared before serving to enhance flavor and texture.
Seafood: Sous vide is ideal for gently cooking delicate seafood such as salmon, shrimp, and scallops, ensuring they remain moist and tender.
Vegetables: Vegetables cooked sous vide retain their texture and nutrients. Restaurants often use this method to prepare vegetables as garnishes for main courses.
Eggs: Sous vide-cooked eggs have a perfect consistency and are ideal for breakfast or brunch services.
Desserts: Sous vide is also used to perfectly cook desserts like crème brûlée or chocolate fondant.
Challenges of Using Sous Vide in Professional Kitchens
Equipment Investment: Sous vide equipment, particularly for industrial kitchens, can be expensive. Vacuum sealers, water baths, and immersion circulators are significant upfront investments.
Time Management: Because sous vide requires cooking at low temperatures for extended periods, managing time for last-minute orders can be challenging. Therefore, advanced preparation and planning are crucial.
High Training Requirements: Sous vide is a precise technique that requires trained staff to use correctly. Incorrect temperature settings or insufficient cooking times can negatively affect the quality of the dish.
Sous vide is an advanced technique that allows for precise and consistent cooking in professional kitchens. Its advantages, including flavor intensity, texture perfection, and the preservation of food’s natural qualities, make it a valuable tool for elevating restaurant menus. With the right equipment and knowledge, sous vide offers kitchen teams the opportunity to create exceptional dishes with unmatched consistency and quality.
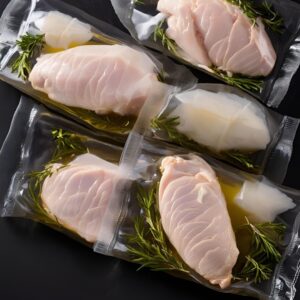
Season the chicken breasts with 5 grams each of salt and black pepper.
Place each chicken breast in a vacuum-seal bag with a sprig of thyme and 15 mL of olive oil.
Vacuum-seal the bags tightly, removing all air.
Submerge the sealed bags in the preheated water bath and cook for 1.5 hours.
Remove the chicken breasts from the bags.
Heat a pan over high heat and add a small amount of oil.
Sear the chicken breasts for 1-2 minutes on each side until they develop a golden crust.
Slice or serve the chicken breasts hot.
Smoking
Smoking is one of the most revered and time-honored techniques in professional kitchens, offering a unique way to cook, flavor, and preserve food. This method, which involves exposing food to smoke from burning or smoldering wood, imparts a distinctive smoky flavor and can be applied to a wide range of ingredients, including meats, fish, vegetables, and cheeses. Originating from ancient preservation methods, smoking remains a cornerstone of many culinary traditions, particularly in barbecue and gourmet cuisine.
The Essence of Smoking
At its core, smoking is about slow, controlled cooking and flavoring. Unlike grilling, which uses direct high heat, smoking relies on indirect heat and wood smoke to cook food slowly over time. This allows the smoke to penetrate deeply, creating complex layers of flavor. There are two primary methods of smoking: cold smoking and hot smoking.
Cold Smoking:
Cold smoking exposes food to smoke at temperatures typically below 85°F (29°C). Since the temperature is low, the food does not cook during the process; instead, it absorbs the smoke flavor. This method is ideal for items that are either already cooked or cured, such as smoked salmon, cheese, and cured meats. Cold smoking can take several hours to a few days, depending on the intensity of flavor desired.
Hot Smoking:
Hot smoking combines cooking and smoking by exposing food to smoke at temperatures between 165°F and 300°F (74°C to 149°C). This method fully cooks the food while infusing it with a rich smoky flavor. It is commonly used for meats like ribs, brisket, poultry, and fish. The duration of hot smoking can vary from a few hours to an entire day, depending on the cut of meat and the temperature used.
The Role of Wood in Smoking
The choice of wood is crucial in smoking, as different types of wood impart different flavors to the food. Selecting the right wood is an essential skill for any chef aiming to master the art of smoking.
Hickory: Strong, hearty flavor; ideal for pork, ribs, and red meats.
Mesquite: Bold, intense flavor; best for beef and game meats.
Applewood: Sweet and mild; perfect for poultry and pork.
Cherrywood: Fruity and sweet; works well with poultry, pork, and fish.
Oak: Robust and versatile; pairs well with beef, lamb, and sausages.
Alder: Delicate and mild; traditionally used for fish, especially salmon.
Wood chips or chunks should be soaked in water for about 30 minutes before being added to the smoker. This ensures a slow, steady release of smoke, which is essential for achieving the best results.
Smoking Equipment and Techniques
Professional kitchens use various types of smoking equipment, depending on the specific needs and scale of the operation. Traditional smokers, smokehouses, and modern electric smokers each offer unique advantages.
Traditional Wood Smokers: These rely on burning wood to produce smoke, requiring careful monitoring of temperature and smoke levels. They are ideal for chefs who prefer a hands-on approach.
Electric Smokers: These offer precise control over temperature and smoke production, making them popular in modern kitchens where consistency and efficiency are key.
Smokehouses: Larger operations may use smokehouses, which can handle higher volumes of food and allow for more extensive smoking processes, particularly for cold smoking.
How to Smoke: A Step-by-Step Guide
Choose the Right Equipment:
Select the appropriate smoker for your needs, whether it’s a traditional wood smoker, an electric smoker, or a smokehouse. Ensure the equipment is clean and ready for use.
Prepare the Food:
Season or marinate the food as desired. For meats, consider using a dry rub, marinade, or brine to enhance flavor.
Preheat the Smoker:
Preheat the smoker to the desired temperature. For cold smoking, maintain a temperature below 85°F (29°C). For hot smoking, set the temperature between 165°F and 300°F (74°C to 149°C), depending on the food being smoked.
Add Wood Chips:
Choose the appropriate wood chips for the flavor profile you want to achieve. Soak the wood chips in water for about 30 minutes before adding them to the smoker to ensure a steady, slow burn.
Place the Food in the Smoker:
Arrange the food on the smoker racks, ensuring there is enough space between pieces for the smoke to circulate evenly. Close the smoker lid.
Monitor the Temperature:
Maintain a consistent temperature throughout the smoking process. Use a meat thermometer to check the internal temperature of the food, ensuring it reaches safe levels for consumption.
Smoke for the Appropriate Time:
Smoke the food for the recommended time, which varies based on the type of food and the smoking method:
Cold-Smoked Salmon: 12-24 hours
Hot-Smoked Ribs: 4-6 hours
Smoke-Roasted Turkey: 3-5 hours
Rest and Serve:
Once the smoking process is complete, allow the food to rest for a few minutes to let the juices redistribute. Slice and serve.
Applications of Smoking in Professional Kitchens
In professional kitchens, smoking is not just about flavor; it’s also about presentation, texture, and the overall dining experience. Smoked meats like brisket, ribs, and pulled pork are staples in many restaurants, particularly those specializing in barbecue. These dishes often require long smoking times to break down tough connective tissues in the meat, resulting in a tender, flavorful product that becomes the centerpiece of the menu.
Smoked Fish: Cold-smoked salmon and hot-smoked mackerel or trout are popular in high-end restaurants, often served as appetizers or part of a larger dish.
Smoked Vegetables: Smoking vegetables like bell peppers, tomatoes, or mushrooms can add depth to vegetarian dishes, enhancing their appeal and flavor profile.
Smoked Cheeses: Cold-smoking cheeses like cheddar, gouda, or mozzarella adds a rich, smoky flavor, perfect for cheese boards or gourmet sandwiches.
Smoked Oils and Spices: Smoking oils, butter, or spices like paprika can add a unique touch to various dishes, offering a subtle yet distinctive smoky flavor.
Challenges of Smoking in Professional Kitchens
While smoking offers numerous benefits, it also presents several challenges in a professional kitchen setting:
Equipment and Space: Professional smokers and smokehouses require significant space and regular maintenance to function properly.
Time-Consuming Process: Smoking, particularly cold smoking, is a time-intensive process that requires careful planning and scheduling.
Temperature Control: Maintaining a consistent temperature is crucial for successful smoking. Fluctuations can lead to uneven cooking and subpar results.
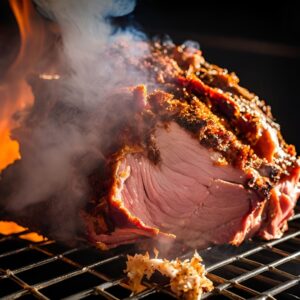
Smoked Pulled Pork Recipe
Ingredients:
1 pork shoulder (2.2-2.7 kg / 5-6 pounds)
60 grams (1/4 cup) brown sugar
15 grams (2 tablespoons) paprika
18 grams (1 tablespoon) salt
6 grams (1 tablespoon) black pepper
10 grams (1 tablespoon) garlic powder
10 grams (1 tablespoon) onion powder
2 grams (1 teaspoon) cayenne pepper
Wood chips (hickory or applewood)
Instructions:
Preheat the smoker to 107°C (225°F).
In a bowl, mix 60 grams of brown sugar, 15 grams of paprika, 18 grams of salt, 6 grams of black pepper, 10 grams of garlic powder, 10 grams of onion powder, and 2 grams of cayenne pepper to make the rub.
Rub the spice mixture all over the pork shoulder.
Place the pork shoulder in the smoker.
Add wood chips to the smoker for smoke flavor.
Smoke the pork shoulder for 8-10 hours, until the internal temperature reaches 90°C (195°F) and the meat is tender.
Remove from the smoker and let the pork rest for 30 minutes before pulling the meat apart with forks.
Serve with barbecue sauce and buns.
Key Aspects of Slow Cooking
1. Low Temperature, Long Duration
Slow cooking typically occurs at temperatures between 170°F and 280°F (75°C and 140°C). This low, steady heat allows the food to cook gently over several hours, often ranging from 4 to 10 hours, depending on the recipe.
2. Tenderizes Tough Cuts of Meat
One of the main benefits of slow cooking is its ability to tenderize tough cuts of meat. Cuts like brisket, pork shoulder, and chuck roast, which contain a lot of connective tissue, break down over the long cooking time, resulting in melt-in-your-mouth textures.
3. Flavor Development
The extended cooking time allows flavors to meld and intensify. Ingredients like herbs, spices, and aromatics have more time to infuse into the food, creating deep, rich flavors that are difficult to achieve with faster cooking methods.
4. Moisture Retention
Slow cooking is typically done in a covered pot or slow cooker, which traps moisture. This prevents the food from drying out and helps retain the natural juices, resulting in a moist and succulent dish.
5. Convenience and Efficiency
Slow cooking is a convenient method for busy individuals. Once the ingredients are prepared and the cooking begins, it requires little attention, allowing the cook to focus on other tasks. Many slow cookers also have timers, enabling you to set them in the morning and come home to a fully cooked meal.
6. Versatility
Slow cooking is incredibly versatile and can be used for a wide range of dishes, including stews, soups, braised meats, chili, casseroles, and even desserts. It’s also ideal for cooking large batches of food, making it great for meal prep.
7. Energy Efficiency
Slow cookers use less energy than conventional ovens due to their lower wattage and the fact that they maintain a low, consistent temperature over time. This makes slow cooking an energy-efficient method of preparing meals.
8. Nutrient Preservation
Cooking at lower temperatures helps preserve nutrients that might otherwise be lost in higher-heat cooking methods. Slow-cooked meals often retain more of their vitamins, minerals, and antioxidants.
9. Economical Cooking
Because slow cooking is ideal for tougher, less expensive cuts of meat, it’s a cost-effective way to prepare hearty, satisfying meals. It also reduces food waste by making use of ingredients that might otherwise be considered undesirable.
10. Enhances Food Safety
Slow cooking, especially for large cuts of meat, ensures thorough cooking. The consistent low heat and extended cooking time allow the food to reach safe internal temperatures without overcooking or burning.
11. Improves Texture and Consistency
Slow cooking promotes even cooking, ensuring that all parts of the dish are uniformly tender and flavorful. This is especially important in dishes like stews or chili, where a variety of ingredients need to blend together harmoniously.
Use of Slow Cooking
Slow cooking is a popular culinary technique that leverages extended cooking times at low temperatures to create deeply flavorful and tender dishes. This method is particularly valued for its ability to transform tougher cuts of meat into succulent meals and for infusing complex flavors into a variety of dishes. Here’s how slow cooking is commonly utilized:
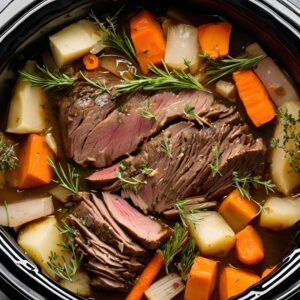
Tenderizing Tough Cuts of Meat
Perfect for Braising
Slow cooking is ideal for braising, a technique that tenderizes tougher cuts of meat such as brisket, pork shoulder, or lamb shanks. The low, slow heat breaks down collagen in the meat, making it extremely tender.
Salt and pepper to taste (about 5 grams / 0.18 oz each)
Instructions:
Season the chuck roast with salt and pepper.
Heat the olive oil in a large skillet over medium-high heat. Brown the roast on all sides, then transfer it to a slow cooker.
In the same skillet, sauté the onions and garlic until soft. Add the tomato paste and cook for another minute.
Deglaze the skillet with red wine, scraping up any browned bits, then pour the mixture over the roast in the slow cooker.
Add the beef broth, carrots, potatoes, and fresh herbs to the slow cooker.
Cover and cook on low for 8-10 hours, until the roast and vegetables are tender.
Developing Rich Flavors
Soups and Sauces
Slow cooking helps develop profound depths of flavor in soups and sauces, allowing herbs and spices to impart more complex tastes over the extended cooking period.
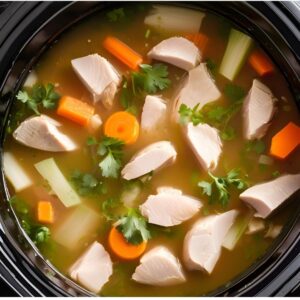
Example Recipe: Slow Cooker Chicken Soup
Ingredients:
1 whole chicken (about 1.5-2 kg / 3.3-4.4 pounds) or 4 chicken breasts (approximately 680-900 grams / 1.5-2 pounds)
Salt and pepper to taste (about 5 grams / 0.18 oz each)
Instructions:
Place the whole chicken or chicken breasts, carrots, celery, onion, garlic, chicken broth, bay leaves, and fresh herbs in the slow cooker.
Cover and cook on low for 6-8 hours.
Remove the chicken, shred the meat, and return it to the slow cooker.
Season with salt and pepper to taste.
Tips for Effective Slow Cooking
1. Choose the Right Cut of Meat
Tougher cuts of meat like chuck roast, brisket, pork shoulder, and lamb shanks are ideal for slow cooking. These cuts have more connective tissue and fat, which break down during the long cooking process, resulting in tender, flavorful dishes.
2. Don’t Overfill the Slow Cooker
Keep your slow cooker no more than two-thirds full. Overfilling can lead to uneven cooking and can prevent the food from reaching the correct temperature. Conversely, too little food can overcook and dry out.
3. Layer Ingredients Correctly
Place harder vegetables like potatoes, carrots, and onions at the bottom of the slow cooker, as they take longer to cook. Meats should be placed on top of the vegetables to ensure they cook evenly.
4. Use the Low Setting
Whenever possible, cook on the low setting rather than high. Slow cooking on low allows flavors to develop more deeply and results in more tender meat. The high setting can be used if you’re short on time, but it may result in a slightly different texture.
5. Keep the Lid On
Resist the temptation to lift the lid and check on your food frequently. Each time you remove the lid, heat escapes, and it can take about 20-30 minutes to regain the lost heat. This can significantly extend the cooking time.
6. Brown Meat and Vegetables First
While it’s not necessary, browning meat and sautéing vegetables before adding them to the slow cooker can add depth of flavor to your dish. The caramelization that occurs during browning enhances the overall taste and can give your slow-cooked meals a more robust flavor.
7. Adjust Liquid Amounts
Slow cookers retain moisture, so you generally need less liquid than you would for stovetop or oven cooking. If you’re adapting a recipe, reduce the liquid by about a third. Keep in mind that ingredients like vegetables release liquid as they cook, so start with less liquid and add more if needed.
8. Add Dairy and Fresh Herbs at the End
Dairy products like milk, cream, and yogurt can curdle if cooked for too long, so it’s best to stir them in during the last 30 minutes of cooking. The same goes for fresh herbs like parsley, cilantro, and basil, which can lose their flavor if cooked for too long.
9. Season Wisely
Seasoning at the beginning of cooking is important, but flavors can mellow out over time in a slow cooker. Taste your dish about an hour before it’s done and adjust the seasoning as needed. Don’t be afraid to add a splash of vinegar, a squeeze of lemon juice, or a dash of salt to brighten up the flavors before serving.
10. Let It Rest
After the cooking time is complete, allow the dish to rest for about 15-20 minutes before serving. This rest period allows the flavors to meld together and ensures that the juices are evenly distributed throughout the dish, particularly in meats.
11. Use the Right Size Slow Cooker
Choose a slow cooker that is appropriately sized for the recipe you’re making. A larger slow cooker can dry out smaller quantities of food, while a smaller one might lead to overflow. A general rule is to ensure the cooker is between half to two-thirds full for best results.
12. Prep Ingredients the Night Before
To save time in the morning, you can prepare and chop all your ingredients the night before. Store them in the fridge in separate containers, and in the morning, simply combine them in the slow cooker and start cooking.
13. Double Up and Freeze
Slow cookers are great for making large batches. Consider doubling your recipe and freezing half for a quick meal later on. Many slow-cooked dishes, like stews, soups, and chili, freeze exceptionally well.
14. Adjust Cooking Time for Altitude
If you live at a high altitude, cooking times may be longer. The lower atmospheric pressure at high altitudes affects the boiling point of liquids, so you may need to add additional time to your slow cooker recipes.