A recipe is much more than just a list of ingredients and instructions. When properly understood, it ensures consistency, quality, and efficiency in a professional kitchen. Understanding a recipe is the first step toward mastery in the culinary field.
Recipes typically consist of several essential components: the title, ingredients, measurements, preparation time, cooking time, yield, and finishing touches. Each of these elements is vital to the success of the dish.
The title of a recipe can be more informative than it seems. It provides information about the type of dish, key ingredients, and sometimes the cooking method. This helps chefs visualize the final product and anticipate the steps involved.
The ingredients list includes everything needed to prepare the dish, along with specific quantities. It is important for chefs to understand not only what each ingredient is but also why it is used. Ingredients serve specific functions—such as flavor, texture, binding, or volume. Understanding these roles allows for informed substitutions or adjustments when necessary, without compromising quality.
Measurements are equally crucial. Recipes often use either metric or imperial systems, and a professional chef must be comfortable converting between these systems to ensure accuracy. Misinterpreting measurements can lead to disastrous results, especially in baking where precision is key. Learning standard abbreviations—such as tsp (teaspoon), tbsp (tablespoon), and oz (ounce)—ensures correct interpretation of instructions.
Preparation time and cooking time help plan the cooking process. Proper planning is essential for effective time management, especially when coordinating multiple dishes. The yield indicates the number of servings or portion size, which helps manage portion control and reduce waste.
Finishing touches often involve garnishing or additional techniques that elevate the dish’s presentation and flavor. This final step is where chefs can showcase creativity while adhering to restaurant standards.
Techniques for Reading and Analyzing Recipes
Successfully executing a recipe requires more than simply reading it—it demands an analytical approach to understand its intricacies and nuances. This section covers essential techniques for reading and analyzing recipes.
Critical Reading
The first rule of working with a recipe is to read it from start to finish before beginning any preparation. This initial reading helps identify potential challenges, special techniques, or equipment requirements. Chefs must understand the entire workflow, preventing surprises during critical moments in the cooking process. Critical reading also helps chefs identify dependencies—such as ingredients that need to be prepared in advance or tasks that can be done simultaneously.
Mise en Place
The concept of mise en place—a French term meaning “everything in its place”—is a fundamental principle in professional cooking. Mise en place involves gathering all ingredients, tools, and equipment before starting to cook. This ensures a smooth and efficient cooking process, as everything is ready when needed. It reduces errors and helps maintain focus, especially when executing complex recipes. During mise en place, chefs should also assess the quality of ingredients, ensuring they meet the standards required for the dish.
Step-by-Step Planning
Breaking a recipe down into individual steps is key to maintaining efficiency and organization. This involves dividing tasks based on their nature—preparation, cooking, finishing—and establishing a sequence that optimizes workflow. Chefs should identify tasks that can be done in advance or in parallel, such as chopping vegetables while waiting for a sauce to reduce. Proper step-by-step planning prevents bottlenecks and ensures the dish comes together cohesively.
Adjusting for Volume
Scaling recipes is an important skill in a professional kitchen, particularly when preparing larger quantities. Chefs must understand how to scale recipes while maintaining balance in flavor and texture. Scaling involves more than simple multiplication; some ingredients, such as spices, may require different adjustments to maintain the same intensity of flavor. Chefs must know which elements of a recipe need adjustment and how to modify cooking times and techniques accordingly.
Practical Execution in a Professional Setting
Time Management and Workflow
Time is crucial in a professional kitchen. Proper time management is essential for ensuring all dishes are prepared and served promptly. Chefs must understand how to prioritize steps within a recipe, focusing on critical points that require attention. Recognizing which parts of the cooking process can be completed ahead of time and which steps must be done at the last minute is vital for managing time effectively.
Working under pressure is inherent in the culinary profession. Developing techniques to stay calm and focused, even when orders are piling up, is vital for any Chef de Partie. This involves not only managing one’s own tasks but also coordinating with others to ensure a smooth flow of dishes.
Interpreting Terminology
Recipes often use specific cooking terms unique to the culinary world. Understanding and interpreting kitchen jargon—such as sauté, blanch, or brunoise—is fundamental to executing recipes accurately. Misunderstanding these terms can lead to errors in texture, flavor, or overall quality.
Mastery of various cooking techniques—such as roasting, frying, baking, and grilling—is also critical. Recipes provide the basic instructions, but it is the chef’s expertise that brings them to life. Techniques like emulsifying a sauce, creating a proper sear, or achieving the right consistency in a reduction require both knowledge and experience.
Adapting to Kitchen Conditions
Every kitchen is different, and chefs must learn to adapt recipes to their specific environment. Equipment variability is a common challenge—ovens may run hotter or cooler than their settings indicate, and burners may have different heat outputs. Chefs need to be flexible and make adjustments as needed, using their senses—sight, smell, touch, and taste—to judge when a dish is ready. Developing intuition for cooking times and temperatures, based on available equipment, is a key skill for professional chefs.
Communicating with Kitchen Personnel
Delegation and Coordination
A Chef de Partie often leads a section of the kitchen, meaning they must communicate effectively with commis chefs and junior team members. Delegation is an important skill—knowing which tasks to assign to whom and how to provide clear instructions ensures that all members of the team work efficiently.
Clear and concise instructions are crucial when delegating tasks. Each team member should understand not only what they need to do but why it is important. This understanding fosters a sense of ownership and responsibility, leading to higher quality work. Effective coordination also involves being aware of what each team member is doing and offering support when needed.
Quality Control
Maintaining high standards is a key responsibility of a Chef de Partie. This involves establishing clear quality benchmarks for every dish and ensuring these standards are consistently met. Chefs must be able to spot errors—such as incorrect seasoning or improper cooking techniques—and provide corrective guidance to junior team members. Quality control is an ongoing process, from initial preparation to final plating.
Taste Testing and Consistency
Taste testing is one of the most important steps in maintaining the quality of a dish. Chefs must develop a refined palate to detect subtle differences in flavor and adjust seasoning as needed. Consistency is key—each dish should taste the same, regardless of who prepares it. Leading regular taste tests helps ensure dishes meet the restaurant’s standards and that necessary adjustments are made promptly.
Writing and Testing Recipes
Writing and developing recipes is an essential skill for any Chef de Partie who aims to create original dishes or contribute to the menu. This process involves not only creativity but also precision and a deep understanding of cooking techniques.
Recipe Development
Writing clear instructions is critical to ensure that anyone following the recipe can achieve consistent results. Each step should be detailed and easy to understand, with specific measurements and techniques clearly described. Avoid using ambiguous terms such as “a pinch” or “to taste” unless these terms are qualified with guidance on how to adjust them based on the desired outcome.
A good recipe provides a logical flow from one step to the next, with each action building on the previous one. When developing a recipe, chefs should consider the reader’s perspective and ensure that every instruction is explicit and easy to follow. This is especially important in a professional kitchen, where multiple chefs may need to execute the same dish with consistent results.
Testing Recipes
Once a recipe is written, it must be tested to ensure accuracy and consistency. Testing involves preparing the dish exactly as written, taking notes on any issues that arise, and making necessary adjustments. This process may need to be repeated several times to achieve the desired result.
Testing should be done under the same conditions in which the recipe will ultimately be executed—using the same equipment, ingredients, and timing. This helps identify any potential challenges that other chefs might face when preparing the dish. Adjustments should be documented meticulously, including changes to ingredient quantities, cooking times, or methods.
Documenting Changes
Keeping a detailed record of modifications is crucial for ensuring consistency across the kitchen team. Any adjustments made during the testing phase should be noted and incorporated into the final version of the recipe. This documentation helps prevent mistakes and ensures that all chefs working on the dish are following the same procedures.
Recipes should be stored in a format that is easily accessible to the kitchen team, whether in a physical recipe book or a digital database. Regularly reviewing and updating recipes helps keep them relevant and ensures that they continue to meet the restaurant’s standards.
Health, Safety, and Hygiene Considerations
Food Safety Principles
Food safety is paramount in a professional kitchen. Proper hygiene practices—such as handwashing, equipment sanitation, and safe food storage—are essential to prevent contamination. Chefs must be vigilant about cleanliness, particularly when handling raw ingredients.
Cross-contamination is a significant risk, especially when working with allergens. Chefs must know how to avoid cross-contact between allergens and other ingredients. This includes using separate equipment and work surfaces for different types of ingredients and clearly labeling allergenic foods.
Dietary Considerations
Understanding common dietary restrictions is increasingly important in the culinary industry. Chefs must be knowledgeable about vegan, gluten-free, nut-free, and other special diets, and be able to modify recipes to accommodate guests with specific needs. This requires creativity and a deep understanding of ingredients to ensure that modified dishes are still flavorful and satisfying.
Recipe Presentation and Plating
Garnishing Techniques
The final step in preparing any dish is presentation. Garnishing techniques can significantly impact the visual appeal of a dish. Chefs should learn how to use garnishes such as herbs, edible flowers, or flavored oils to enhance both the appearance and flavor of a dish. A well-chosen garnish adds color, texture, and a final layer of flavor that elevates the entire dish.
Consistency in Plating
In a professional kitchen, consistency in plating is crucial. Each dish must look identical, with the same portion sizes, garnish placement, and presentation style. Training in consistent plating ensures that every guest receives the same experience, regardless of who prepared their meal. Chefs should practice plating techniques until they are able to replicate the same presentation flawlessly every time.
Tips for Success
To succeed in a professional kitchen, always double-check the recipe before starting. Take note of any unfamiliar techniques or ingredients, and plan ahead to ensure a smooth workflow. Maintaining organized notes on any changes made to recipes is crucial for consistency, and communicating these changes to the rest of the team helps everyone stay on the same page. Remember, consistency is key—practice each recipe until you can produce the same high-quality results every time.
Suggested Reading
“The Professional Chef” by The Culinary Institute of America (CIA).
“On Food and Cooking” by Harold McGee for a deeper understanding of ingredients and their transformations.
Mise en place, a French term meaning “to put in place,” refers to preparing and organizing ingredients and equipment before cooking. This concept forms the foundation of cooking preparation and ensures chefs can work efficiently by having everything they need ready in advance. In this training module, we will learn how mise en place is applied in the kitchen, the importance of efficient kitchen organization, and how these principles can be adapted to professional or home kitchens.
Key Elements of Mise en Place
Ingredient Preparation: The most crucial step of mise en place is properly preparing all ingredients. This includes chopping vegetables, preparing sauces, and marinating meats. Ingredients must be properly cut, measured, and stored. Each ingredient should be prepared in the form it will be used during cooking.
Storing Ingredients: Proper storage is essential for maintaining freshness and ensuring food safety. Chopped vegetables, marinated meats, and other prepared ingredients should be stored in appropriate containers. Here are some important points regarding storage:
Using Plastic Wrap: When storing ingredients, plastic wrap is used to minimize air exposure. The wrap should be tightly applied to cover the entire ingredient, minimizing oxidation and spoilage.
Labeling and Dating: Each container should be labeled with the ingredient name, preparation date, and expiration date. This makes it easier to track when the ingredient was prepared and how long it will stay fresh.
Temperature Control: Ingredients should be stored at the proper temperatures. Raw meats and seafood should be kept in the coldest part of the refrigerator, while vegetables should be kept in areas with suitable humidity. Ingredients intended for freezing should be quickly placed in the freezer, and the freezing process should be closely monitored.
Using Airtight Containers: Storing ingredients in airtight containers is important to maintain their freshness for longer. This also helps prevent odor transfer and cross-contamination.
Equipment Organization: Tools like knives, pans, and spatulas should be easily accessible and well-organized. A clutter-free workspace increases efficiency and safety. Each piece of equipment should be kept in a designated place and cleaned immediately after use.
Recipe Review: Reviewing recipes in advance and checking if all necessary ingredients are available ensures a smooth cooking process. Reading the recipe thoroughly helps identify any missing items or steps that require special preparation. Preparing a list of needed ingredients and equipment for each recipe step helps prevent surprises during cooking.
Workstation Organization: Organizing the workspace is an essential part of mise en place. The workbench should be clean, and ingredients and equipment should be arranged logically. For example, chopped vegetables should be placed near the cooking pot, and spices should be close to where they will be added. This arrangement minimizes movements and increases efficiency.
Example Mise en Place Process
Let’s illustrate the mise en place process with a recipe:
For example, if we decide to make “Stir-Fried Vegetable Pasta,” the mise en place process could be as follows:
Recipe Review and Ingredient List Preparation: Read the recipe thoroughly and identify the ingredients needed. For this recipe, the required ingredients are pasta, red bell pepper, zucchini, onion, garlic, olive oil, salt, black pepper, fresh basil, and grated parmesan.
Ingredient Preparation:
Red bell pepper and zucchini: Slice thinly.
Onion: Cut into half-rings.
Garlic: Finely mince.
Basil: Separate leaves and chop larger leaves into smaller pieces.
Pasta: Cook in boiling water as per the package instructions, and ready for use.
Equipment Preparation: Prepare and arrange the equipment on the workbench:
A large skillet (for sautéing vegetables)
Pasta strainer
Cutting board and knife
Spatula and spoon
Organizing the Workspace: Arrange ingredients and equipment logically in your workspace. Keep the chopping board close to the stove and spices within easy reach. This will make accessing ingredients and equipment easier, saving time and increasing efficiency.
Preparation Checklist: After completing preparation, create a checklist to ensure all ingredients and equipment are ready. This ensures that nothing is missing during the cooking process.
Hygiene and Safety Precautions: Ensure all ingredients are clean and fresh, and all equipment is hygienic. Use different cutting boards for vegetables and meats to prevent cross-contamination.
Advanced Mise en Place Techniques
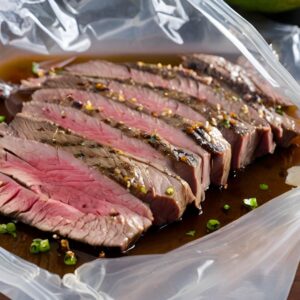
Pre-preparation and Storage: Ingredients that will be used throughout the day or week can be pre-prepared. For example, onions and garlic can be chopped in bulk and stored in airtight containers. This significantly reduces preparation time and helps things move faster. Proper storage conditions ensure ingredients stay fresh. Pre-chopped vegetables and pre-cooked items should be stored in airtight containers or vacuum-sealed bags to minimize spoilage.
Plastic Wrap and Vacuum Sealing: Prepared ingredients should be tightly wrapped with plastic wrap to cover them completely and keep air out. Vacuum-sealed bags can also be used to keep ingredients fresh for longer. This method slows down oxidation and spoilage.
Labeling and Dating: Prepared ingredients must be labeled with the ingredient name, preparation date, and expiration date. This also helps implement FIFO (First In, First Out) to minimize waste.
Marinating Meats and Pre-cooking: Marinating meats in advance enhances flavor and saves time during cooking. Marinated meats should be stored under suitable conditions in the refrigerator until needed. Additionally, some ingredients can be pre-cooked (blanching). Vegetables are briefly cooked in boiling water and then placed in ice water. This method retains the vegetables’ color and reduces cooking time.
Measuring and Weighing: Pre-measuring ingredients such as spices, sauces, and flour saves time during cooking and ensures recipe consistency. Having everything ready in small containers makes the process more fluid and maintains flavor and texture consistency.
Batch Preparation: Similar ingredients used in different recipes can be prepared in batches. For example, onions that will be used in multiple dishes can be chopped once and stored separately, creating a more efficient preparation process. This technique is especially useful when multiple dishes need to be prepared simultaneously.
Modular Preparation: Some components can be used in multiple dishes during meal preparation. For example, a base sauce can be prepared and used as the foundation for several dishes. This reduces workload and speeds up preparation. Modular preparation also allows for variety in the menu.
Equipment and Space Management: Advanced mise en place includes managing equipment efficiently, not just ingredients. In large kitchens, particularly during peak hours, every piece of equipment should be dedicated to a specific task. Effective use of kitchen space allows for smooth operation, even in limited spaces. Pans, spatulas, and other tools should be organized in a specific way, ensuring easy access when needed and preventing time loss.
Color and Texture Balance: An advanced chef considers not only the preparation of ingredients but also the color and texture balance of the dish. To serve an attractive and well-balanced dish, it is important to consider the colors and textures of the ingredients during preparation. Different colored vegetables can be used to make the plate more visually appealing.
Portion Control: During mise en place, determining portions in advance ensures consistency during service. Every portion must contain the same amount of ingredients, which is important for customer satisfaction. Ingredients should be pre-portioned into containers and prepared in this manner. This technique is crucial for large events or during busy service hours.
Timing and Synchronization During Preparation: Advanced mise en place also involves timing. By considering the different preparation times of ingredients, planning should be done to decide when each ingredient will be prepared. For example, marinating meat that takes a long time to cook should be done first, while other preparations can proceed simultaneously. This synchronization improves time management and makes the process more efficient.
Standardization and Quality Control: Consistency is key to maintaining quality in the kitchen. Every preparation must be done using a specific method and with accuracy. Vegetables should be chopped uniformly, and marination times should be applied consistently. Standardized preparation processes ensure consistency and high quality in the kitchen.
Importance of Kitchen Organization
Kitchen organization is key to increasing efficiency and hygiene in both professional and home kitchens. Good organization helps reduce stress, save time, and create a safer environment during cooking.
Time Management: With mise en place, each step of meal preparation proceeds faster. Having all ingredients ready in advance prevents unnecessary waiting during the cooking process.
Hygiene and Safety: Keeping ingredients and equipment organized helps prevent cross-contamination and keeps the workspace clean. This is especially important when working with high-risk ingredients such as raw meat.
Reducing Stress and Streamlining Work: Preparing in advance makes the cooking process more predictable, allowing for easier handling of unexpected situations. This reduces stress for kitchen staff and increases overall efficiency.
Mise en Place and Kitchen Management for a Chef de Partie (CDP)
A Chef de Partie (CDP) is responsible for managing a specific station in the kitchen. A CDP’s success in mise en place and kitchen organization directly affects both their station’s efficiency and the overall kitchen operation. Below are some important points on how a CDP should manage mise en place and kitchen organization:
Station Setup and Responsibility: The CDP is responsible for the setup and organization of their station, ensuring all ingredients and equipment are readily available. Keeping everything in the proper place increases efficiency. The CDP must keep their area clean and organized to maintain hygiene standards.
Teamwork and Communication: Maintaining good communication and coordination among different stations in the kitchen is crucial. The CDP should stay in constant communication with other chefs and report any delays or shortages during preparation. They should also support other stations when needed.
Stock Control and Order Management: The CDP must monitor the quantity of ingredients at their station and order missing items in advance. Proper stock management is essential to prevent disruptions caused by ingredient shortages. Therefore, tracking ingredient usage and minimizing waste are key responsibilities of a CDP.
Prioritization and Timing: The CDP should prioritize tasks during meal preparation. Longer cooking tasks should be started first, allowing other preparations to be completed during this time. This approach ensures that customer orders are served accurately and on time.
Training and Development: The CDP is also responsible for training less experienced kitchen staff. Educating their team on mise en place and kitchen organization increases the overall efficiency of the kitchen and ensures smoother operations. Additionally, it is important for the CDP to continually develop themselves by learning new techniques and methods.
Quality Control and Standardization: The CDP must ensure that dishes are always prepared to the same standard. Maintaining consistent quality in each recipe is critical to customer satisfaction. Therefore, the CDP should continually check the taste, presentation, and appearance of dishes. It is also important to use standard recipes to ensure consistent quality and quantity of ingredients. The presentation of dishes should reflect the same level of aesthetics and professionalism every time.
Problem Solving and Flexibility: Unexpected issues often arise in the kitchen, especially during busy service hours. The CDP must be capable of managing such situations and quickly finding solutions when necessary. This flexibility is key to ensuring customer satisfaction and maintaining smooth kitchen operations. When changes to the menu are needed or certain ingredients are unavailable, the CDP should continue the process by using alternative ingredients and methods.
Motivation and Leadership: The CDP must motivate their team members and set an example for them. Given the intense and stressful nature of the kitchen, maintaining staff morale is crucial. The CDP should work to ensure harmony among staff and be competent in managing conflicts when they arise. Acknowledging each team member’s contributions can greatly boost motivation.
Workplace Safety and Hygiene Procedures: Food safety and hygiene are fundamental aspects of kitchen management. The CDP must ensure all team members follow hygiene rules and provide a safe working environment. This includes adherence to proper handwashing procedures, storing ingredients at appropriate temperatures, and preventing cross-contamination. Additionally, the regular cleaning and maintenance of kitchen equipment must be handled meticulously.
Mise en place and kitchen organization are indispensable elements for increasing efficiency and quality in professional kitchens. Success in the kitchen comes from preparation and organization, and applying these principles will enhance both individual and team performance.
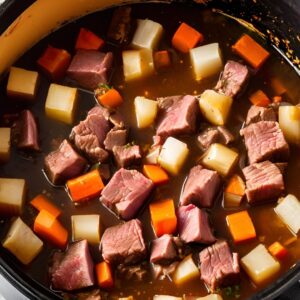
Cooking beef to the correct internal temperature ensures both culinary success and food safety. Understanding the right temperatures for each doneness level and using proper resting techniques can significantly enhance flavor, texture, and juiciness, while also mitigating the risk of foodborne illness. This section details how to cook beef to various levels of doneness, which cuts are ideal for each method, and why resting is critical for the best results.
Doneness Levels for Beef
Rare Beef
Temperature: 120-125°F (49-52°C)
Characteristics: Cool red center with a tender texture and seared exterior.
Safety Note: Rare beef is generally safe for intact cuts, as harmful bacteria are typically located on the surface. Ensure the exterior is seared properly to kill surface bacteria, but note that rare or undercooked ground beef is unsafe due to the potential for internal contamination.
Cooking Tips: Sear the beef on high heat for 1-2 minutes per side to achieve a crust while keeping the center rare. Use a thermometer to ensure accuracy, targeting 120-125°F. Rest the meat for 5-10 minutes to allow juices to redistribute.
Medium-Rare Beef
Temperature: 130-135°F (54-57°C)
Characteristics: Warm red center, tender with slightly more firmness than rare, considered ideal by many chefs for flavor and texture balance.
Recommended Cuts: Sirloin, ribeye, filet mignon.
Safety Note: Medium-rare is a safe choice for whole muscle cuts, as long as proper searing is applied. Like rare beef, it’s unsuitable for ground beef or mechanically tenderized meats due to potential bacterial presence.
Cooking Tips: Sear over high heat, then finish on lower heat or in the oven to reach 130-135°F. Rest the meat for 5-10 minutes before slicing to maintain juiciness.
Medium Beef
Temperature: 140-145°F (60-63°C)
Characteristics: Warm pink center, firmer texture with some moisture retained. Slightly less juicy than medium-rare but still tender enough for most diners.
Recommended Cuts: New York strip, prime rib.
Safety Note: Medium doneness is safe for all cuts, including ground beef, as the internal temperature is high enough to kill most harmful bacteria. This makes it a safe and commonly requested doneness level.
Cooking Tips: Sear on medium-high heat, then lower the temperature to cook evenly without drying out. Rest for 5-10 minutes after reaching 140-145°F. Avoid cutting too soon to preserve the remaining moisture.
Medium-Well Beef
Temperature: 150-155°F (65-68°C)
Characteristics: Slight hint of pink in the center, mostly gray-brown throughout. The texture becomes firmer with minimal juiciness.
Safety Note: Medium-well beef reaches a temperature that is safe for all cuts, including ground beef. This doneness level minimizes the risk of bacterial contamination and is often chosen for health or safety reasons.
Cooking Tips: Cook slowly over moderate heat to avoid drying out the exterior. Apply a marinade or baste the beef during cooking to retain moisture. Rest for 10 minutes to allow the juices to redistribute.
Well-Done Beef
Temperature: 160°F (71°C) and above
Characteristics: Fully cooked with no pink remaining. The texture can be tough and dry if overcooked, but slow-cooking techniques can help retain some tenderness.
Recommended Cuts: Ground beef, brisket, short ribs (best when slow-cooked to well done).
Safety Note: Well-done beef ensures the destruction of harmful bacteria, including E. coli, Salmonella, and other pathogens. For food safety, ground beef must always be cooked to at least 160°F to avoid contamination risks.
Cooking Tips: Use slow-cooking methods such as braising or stewing to retain moisture. Sear at high heat initially, then cook at lower heat for an extended period to reach the proper internal temperature. Rest the meat for 10-15 minutes after cooking.
Cooking beef to the correct internal temperature ensures both culinary success and food safety. Understanding the right temperatures for each doneness level and using proper resting techniques can significantly enhance flavor, texture, and juiciness, while also mitigating the risk of foodborne illness. This section details how to cook beef to various levels of doneness, recommended cuts for each method, and why resting is critical for the best results.
Level of Doneness
Temperature (°F)
Temperature (°C)
Characteristics
Recommended Cuts
Safety Note
Cooking Tips
Rare
Undercooked
Bleeding
saignant
120-125
49-52
Cool red center, tender texture
Tenderloin, ribeye, strip steak
Generally safe for intact cuts; ensure the exterior is properly seared.
Sear on high heat for 1-2 minutes per side; rest for 5-10 minutes.
Medium Rare
Pink
à point
130-135
54-57
Warm red center, slightly firmer
Sirloin, ribeye, filet mignon
Safe for whole muscle cuts; not suitable for ground beef
Sear over high heat, finish on lower heat; rest for 5-10 minutes.
Medium
Medium done
½
demi-anglais
140-145
60-63
Warm pink center, balanced tenderness
New York strip, prime rib
Safe for all cuts, including ground beef.
Sear on medium-high heat, then lower to cook evenly; rest for 5-10 minutes.
Medium Well
Almost well done
¾
Three-quarters done
cuit
150-155
65-68
Slight hint of pink, firmer texture
Flank steak, skirt steak, brisket
Safe for all cuts, and minimizes bacterial risk.
Cook slowly over moderate heat; baste to retain moisture; rest for 10 minutes.
Well Done
Fully done
bien cuit
160 and above
71 and above
Fully cooked, no pink, can be dry
Ground beef, brisket, short ribs
Ensures destruction of harmful bacteria; required for ground beef.
Use slow-cooking methods like braising; rest for 10-15 minutes.
Using a Kitchen Thermometer
A kitchen thermometer ensures accurate measurement of the internal temperature of the meat, helping to achieve both safety and the desired texture and flavor. When using a thermometer, follow these guidelines:
Proper Placement: Always insert the thermometer into the thickest part of the meat. This area is usually the slowest to heat and gives the most accurate reading. Avoid placing the thermometer near bones or in fatty areas, as this can give incorrect readings.
Measuring Temperature: Keep the thermometer inserted for several seconds to get an accurate reading. This rule applies to both digital and analog thermometers.
Consider Meat Thickness: The thickness of the meat significantly affects the cooking time and temperature. Thin cuts cook faster, while thick cuts take longer to reach the desired internal temperature. For thicker cuts, measure the temperature in multiple places to ensure even cooking.
Tips for Using a Kitchen Thermometer
Always insert the thermometer into the thickest part of the meat.
Hold the thermometer steady for a few seconds to get an accurate reading.
For thick cuts, take multiple temperature readings at different points.
Resting Beef After Cooking
Resting beef after cooking is an essential technique in both professional and home kitchens. It allows the juices, which migrate toward the surface during cooking, to redistribute throughout the meat. This ensures the beef remains juicy, flavorful, and tender, and avoids the loss of moisture when sliced.
Why Resting Beef is Important
Juice Redistribution: During cooking, the heat forces the juices to move towards the outer layers of the meat. When the meat is allowed to rest, these juices have time to redistribute evenly throughout, resulting in a moist and juicy texture.
Enhanced Flavor: Resting allows the meat to reabsorb its juices, retaining maximum flavor. Additionally, allowing the muscle fibers to relax during resting contributes to improved tenderness and a better overall texture when served.
Temperature Stabilization: Resting helps to stabilize the internal temperature of the beef. After removing it from heat, the temperature continues to rise slightly due to carryover cooking. This ensures that the meat is cooked thoroughly without exceeding the desired doneness level.
Proper Resting Techniques
Resting Time: The time required for resting depends on the size of the cut. Smaller cuts like steaks should rest for 5-10 minutes, while larger roasts need around 15-20 minutes. A general guideline is to rest beef for 10-20% of the total cooking time.
Covering the Meat: While resting, lightly tent the beef with aluminum foil. This prevents excess heat loss without trapping too much steam, which can soften the crust and affect the texture.
Resting Surface: Place the beef on a warm plate or cutting board with grooves to collect runoff juices. These juices are flavorful and can be used to make sauces or gravy for the dish.
Type of Cut
Resting Time
Small Cuts (Steaks)
5-10 minutes
Large Cuts (Roasts)
15-20 minutes
Common Questions About Resting Beef
Does Resting Make Beef Cold?: During resting, the internal temperature of the beef will continue to rise by a few degrees due to carryover cooking. The meat will remain warm, especially if resting is performed in a warm area or the serving plates are pre-warmed.
Why Shouldn’t Beef Be Sliced Immediately?: If beef is sliced immediately after cooking, the juices that move to the surface during cooking will escape, resulting in drier meat. Resting allows these juices to be reabsorbed, ensuring a juicy and flavorful dish.
Practical Tips for Resting Beef
Timing and Temperature: For larger cuts, to prevent excessive heat loss during resting, return the beef to a low oven (around 200°F/93°C) briefly after resting, or serve on pre-warmed plates to maintain the desired serving temperature.
Using Resting Juices: Collect the juices that accumulate during the resting period and use them in sauces or gravies. Alternatively, baste the meat with these juices just before serving to enhance its flavor.
Resting Before Final Sear: If employing the reverse-sear technique, rest the beef before the final sear. This locks in the juices, and a quick, high-heat sear after resting ensures a crisp exterior without losing internal moisture.
Food Safety and Proper Cooking
To ensure food safety when cooking beef, consider the following:
Bacterial Risk: Beef, particularly when cooked to rare or medium-rare levels, may carry bacterial risks if not properly handled. Vulnerable individuals, including children, the elderly, and those with compromised immune systems, should consume beef that has been cooked to at least medium (140-145°F) to reduce health risks.
Thermometer Usage: The only way to guarantee that beef is cooked safely is by checking the internal temperature with a kitchen thermometer. Judging doneness based on external color can be misleading, as browning may occur before the beef is safely cooked inside.
Food Safety Tips
Always use a thermometer to check the internal temperature of the meat.
For vulnerable individuals, cook beef to at least medium doneness.
Ensure ground beef reaches a minimum of 160°F (71°C) to destroy bacteria.
Cooking beef to various doneness levels requires precision and an understanding of both temperature and timing. Mastering these elements allows chefs to achieve a balance between flavor, texture, and food safety, ensuring that each cut is of the highest quality. Resting is a critical component in the cooking process that should never be overlooked, as it directly impacts the juiciness and tenderness of the final dish. Always choose the right cut of beef for the intended cooking method, and follow the recommended guidelines to achieve the best culinary results.
Poaching is a gentle cooking technique that involves simmering food in a flavorful liquid at a low temperature. This method is ideal for delicate items such as fish, eggs, fruits, and poultry, ensuring they retain their structure, moisture, and subtle flavors.
Temperature Control
One of the most crucial elements in poaching is maintaining the correct temperature. The ideal range for poaching is between 160°F and 180°F (71°C to 82°C). This temperature range is just below simmering, where small bubbles appear at the bottom of the pot and occasionally rise to the surface.
Importance of Temperature Control
Prevents Overcooking: Poaching at too high a temperature can lead to overcooking, resulting in tough, dry food.
Maintains Structure: Gentle heat helps keep the structure of delicate items like fish or eggs intact.
Enhances Flavor Infusion: Cooking at lower temperatures allows the food to absorb flavors from the poaching liquid more effectively.
Tips for Temperature Control
Use a Thermometer: Regularly check the temperature with a kitchen thermometer to ensure it stays within the desired range.
Adjust Heat Gradually: If the temperature begins to rise above the ideal range, lower the heat gradually to maintain a steady poaching environment.
Cover Partially: To maintain consistent heat, you can partially cover the pot, which helps retain heat without causing rapid boiling.
Flavorful Liquids
The choice of liquid for poaching significantly affects the flavor of the final dish. While water is a common base, incorporating other liquids can enhance the taste and aroma of the food.
Common Poaching Liquids
Water: Often used for its neutrality, allowing the natural flavors of the food to shine.
Broth: Chicken, beef, or vegetable broth adds a savory depth of flavor.
Wine: Both white and red wines can impart unique flavors and acidity.
Milk: Adds a creamy texture and subtle sweetness, ideal for certain types of fish and poultry.
Enhancing the Poaching Liquid
Adding herbs, spices, and aromatics can further elevate the flavor profile of the poaching liquid:
Herbs: Thyme, rosemary, dill, and bay leaves are excellent choices.
Spices: Peppercorns, cloves, and star anise can add complexity.
Aromatics: Onion, garlic, celery, and carrot enhance both flavor and aroma.
Submersion
Ensuring the food is completely submerged in the poaching liquid is vital for even cooking. This allows the heat to circulate around the food uniformly, ensuring that it cooks gently and evenly.
Importance of Submersion
Even Cooking: Complete submersion ensures that all parts of the food cook at the same rate.
Flavor Distribution: It allows the flavors from the liquid to penetrate the food evenly.
Preventing Dryness: Submerged food retains moisture, resulting in a tender texture.
Best Practices for Submersion
Use an Appropriate-Sized Pot: Choose a pot that is just large enough to hold the food and liquid without overcrowding.
Weigh Down Food: If the food tends to float, use a heatproof plate or a small weight to keep it submerged.
Monitor Liquid Level: Ensure the liquid level remains consistent throughout the cooking process, adding more liquid if necessary.
Minimal Handling
Delicate foods, such as fish and eggs, can fall apart or become damaged if overhandled. Therefore, it’s essential to minimize handling during the poaching process to maintain the food’s integrity and appearance.
Importance of Minimal Handling
Maintains Integrity: Less handling reduces the risk of breaking or damaging the food.
Preserves Appearance: Minimal movement helps maintain the visual appeal of delicate items.
Prevents Texture Changes: Excessive handling can alter the texture of delicate foods, making them mushy or unevenly cooked.
Tips for Minimal Handling
Use Gentle Tools: Employ tools like slotted spoons, fish spatulas, or skimmers to handle the food gently.
Turn Sparingly: If you must turn the food, do so sparingly and with great care.
Avoid Stirring: Stirring is generally unnecessary and can cause damage to delicate foods.
Uses of Poaching and Recipes
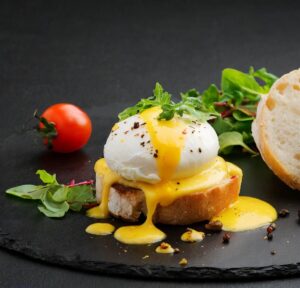
Poaching Eggs
One of the most common uses of poaching is for eggs. Poached eggs are a staple in many breakfast dishes. The gentle cooking method ensures that the egg whites are tender and fully cooked while keeping the yolks soft and runny. Poached eggs are often served on toast, as part of Eggs Benedict, or over salads.
Tips for Poaching Eggs
Use Fresh Eggs: Fresher eggs hold their shape better when poached.
Create a Gentle Whirlpool: Stirring the water to create a gentle whirlpool helps the egg whites wrap around the yolk, forming a neater shape.
Add Vinegar: A small amount of vinegar added to the poaching water can help coagulate the egg whites faster.
Poached Egg Recipe
Ingredients:
4 fresh eggs
15 mL (1 tablespoon) vinegar
2 liters (8 cups) water
Instructions:
Add 2 liters (8 cups) of water to a large pot and bring to a boil. Once boiling, reduce the heat to a simmer.
Add 15 mL (1 tablespoon) of vinegar and create a gentle whirlpool by stirring the water.
Crack each egg into a small bowl and gently slide it into the water.
Cook for about 3-4 minutes, then remove the eggs with a slotted spoon.
Serve immediately.
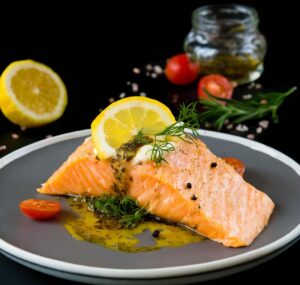
Poaching Fish
Fish, particularly varieties that are tender and flaky like salmon, cod, and tilapia, benefits greatly from poaching. It ensures that the fish is cooked through without losing moisture, resulting in a tender and flavorful dish. Poaching liquids, often enhanced with herbs, spices, and citrus, can add subtle flavors to the fish without overpowering it.
Tips for Poaching Fish
Choose the Right Liquid: Water, broth, or milk can be used as the poaching liquid, often enhanced with herbs, spices, and citrus for added flavor.
Monitor Temperature: Keep the poaching liquid at a consistent temperature of about 160°F to 180°F (71°C to 82°C) to ensure even cooking.
Check Doneness: The fish is done when it flakes easily with a fork but is still moist.
Poached Fish Recipe
Ingredients:
4 salmon fillets (approximately 150-180 grams each / 5.3-6.3 oz each)
1 liter (1000 mL / 4 cups) fish stock or vegetable broth
Salt and pepper to taste (approximately 5 grams / 0.2 oz)
Instructions:
Add 1 liter (1000 mL / 4 cups) of fish stock or vegetable broth to a large pot and heat over medium heat.
Add the lemon slices, rosemary, and crushed garlic. Season with salt and pepper.
When the liquid starts to simmer, carefully place the salmon fillets in the pot.
Reduce the heat and poach for about 10–12 minutes, until the salmon is opaque.
Remove the fillets and serve immediately.
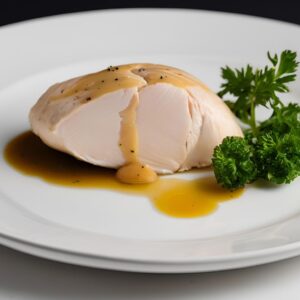
Poaching Poultry
Chicken and other poultry can be poached to keep the meat moist and tender. This is particularly useful for chicken breasts, which are prone to drying out when cooked using dry-heat methods. Poached chicken is excellent for salads, sandwiches, and can be shredded for use in tacos, enchiladas, or as a topping for pizzas.
Tips for Poaching Poultry
Start with Cold Liquid: Placing the poultry in cold liquid and then gradually heating helps cook the meat evenly.
Season the Liquid: Adding aromatics such as onion, garlic, and herbs to the poaching liquid can enhance the flavor of the poultry.
Simmer Gently: Avoid boiling the liquid; keep it at a gentle simmer to prevent the poultry from becoming tough.
Poached Chicken Breast Recipe
Ingredients:
4 chicken breasts (170 grams / 6 oz each)
1.5 liters (1500 mL / 6 cups) water or chicken broth
1 onion, quartered (150 grams / 5.3 oz)
2 garlic cloves, crushed (10 grams / 0.35 oz)
1 sprig fresh thyme (5 grams / 0.2 oz)
1 carrot, chopped (100 grams / 3.5 oz)
Salt (5 grams / 0.18 oz)
Black pepper (5 grams / 0.18 oz)
Instructions:
Add the water or chicken broth to a large pot along with the onion, garlic, thyme, and carrot.
Bring the liquid to a boil, then add the chicken breasts.
Reduce the heat and poach the chicken for about 15-20 minutes, until fully cooked.
Remove the chicken and slice or shred for use in salads, sandwiches, or other dishes
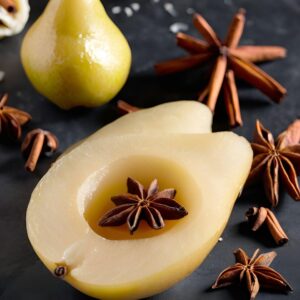
Poaching Fruit
Poaching can transform fruits, especially those that are slightly underripe or naturally firm, into tender, flavorful desserts. Fruits like pears, apples, peaches, and plums can be poached in a sugar syrup, wine, or liqueur, which enhances their sweetness and adds a rich flavor. Poached fruits can be served with ice cream, whipped cream, or used as fillings for pastries and pies.
Tips for Poaching Fruit
Choose the Right Fruit: Firmer fruits, such as pears, apples, and peaches, are ideal for poaching.
Enhance the Liquid: Adding spices like cinnamon, star anise, or vanilla to the poaching liquid can add depth of flavor.
Monitor the Texture: Poach the fruit until it is tender but still holds its shape.
Poached Pear Recipe
Ingredients:
4 pears, peeled and cored (150 grams / 5.3 oz each)
1 liter (1000 mL / 4 cups) water
400 grams (2 cups) sugar
1 vanilla bean, split
1 cinnamon stick (7 grams / 0.25 oz)
2 star anise (4 grams / 0.14 oz)
Instructions:
Add the water, sugar, vanilla bean, cinnamon stick, and star anise to a large pot.
Bring to a boil, ensuring the sugar is fully dissolved.
Add the pears and reduce the heat to a simmer.
Poach the pears for 20-25 minutes, until tender.
Remove the pears and serve warm or cold.
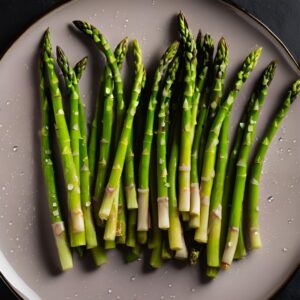
Poaching Vegetables
Delicate vegetables that might lose texture and color when boiled or steamed, such as asparagus, spinach, or broccoli, can be poached to preserve their integrity and nutrients. This method allows the vegetables to cook thoroughly while maintaining a vibrant color and a firm texture.
Tips for Poaching Vegetables
Use a Gentle Simmer: Keep the water at a gentle simmer to preserve the texture and color of the vegetables.
Season the Water: Adding a pinch of salt to the poaching water can enhance the natural flavors of the vegetables.
Avoid Overcooking: Monitor the vegetables closely and remove them from the liquid as soon as they are tender.
Add the water and salt to a large pot and bring to a boil.
Add the asparagus and reduce the heat to a simmer.
Poach the asparagus for 3-5 minutes, until bright green and tender.
Remove the asparagus and serve immediately.
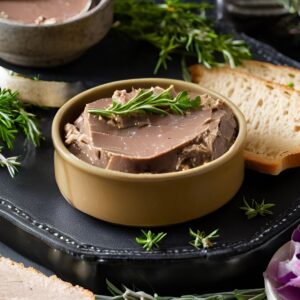
Preparing Terrines and Pâtés
Poaching is used in the preparation of terrines and pâtés, where the mixture is cooked gently in a water bath. This controlled cooking environment is perfect for achieving the smooth, even texture desired in these dishes without risking the edges burning or drying out before the center is fully cooked.
Tips for Poaching Terrines and Pâtés
Use a Water Bath: Place the terrine or pâté mold in a larger pan filled with hot water to ensure even cooking.
Monitor the Temperature: Keep the water bath at a consistent temperature, typically around 160°F (71°C), to prevent curdling.
Cover the Mold: Cover the terrine or pâté with foil to prevent the top from drying out.
Chicken Liver Pâté Recipe
Ingredients:
500 grams (1.1 lbs) chicken livers, cleaned
240 mL (1 cup) milk
30 grams (2 tablespoons) butter
1 onion, chopped (150 grams / 5.3 oz)
2 garlic cloves, crushed (10 grams / 0.35 oz)
120 mL (1/2 cup) white wine
1 sprig fresh thyme (5 grams / 0.2 oz)
Salt and pepper to taste (approximately 5 grams / 0.18 oz each)
Instructions:
Soak the chicken livers in milk for 1 hour, then drain.
Melt the butter in a pan over medium heat, then add the chopped onion and crushed garlic. Cook until soft.
Add the chicken livers and cook for about 5-7 minutes, until fully cooked.
Add the white wine and thyme, and cook until the liquid evaporates.
Transfer the mixture to a blender and process until smooth. Season with salt and pepper.
Place the pâté in a terrine mold, set in a water bath, and bake at 160°C (320°F) for about 45 minutes.
Cool and serve cold.
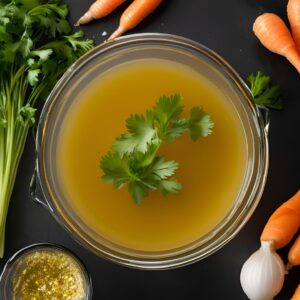
Making Stocks and Broths
Although technically a form of simmering, poaching is an essential part of making stocks and broths, where bones, vegetables, and herbs are cooked slowly in water at low temperatures to extract maximum flavor without boiling vigorously, which can make the stock cloudy.
Tips for Making Stocks and Broths
Start with Cold Water: Begin with cold water to help extract more flavor from the ingredients.
Skim Frequently: Regularly skim off any foam or impurities that rise to the surface to keep the stock clear.
Simmer Gently: Maintain a gentle simmer to ensure the flavors meld without boiling, which can cause the stock to become cloudy.
Chicken Stock Recipe
Ingredients:
1 whole chicken or chicken parts (approximately 1.5-2 kg / 3.3-4.4 lbs)
2 onions, quartered (300 grams / 10.6 oz)
2 carrots, chopped (200 grams / 7 oz)
2 celery stalks, chopped (200 grams / 7 oz)
1 bunch parsley (50 grams / 1.8 oz)
1 bay leaf (1 gram / 0.04 oz)
10 peppercorns (2 grams / 0.07 oz)
3 liters (3000 mL / 12 cups) water
Instructions:
Add all ingredients to a large pot.
Add the water and bring to a boil.
Reduce the heat and simmer gently for about 2-3 hours, skimming off any foam that forms on the surface.
Remove the chicken and vegetables, then strain the stock through a fine sieve.
Cool the stock and store it in the refrigerator or freezer.
Understanding kitchen terminology is essential for:
Following Recipes Accurately: Knowing the specific terms used in recipes ensures that you can follow them correctly and achieve the desired results. Terms like “simmer,” “dice,” and “braise” describe precise techniques and methods that impact the outcome of the dish.
Improving Cooking Techniques: Familiarity with kitchen terms allows you to understand and execute various cooking techniques more effectively. This knowledge helps you refine your skills and produce consistently better dishes.
Communicating Effectively in a Culinary Environment: Whether you’re working in a professional kitchen or cooking at home, knowing the correct terms helps you communicate clearly with others. It ensures everyone understands the processes and techniques being used.
Familiarity with Kitchen Terms Enhances
Understanding Cooking Shows: Cooking shows often use specific terminology to describe techniques and ingredients. Knowing these terms allows you to follow along more easily and learn new skills.
Reading Culinary Books: Culinary books and cookbooks use precise language to explain recipes and techniques. Familiarity with kitchen terms helps you comprehend these resources and apply the knowledge to your cooking.
Professional Kitchen Operations: In a professional kitchen, clear communication is critical. Using the correct terms ensures that instructions are understood and followed, which helps maintain efficiency and quality.
How Understanding Terminology Enhances Cooking Skills
Accurately Interpreting Recipes and Cooking Instructions: Knowing the terms used in recipes helps you understand what needs to be done at each step. This accuracy prevents mistakes and leads to better results.
Building Confidence in the Kitchen: As you become more familiar with kitchen terminology, you’ll feel more confident in your cooking abilities. This confidence enables you to try new recipes and techniques without hesitation.
Improving Overall Cooking Efficiency and Safety: Understanding and using the correct terms ensures that you follow best practices in the kitchen. This knowledge helps you work more efficiently and safely, reducing the risk of accidents and errors.
Basic Kitchen Terms
1. Al Dente: Italian for “to the tooth.” It describes pasta that is cooked to be firm to the bite, not soft or overly chewy.
2. Bain-Marie: A water bath used to cook certain dishes gently or keep them warm without direct heat. Typically involves placing a container (with the food inside) in a larger, shallow pan filled with hot water.
3. Baste: To moisten food during its cooking (usually roasting) using fat or juices from the dish itself, or sometimes another liquid like broth, to prevent drying out and add flavor.
4. Blanch: A cooking process where food, often vegetables or nuts, is briefly boiled and then plunged into ice water to stop the cooking process immediately. This method helps to preserve color, texture, and nutrients.
5. Caramelize: The process of cooking sugar until it becomes a brown liquid. In terms of vegetables like onions, it refers to the slow cooking that browns the natural sugars in food, enhancing its sweetness and flavor.
6. Deglaze: Adding liquid such as stock or wine to a pan to loosen and dissolve the food particles that are stuck to the bottom after cooking, which is then usually turned into a sauce.
7. Dice: To cut food into small cubes of uniform size and shape. The size is often specified in recipes to ensure even cooking.
8. Emulsify: The process of combining two ingredients together which normally don’t mix easily, like oil and vinegar. The mixture is achieved by slowly adding one ingredient to another while simultaneously mixing rapidly. This is commonly done in making vinaigrettes and mayonnaise.
9. Fold: A gentle mixing method, usually used with delicate ingredients or mixtures that need to maintain their airiness. A spatula is used to slice down to the bottom of the bowl, moving across the bottom, and then back up the other side, bringing some of the mixture from the bottom over the top.
10. Julienne: To cut food into short, thin strips. Commonly used for vegetables in stir-fries or salads.
11. Mince: To chop food into extremely small pieces, finer than chopping. This is often used for garlic, herbs, or onions.
12. Poach: To cook food gently in a simmering (not boiling) liquid. Commonly used for eggs, fish, and fruit.
13. Reduce: To boil a liquid, typically a sauce, until the volume is reduced by evaporation, which thickens the consistency and intensifies the flavor.
14. Sauté: To cook food quickly in a small amount of oil or fat over relatively high heat.
15. Simmer: To cook liquid just below the boiling point where only small bubbles form on the surface.
16. Steam: To cook food by placing it in a closed environment with boiling water. The steam from the boiling water cooks the food, which makes it a healthy cooking choice since no additional fat is required.
17. Zest: The outer, colorful skin of citrus fruits used as a flavoring. It is often grated or peeled in thin strips.
18. Degrease: The process of removing fat from the surface of sauces, soups, or stews, usually done by skimming with a spoon or chilling the liquid to solidify the fat and then removing it.
19. Dredge: Coating wet or moist foods with a dry ingredient like flour, cornmeal, or breadcrumbs before cooking to create a crisp exterior. Often used in frying recipes.
20. Flambé: A cooking procedure in which alcohol (brandy, rum, or liqueur) is added to a hot pan to create a burst of flames, intended to add flavor and reduce the alcoholic content of the dish.
21. Gratin: A culinary technique in which an ingredient is topped with a browned crust, often using breadcrumbs, grated cheese, egg, and/or butter. Gratin dishes are typically baked or broiled until the top is golden and crispy.
22. Knead: A process of working dough with the hands to develop the gluten in flour, essential for giving breads, pastas, and other baked goods their texture and elasticity.
23. Macerate: Softening or breaking up food (usually fruit) by soaking it in a liquid (often with sugar, syrup, or alcohol) to infuse it with flavor. This is often done to berries and other fruits to draw out their natural juices.
24. Parboil: Partially cooking food, typically vegetables or rice, in boiling water for a brief period. The process is usually followed by rinsing under cold water to halt the cooking process quickly.
25. Render: The process of cooking fatty pieces of meat slowly over low heat so that the fat melts away from the meat. Rendering is commonly used for bacon and duck breasts to produce crispy skin and a moist interior.
26. Roux: A cooked mixture of flour and fat, usually butter, used to thicken sauces, soups, and stews. The color can range from white to blond to brown, depending on how long it’s cooked and the desired flavor and color.
27. Sear: Quickly browning the surface of food, especially meat, at a high temperature so that it forms a flavorful crust. A common first step in braising or slow-cooking processes.
28. Temper: The technique of slowly warming up cold ingredients by adding a hot or boiling liquid in small amounts. Commonly used to prevent curdling in recipes involving eggs or cream.
29. Whip: Beating an ingredient vigorously to incorporate air, making it light and fluffy. Commonly used for cream, egg whites, or batter.
Regional and Cultural Terms
1. Aioli
Definition: A Mediterranean sauce made of garlic and olive oil.
Explanation: Aioli is often emulsified with egg yolk to achieve a mayonnaise-like consistency. It is commonly served with seafood, vegetables, and sandwiches.
2. Tapas
Definition: Spanish cuisine featuring small portions of various dishes.
Explanation: Tapas are typically served in bars and restaurants as appetizers. They can include a variety of small plates such as meats, seafood, cheeses, and vegetables.
3. Dim Sum
Definition: Chinese cuisine consisting of small, bite-sized portions of food, usually served in steamer baskets or on small plates.
Explanation: Dim Sum is often enjoyed during brunch hours and includes dumplings, baozi, rolls, and other delicacies.
4. Tandoori
Definition: Indian cuisine featuring dishes cooked in a tandoor, a traditional clay oven.
Explanation: Tandoori dishes are typically marinated in yogurt and spices, then cooked at high temperatures. Tandoori chicken is one of the most well-known examples.
5. Umami
Definition: The fifth taste sensation, recognized in Japanese cuisine, that denotes a savory or meaty flavor.
Explanation: Umami is found in foods such as meats, fish, tomatoes, mushrooms, and certain cheeses. It enhances the depth of flavor in dishes.
6. Mezze
Definition: A selection of small dishes served in Middle Eastern, Mediterranean, and Balkan cuisines.
Explanation: Mezze is typically served as an appetizer and can include hummus, baba ghanoush, falafel, and various salads.
7. Bouillabaisse
Definition: A traditional French fish stew.
Explanation: Bouillabaisse is made with saffron, tomatoes, garlic, and a variety of fish and seafood. It is a specialty of the Provence region and is usually served with rouille sauce and crusty bread.
8. Raita
Definition: A cooling yogurt-based side dish or condiment in Indian cuisine.
Explanation: Raita is often mixed with grated vegetables, spices, and herbs. It is typically served alongside spicy dishes to provide a refreshing contrast.
9. Ceviche
Definition: A Latin American dish made by marinating raw fish or seafood in citrus juice.
Explanation: Ceviche is typically marinated in lemon or lime juice, onions, chilies, and cilantro, and is usually served cold.
10. Mole
Definition: A complex sauce from Mexican cuisine made with ingredients like chocolate, chilies, and spices.
Explanation: Mole sauces vary widely but are known for their rich, layered flavors. They are often served over chicken or turkey.
11. Pho
Definition: A Vietnamese soup consisting of broth, rice noodles, herbs, and meat.
Explanation: Pho is typically made with beef or chicken and is flavored with ingredients like star anise, cloves, and cinnamon.
12. Poutine
Definition: A Canadian dish of french fries topped with cheese curds and gravy.
Explanation: Poutine is especially popular in Quebec and is enjoyed as a hearty snack or main dish.
13. Goulash
Definition: A Hungarian stew made with meat, vegetables, and paprika.
Explanation: Goulash is a hearty dish often served with bread or potatoes.
14. Souvlaki
Definition: Greek skewered and grilled meat.
Explanation: Souvlaki is typically served in pita bread with tomatoes, onions, and tzatziki sauce.
15. Paella
Definition: A Spanish rice dish made with saffron, seafood, meat, and vegetables.
Explanation: Paella is traditionally cooked in a large, shallow pan and is often enjoyed at family gatherings or celebrations.
16. Bratwurst
Definition: A German sausage made from pork, beef, or veal.
Explanation: Bratwurst is usually grilled or pan-fried and served with sauerkraut or in a bread roll.
17. Sashimi
Definition: Thinly sliced raw fish or seafood, a staple of Japanese cuisine.
Explanation: Sashimi is typically served with soy sauce, wasabi, and pickled ginger.
18. Ratatouille
Definition: A French Provençal stewed vegetable dish.
Explanation: Ratatouille is made with eggplant, zucchini, tomatoes, bell peppers, and onions, and can be served as a main dish or side.
19. Tzatziki
Definition: A Greek sauce made from yogurt, cucumber, garlic, and olive oil.
Explanation: Tzatziki is often served as a dip or alongside dishes like souvlaki and gyros.
Understanding various cooking techniques is crucial for maximizing the flavor and texture of different cuts of beef. Here’s a guide to some of the most popular methods for preparing beef, ensuring delicious results every time.
Grilling Beef
Grilling beef is a classic cooking method that imparts a smoky, charred flavor that many diners love. Understanding the ideal cuts, mastering the grilling technique, and applying professional tips can elevate your grilling game in a professional kitchen.
Ideal Cuts for Grilling
When it comes to grilling beef, certain cuts are particularly well-suited for this method due to their flavor, fat content, and tenderness.
Ribeye: Known for its rich marbling, ribeye delivers a juicy, flavorful steak that grills beautifully.
Sirloin: A leaner cut that still offers great flavor and tenderness, perfect for those who prefer a less fatty steak.
T-bone: Combines the tenderness of a filet mignon and the flavorful strip steak, offering the best of both worlds.
Burgers: Ground beef patties, especially those with a higher fat content (around 20% fat), grill well and remain juicy.
Grilling Technique
Mastering the grilling technique is essential for achieving the perfect steak or burger.
Preheat the Grill: Start by preheating the grill to high. This ensures that the grates are hot enough to sear the meat quickly, creating a flavorful crust while keeping the inside juicy.
Season the Beef: Season the beef generously with kosher salt and freshly ground black pepper. These basic seasonings enhance the natural flavor of the beef and create a delicious crust when grilled.
Grill the Beef: Place the beef on the preheated grill. For steaks, cook for a few minutes on each side, adjusting the time based on the thickness of the cut and the desired level of doneness (e.g., medium-rare, medium). For burgers, grill each side until the internal temperature reaches 160°F (71°C) for safety.
Professional Tips for Grilling Beef
Resting: After grilling, allow the meat to rest for a few minutes before slicing or serving. This resting period is crucial as it allows the juices to redistribute throughout the meat, ensuring each bite is juicy and flavorful.
Use a Meat Thermometer: To ensure the meat is cooked to the desired level of doneness, use a meat thermometer. Aim for 130°F (54°C) for medium-rare, 140°F (60°C) for medium, and 160°F (71°C) for well-done.
Control the Heat: If the grill is too hot, it can cause the exterior of the meat to char before the inside is fully cooked. Adjust the heat as needed, or move the meat to a cooler part of the grill to finish cooking.
Example Recipe:
Grilled Ribeye Steak:
Ingredients:
350 grams (12.3 ounces) ribeye steak, about 1 inch thick
15 ml (1 tablespoon) olive oil
5 grams (1 teaspoon) salt
2 grams (1/2 teaspoon) freshly ground black pepper
Instructions:
Take the 350-gram ribeye steak out of the refrigerator 30 minutes before cooking to bring it to room temperature. This helps ensure even cooking.
Preheat your grill to high heat. Ensure the grill grates are clean and lightly oiled to prevent the steak from sticking.
Rub the steak with 15 ml of olive oil, ensuring it’s evenly coated. Season generously with 5 grams of salt and 2 grams of freshly ground black pepper on both sides of the steak.
Place the steak on the preheated grill. Grill for about 4-5 minutes per side for medium-rare, or until the internal temperature reaches 130°F (54°C).
Remove the steak from the grill and let it rest for 5 minutes before slicing. This resting period allows the juices to redistribute throughout the meat, ensuring a juicy and flavorful steak.
Slice the steak against the grain into desired portions and serve immediately.
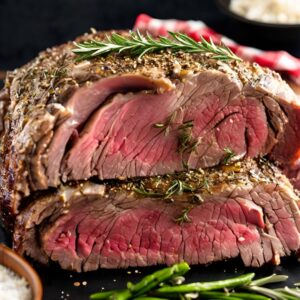
Roasting Beef
Roasting beef is a classic technique that allows for even cooking and deep, rich flavors. It’s ideal for serving larger groups and is a staple in many professional kitchens. Understanding the best cuts for roasting, mastering the technique, and applying expert tips ensures a perfectly roasted beef every time.
Ideal Cuts for Roasting
When it comes to roasting, certain larger cuts of beef are particularly well-suited due to their size, marbling, and ability to develop rich flavors during the slow cooking process.
Prime Rib: Known for its marbling, prime rib is a luxurious cut that remains tender and juicy when roasted.
Tenderloin: This cut is prized for its tenderness and subtle flavor, making it perfect for roasting.
Sirloin Roast: A more affordable option that still delivers excellent flavor and texture when roasted properly.
Roasting Technique
Mastering the roasting technique is essential for achieving a perfectly cooked roast with a flavorful crust and juicy interior.
Preheat the Oven: Begin by preheating your oven to a moderate temperature, typically around 325°F (163°C). This temperature allows the meat to cook evenly without drying out, developing a deep, savory flavor over time.
Season the Roast: Generously season the beef with kosher salt, freshly ground black pepper, and any additional herbs or spices that complement the cut. Place the seasoned roast in a roasting pan, fat side up, to allow the fat to baste the meat as it cooks.
Roast: Place the roasting pan in the preheated oven and cook until the beef reaches the desired internal temperature. The exact cooking time will depend on the size of the roast and the level of doneness you’re aiming for.
Professional Tips for Roasting Beef
Use a Meat Thermometer: To ensure the roast reaches the perfect level of doneness, use a meat thermometer to check the internal temperature. For medium-rare, aim for 130°F (54°C); for medium, 140°F (60°C); and for well-done, 160°F (71°C). Insert the thermometer into the thickest part of the roast, avoiding bones or fat for an accurate reading.
Resting the Meat: Once the roast has reached the desired temperature, remove it from the oven and let it rest for at least 15-20 minutes before slicing. Resting allows the juices to redistribute throughout the meat, ensuring each slice is moist and flavorful.
Basting and Monitoring: During roasting, periodically baste the roast with its own juices or a prepared basting liquid. This adds flavor and helps keep the surface moist. Keep an eye on the roast to ensure it’s cooking evenly and adjust the oven temperature if necessary.
Example Recipe:
Roast Prime Rib:
Ingredients:
1 prime rib roast (approximately 2-2.3 kg / 4-5 pounds)
30 ml (2 tablespoons) olive oil
12 grams (4 cloves) garlic, minced
10 grams (2 tablespoons) fresh rosemary, chopped
10 grams (2 tablespoons) fresh thyme, chopped
10 grams (2 teaspoons) salt
5 grams (1 teaspoon) freshly ground black pepper
Instructions:
Take the prime rib roast out of the refrigerator 1 hour before cooking to bring it to room temperature. This ensures even cooking.
Preheat your oven to 450°F (232°C).
Rub the roast evenly with 30 ml of olive oil. Then, coat it with the minced garlic, chopped rosemary, chopped thyme, salt, and freshly ground black pepper, ensuring all sides are well seasoned.
Place the seasoned roast on a rack in a roasting pan. Roast in the preheated oven at 450°F (232°C) for 15 minutes to create a flavorful crust.
After 15 minutes, reduce the oven temperature to 325°F (163°C). Continue roasting the prime rib until the internal temperature reaches 130°F (54°C) for medium-rare, which should take about 1.5 to 2 hours.
Once the roast reaches the desired temperature, remove it from the oven and let it rest for at least 15 minutes before carving. Resting allows the juices to redistribute throughout the meat, ensuring a moist and flavorful roast.
Slice the roast into portions and serve with your favorite sides.
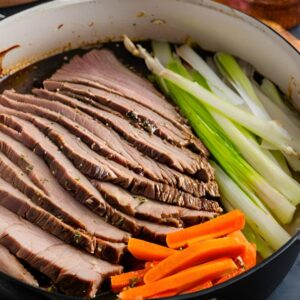
Braising Beef
Braising beef is a cooking method used to transform tougher, less expensive cuts of meat into tender and flavorful dishes. This technique is ideal for meats that require long, slow cooking at low temperatures. By selecting the right cuts, mastering the braising technique, and applying professional tips, you can achieve perfect results every time.
Ideal Cuts for Braising
The best cuts for braising are those that are tougher and benefit from the long cooking process, which tenderizes the meat and develops rich flavors.
Chuck: With its tough muscle structure, chuck becomes incredibly tender and develops a rich flavor during braising.
Brisket: Another tough cut that becomes moist and flavorful with slow cooking, especially when braised for extended periods.
Short Ribs: This bone-in cut becomes melt-in-your-mouth tender with braising, with the meat easily falling off the bone.
Braising Technique
The braising technique begins with browning the meat, followed by adding liquid and slowly cooking it. This method breaks down the connective tissues in the meat, resulting in a tender and flavorful dish.
Brown the Beef: Start by browning the beef in a heavy pot over high heat until all sides are well-browned. This step creates a rich layer of flavor on the meat’s surface, enhancing the final dish.
Add Liquid: After browning, add liquid to the pot (such as broth, wine, or a combination of both). This liquid helps to tenderize the meat during cooking. You can also add herbs and vegetables to build more flavor in the braising liquid.
Simmer: Cover the pot and cook the beef over low heat on the stovetop or in a low oven. The meat should be slowly cooked until it is very tender, which can take several hours.
Professional Tips for Braising Beef
Flavor Development: The braising liquid is key to flavor development and helps tenderize the meat over the long cooking time. Ingredients like broth, wine, vegetables, and herbs contribute to the final flavor profile of the dish.
Low and Slow Cooking: Braising requires cooking at a low temperature for an extended period. This method breaks down the connective tissues in the meat, making it tender and juicy.
Liquid Level: During braising, keep an eye on the liquid level and add more if necessary. The liquid should cover about two-thirds of the meat, ensuring that the dish stays moist and cooks evenly.
Example Recipe:
Braised Brisket:
Ingredients:
1 brisket (approximately 2-2.3 kg / 4-5 pounds)
30 ml (2 tablespoons) vegetable oil
400 grams (2 large onions), sliced
12 grams (4 cloves) garlic, minced
240 grams (4 large carrots), chopped
200 grams (4 celery stalks), chopped
480 ml (2 cups) beef broth
240 ml (1 cup) red wine
30 grams (2 tablespoons) tomato paste
2 bay leaves
10 grams (2 teaspoons) salt
5 grams (1 teaspoon) freshly ground black pepper
Instructions:
Season the brisket evenly with 10 grams of salt and 5 grams of freshly ground black pepper.
Preheat your oven to 300°F (150°C).
Heat the vegetable oil in a large Dutch oven over medium-high heat. Once hot, add the brisket and brown it on all sides, about 4-5 minutes per side. Remove the browned brisket from the pot and set it aside.
In the same pot, add the sliced onions, minced garlic, chopped carrots, and chopped celery. Sauté the vegetables until they are softened, about 5-7 minutes.
Add the beef broth, red wine, tomato paste, and bay leaves to the pot. Stir to combine all the ingredients, scraping up any browned bits from the bottom of the pot for added flavor.
Return the browned brisket to the pot, placing it on top of the vegetables. Cover the pot with a lid and transfer it to the preheated oven. Braise the brisket for about 3-4 hours, or until the meat is tender and easily shredded with a fork.
Once cooked, remove the brisket from the pot and let it rest for a few minutes. Slice the brisket against the grain into thin slices. Serve the sliced brisket with the braising liquid and vegetables for a rich and flavorful dish.
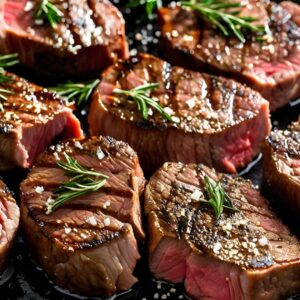
Pan-Searing Beef
Pan-searing is a popular cooking method for achieving a flavorful, caramelized crust on steaks. This technique is ideal for tender cuts of beef that benefit from quick, high-heat cooking. Understanding the right cuts, mastering the technique, and applying expert tips will ensure perfectly seared steaks every time.
Ideal Cuts for Pan-Searing
Certain cuts of beef are particularly well-suited for pan-searing due to their tenderness and fat content, which contribute to a rich, flavorful crust.
Filet Mignon: Known for its tenderness, this cut sears beautifully, creating a delicate and juicy steak.
Ribeye: With its marbling, ribeye develops a deep, rich flavor when seared, resulting in a juicy and flavorful steak.
Sirloin: A leaner cut that still delivers excellent flavor, sirloin steaks are perfect for pan-searing.
Pan-Searing Technique
Mastering the pan-searing technique is essential for achieving a perfectly cooked steak with a beautifully browned crust.
Heat Skillet: Start by heating a heavy skillet over high heat. A cast-iron skillet is ideal due to its ability to maintain even heat, which is crucial for achieving a good sear.
Add Oil: Once the skillet is hot, add a small amount of oil with a high smoke point, such as vegetable or canola oil. This prevents the steak from sticking and helps to develop the crust.
Sear: Place the seasoned steak in the hot pan. Let it cook undisturbed until a brown crust forms on the bottom, which typically takes 2-3 minutes. Flip the steak and continue cooking until it reaches the desired doneness. For a medium-rare steak, aim for an internal temperature of 130°F (54°C).
Professional Tips for Pan-Searing Beef
Avoid Overcrowding: When searing multiple steaks, avoid overcrowding the pan. If the pan is too full, the temperature will drop, causing the steaks to steam rather than sear. This will prevent the formation of the desired crust.
Use a Meat Thermometer: For precise doneness, use a meat thermometer to check the internal temperature of the steak. This ensures that the steak is cooked to the exact level of doneness preferred by the customer.
Basting for Extra Flavor: For added richness, you can baste the steak with butter and aromatics (such as garlic and thyme) during the last minute of cooking. This enhances the flavor and helps develop a deeper crust.
2 grams (1/2 teaspoon) freshly ground black pepper
28 grams (2 tablespoons) unsalted butter
2 cloves garlic, crushed (approximately 6 grams)
2 sprigs fresh thyme
Instructions:
Take the filet mignon steaks out of the refrigerator 30 minutes before cooking to bring them to room temperature. This helps ensure even cooking.
Season the steaks generously with 5 grams of salt and 2 grams of freshly ground black pepper on all sides.
Heat a heavy skillet over high heat until very hot. This step is crucial to achieve a good sear on the steaks.
Add 15 ml of vegetable oil to the skillet and allow it to heat up until it shimmers.
Place the steaks in the skillet and cook for 3-4 minutes on one side, without moving them, until a brown crust forms. Flip the steaks and immediately add 28 grams of unsalted butter, 2 crushed garlic cloves, and 2 sprigs of fresh thyme to the skillet.
Tilt the skillet slightly and use a spoon to baste the steaks with the melted butter and aromatics, continuously spooning the butter over the steaks to infuse them with flavor.
Continue cooking for another 3-4 minutes for medium-rare.
Remove the steaks from the skillet and let them rest for 5 minutes before serving. Resting allows the juices to redistribute throughout the meat, ensuring a juicy and flavorful steak.
Serve the filet mignon with the basting butter and garlic for an added burst of flavor.
Stewing Beef
Stewing is a classic cooking method that transforms tougher cuts of beef into tender, flavorful dishes through long, slow cooking. This technique is ideal for making hearty, comforting meals that are rich in flavor. Understanding the best cuts for stewing, mastering the technique, and applying expert tips will ensure that your stews are consistently delicious.
Ideal Cuts for Stewing
Stewing is best suited for tougher cuts of beef that benefit from slow cooking. These cuts are generally more affordable and, when cooked properly, become incredibly tender and flavorful.
Chuck: Known for its rich flavor and marbling, chuck is one of the most popular cuts for stewing. It becomes tender and succulent when slow-cooked.
Round: A leaner cut that requires slow cooking to break down its tougher fibers, making it a good choice for stews.
Other Tough Cuts: Any other tougher cuts like brisket or short ribs can also be used in stews, providing they are cut into smaller pieces.
Stewing Technique
Mastering the stewing technique involves a few key steps to ensure that the beef is tender and the stew is rich in flavor.
Cut and Brown the Beef: Start by cutting the beef into uniform cubes, usually about 1 to 1.5 inches. Browning the beef in a pot over medium-high heat is an essential step that adds depth of flavor to the stew. Ensure the beef cubes are browned on all sides before removing them from the pot.
Add Liquid: Once the beef is browned, return it to the pot and cover it with liquid. Common liquids for stewing include water, beef stock, or wine, or a combination of these. The liquid should be enough to submerge the beef completely. You can also add a variety of vegetables (such as onions, carrots, and potatoes) and herbs (such as bay leaves, thyme, and rosemary) at this stage.
Simmer: Bring the liquid to a gentle simmer, then reduce the heat to low. Cover the pot and let it cook slowly until the beef is tender. This can take anywhere from 1.5 to 3 hours, depending on the cut of meat and the size of the cubes.
Professional Tips for Stewing Beef
Flavor Integration: Stewing is similar to braising, but it usually involves smaller pieces of meat and more liquid. The long cooking time allows the flavors of the beef, vegetables, and herbs to meld together, creating a rich and hearty dish.
Don’t Rush the Process: Stewing is all about low and slow cooking. Rushing the process by increasing the heat can result in tough meat and a less flavorful stew. Patience is key to achieving the best results.
Layering Flavors: To build a deeper flavor profile, consider layering your ingredients. Sauté onions, garlic, and other aromatics before adding the beef back into the pot. Deglaze the pot with wine or stock after browning the meat to incorporate the flavorful bits stuck to the bottom of the pot.
Adjusting Consistency: If the stew is too thin, you can thicken it by removing the lid during the last half hour of cooking to allow some of the liquid to evaporate. Alternatively, you can make a slurry with flour or cornstarch and water and stir it into the stew to thicken it.
Example Recipe:
Classic Beef Stew:
Ingredients:
900 grams (2 pounds) beef chuck, cut into 1-inch cubes
30 ml (2 tablespoons) vegetable oil
200 grams (1 large onion), chopped
9 grams (3 cloves) garlic, minced
240 grams (4 large carrots), sliced
600 grams (4 large potatoes), cubed
720 ml (3 cups) beef broth
240 ml (1 cup) red wine
2 bay leaves
1 teaspoon (2 grams) dried thyme
10 grams (2 teaspoons) salt, divided
5 grams (1 teaspoon) freshly ground black pepper, divided
Instructions:
Season the beef cubes with half of the salt and pepper.
Heat the vegetable oil in a large pot or Dutch oven over medium-high heat. Working in batches, brown the beef on all sides, about 3-4 minutes per side. Remove the browned beef from the pot and set it aside.
In the same pot, add the chopped onions and minced garlic. Sauté for 4-5 minutes until the onions are softened and translucent, stirring occasionally to prevent burning.
Add the beef broth, red wine, bay leaves, and dried thyme to the pot. Stir well and bring the mixture to a boil.
Return the browned beef to the pot, along with any accumulated juices. Add the sliced carrots and cubed potatoes to the pot, ensuring they are submerged in the liquid.
Reduce the heat to low, cover the pot, and simmer for about 2-3 hours, or until the beef is tender and the vegetables are cooked through. Stir occasionally to prevent sticking and ensure even cooking.
Taste and adjust seasoning with the remaining salt and pepper, if needed.
Serve the beef stew hot, either with crusty bread or over mashed potatoes for a comforting and hearty meal.
Broiling Beef
Broiling is a high-heat cooking method that quickly cooks beef, creating a flavorful, caramelized exterior while keeping the interior tender and juicy. This technique is ideal for thinner cuts of beef that benefit from fast cooking at high temperatures. By understanding the best cuts for broiling, mastering the technique, and applying expert tips, you can achieve perfectly broiled beef every time.
Ideal Cuts for Broiling
Broiling is particularly well-suited for thinner cuts of beef that cook quickly and evenly under high heat.
Flank Steak: A lean and flavorful cut, flank steak is perfect for broiling. It cooks quickly and benefits from a good sear.
Skirt Steak: Known for its intense flavor, skirt steak is another excellent choice for broiling. It’s thinner and cooks rapidly, making it ideal for this high-heat method.
Tenderloin: Although tenderloin is usually thicker, it can be broiled if sliced into thinner medallions. It’s prized for its tenderness and mild flavor.
Broiling Technique
Mastering the broiling technique involves a few critical steps to ensure that the beef is cooked perfectly and develops a beautiful, flavorful crust.
Preheat the Broiler: Begin by preheating the broiler. Make sure the broiler pan is also preheated to ensure even cooking. Position the rack so that the beef is close to the heat source, typically about 4-6 inches away. This proximity allows the beef to cook quickly and develop a nice char.
Season the Beef: Season the beef with kosher salt, freshly ground black pepper, and any other desired spices or marinades. Because broiling is a fast process, it’s important to season the meat well before cooking.
Broil: Place the seasoned beef on the preheated broiler pan. Broil the beef, turning once, until it is browned and cooked to the desired level of doneness. The cooking time will vary depending on the thickness of the cut, but generally, it takes about 3-5 minutes per side for medium-rare. Be sure to use tongs to turn the beef, as piercing it with a fork can cause juices to escape, leading to a drier final product.
Professional Tips for Broiling Beef
Monitor Closely: Broiling uses very high heat, which means the beef can cook—and potentially burn—very quickly. It’s crucial to watch the beef closely and not walk away while it’s under the broiler. Check the beef frequently and be ready to turn it or remove it from the broiler as soon as it reaches the desired doneness.
Use a Meat Thermometer: To ensure the beef is cooked to the desired level of doneness, use a meat thermometer to check the internal temperature. For medium-rare, aim for an internal temperature of 130°F (54°C).
Rest the Beef: After broiling, let the beef rest for a few minutes before slicing. This rest period allows the juices to redistribute throughout the meat, ensuring a moist and flavorful final dish.
Example Recipe:
Broiled Flank Steak:
Ingredients:
680 grams (1.5 pounds) flank steak
60 ml (1/4 cup) soy sauce
30 ml (2 tablespoons) olive oil
6 grams (2 cloves) garlic, minced
15 ml (1 tablespoon) lime juice
7 grams (1 teaspoon) honey
5 grams (1 teaspoon) salt
2 grams (1/2 teaspoon) freshly ground black pepper
Instructions:
In a bowl, mix together the soy sauce, olive oil, minced garlic, lime juice, honey, salt, and freshly ground black pepper. Place the flank steak in a resealable plastic bag and pour the marinade over it. Seal the bag, making sure the steak is well coated, and refrigerate for at least 1 hour, preferably overnight, to allow the flavors to infuse the meat.
Preheat your broiler and place the broiler pan close to the heat source, about 4-6 inches away.
Remove the steak from the marinade and let any excess marinade drip off. Place the steak on the broiler pan. Broil the steak for about 4-5 minutes per side, depending on the thickness of the steak and your preferred level of doneness.
Remove the steak from the broiler and let it rest for 5 minutes. This resting period allows the juices to redistribute throughout the meat, ensuring a juicy and flavorful steak.
Slice the flank steak thinly against the grain. This will make the meat more tender and easier to eat.
Slow Cooking Beef
Slow cooking is a method that transforms tough, large cuts of beef into tender, flavorful dishes through extended cooking times at low temperatures. This technique is ideal for creating rich, hearty meals that require minimal active preparation. By understanding the best cuts for slow cooking, mastering the technique, and applying expert tips, you can consistently produce exceptional slow-cooked beef dishes.
Ideal Cuts for Slow Cooking
Slow cooking is best suited for larger, tougher cuts of beef that benefit from long, slow cooking to break down connective tissues and develop deep flavors.
Chuck Roast: This cut is known for its rich marbling and robust flavor, making it perfect for slow cooking. Over several hours, chuck roast becomes incredibly tender and flavorful.
Brisket: A cut that requires slow cooking to reach its full potential, brisket is ideal for long, slow braises or barbecuing in a slow cooker.
Other Tough Cuts: Cuts like short ribs, round, or shank also benefit greatly from slow cooking, becoming tender and juicy over time.
Slow Cooking Technique
Mastering the slow cooking technique involves a few key steps to ensure that the beef is tender and the dish is flavorful.
Season and Place: Begin by generously seasoning the beef with kosher salt, freshly ground black pepper, and any other desired spices or herbs. Place the seasoned beef in the slow cooker along with liquid (such as broth, wine, or a combination) and aromatics (like onions, garlic, and herbs). The liquid should cover about one-third to one-half of the beef, ensuring that it stays moist during cooking.
Set and Cook: Set the slow cooker to the low setting. Slow cooking typically requires a cooking time of 6-8 hours or more, depending on the size and toughness of the cut. The beef should be cooked until it is extremely tender and easily pulls apart with a fork.
Professional Tips for Slow Cooking Beef
Tenderization: Slow cooking is particularly effective at tenderizing tough cuts of beef. The low, consistent heat breaks down collagen in the connective tissues, turning them into gelatin and resulting in a tender, melt-in-your-mouth texture.
Flavor Development: The long cooking process allows the flavors of the beef, liquid, and aromatics to meld together, creating a deep, complex flavor profile. To enhance this, consider browning the beef before placing it in the slow cooker. This step adds a layer of caramelized flavor that can deepen the overall taste of the dish.
Liquid Control: Be mindful of the amount of liquid added to the slow cooker. While some evaporation occurs during cooking, it’s minimal compared to stovetop or oven cooking. Ensure the liquid is sufficient to keep the beef moist but not so much that the dish becomes overly watery.
Timing: Slow cooking is forgiving in terms of timing, making it ideal for busy kitchens. However, be aware that overcooking, even in a slow cooker, can cause the meat to lose its texture and become mushy. Check for doneness toward the end of the recommended cooking time.
Example Recipe:
Slow-Cooked Chuck Roast:
Ingredients:
1 chuck roast (approximately 1.4-1.8 kg / 3-4 pounds)
30 ml (2 tablespoons) vegetable oil
400 grams (2 large onions), chopped
12 grams (4 cloves) garlic, minced
240 grams (4 large carrots), chopped
600 grams (4 large potatoes), cubed
480 ml (2 cups) beef broth
240 ml (1 cup) red wine
30 grams (2 tablespoons) tomato paste
2 bay leaves
1 teaspoon (2 grams) dried thyme
10 grams (2 teaspoons) salt
5 grams (1 teaspoon) freshly ground black pepper
Instructions:
Season the chuck roast generously with 10 grams of salt and 5 grams of freshly ground black pepper on all sides.
Heat the vegetable oil in a large skillet over medium-high heat. Once hot, add the chuck roast and brown it on all sides, about 3-4 minutes per side. Transfer the browned roast to a slow cooker.
In the same skillet, add the chopped onions, minced garlic, chopped carrots, and cubed potatoes. Sauté the vegetables for about 5 minutes, until they are slightly softened.
Add the beef broth, red wine, tomato paste, bay leaves, and dried thyme to the skillet. Stir to combine, bringing the mixture to a boil. Once boiling, pour the liquid and vegetables over the chuck roast in the slow cooker.
Set the slow cooker to low and cook the chuck roast for 8-10 hours, or until the beef is very tender and can be easily shredded with a fork.
Once done, serve the chuck roast with the cooked vegetables and the braising liquid for a rich, flavorful meal.
Beef Plating and Presentation: A Comprehensive Guide
Plating and presentation are essential aspects of the culinary world, especially when serving prime cuts of beef. The visual appeal of a dish not only enhances the dining experience but also showcases the chef’s skill and attention to detail. Mastering the art of beef plating and presentation is crucial for professional chefs to create dishes that are both visually stunning and delicious. This guide covers the key elements of steak plating, from choosing complementary garnishes to carving techniques, advanced plating styles, and current trends.
The Importance of Visual Appeal
The visual appeal of a dish sets the tone for the dining experience. Before a guest takes their first bite, they eat with their eyes. An attractively presented dish can heighten anticipation, elevate perceived value, and even influence how flavors are experienced. For steak dishes, this means emphasizing the texture, color, and overall presentation of the meat.
Enhancing Flavor and Presentation
Selecting the right garnishes to accompany steak is essential not only for flavor balance but also for the visual composition of the plate. Garnishes should complement the steak without overshadowing it, adding color, texture, and flavor diversity.
Color Contrast
A vibrant plate appeals more to the senses. The contrast between steak and colorful vegetables or garnishes draws attention and enhances the visual allure of the dish. Color contrast not only makes the plate visually appealing but also stimulates appetite. The harmonious use of colors emphasizes the elegance and cohesion of the dish.
Roasted Carrots and Parsnips: These add bright orange and yellow hues. Toss them in olive oil, salt, pepper, and thyme, then roast at 400°F (200°C) for about 25-30 minutes. The orange and yellow tones provide energy and vibrancy, contrasting beautifully with the dark color of the steak.
Green Beans with Almonds: Green adds freshness and contrast. Blanch the beans, then sauté with butter and toasted almonds. The bright green color balances the deep tones of the steak and adds a touch of nature.
Beetroot Puree: Beetroot adds a deep red color, creating a striking contrast with the natural brown hues of the steak. This vibrant color makes the dish look more sophisticated and visually captivating.
Bell Pepper Strips: Slices of red, yellow, and orange bell peppers add brightness to the plate. These colors create an attractive contrast with the dark steak, making the dish more appetizing.
Pickled Red Cabbage or Beets: Pickled red cabbage or beets, with their bright colors and acidic qualities, balance the richness of the steak. The purple and red tones add a sophisticated touch to the plate.
The vegetables and garnishes used to create color contrast enrich the overall composition of the plate and ensure each component stands out. The harmony and contrast between colors heighten the diner’s interest in the dish, making the flavor experience more enjoyable.
Texture Variety
The contrast in texture between the steak and its garnishes makes each bite engaging and prevents the dish from becoming monotonous. Texture variety allows each component of the dish to offer its unique contribution, creating both mouthfeel and visual richness.
Creamy Mashed Potatoes: Boil Yukon Gold potatoes, mash with butter and cream, and add garlic for a smooth, rich complement to the steak. The creamy, soft texture balances the hearty, meaty bite of the steak.
Crispy Roasted Potatoes: These add a crunchy contrast to the tender steak. Quarter the potatoes, toss with olive oil, rosemary, and garlic, then roast until crispy. The crispy texture provides a delightful counterpoint to the tenderness of the steak.
Fresh Salad: A fresh and tangy salad of arugula, spinach, and frisée mixed with a light lemon vinaigrette offers a refreshing contrast. The crisp, light texture of the salad adds a lightness to the steak, keeping the dish balanced.
Caramelized Onions: Soft, sweet caramelized onions provide a delightful contrast to the savory, rich flavor of the steak. The soft texture enhances the overall richness of each bite.
Roasted Nuts (Hazelnuts or Almonds): Roasted nuts add an extra layer of crunch to the plate. These crispy elements, balanced with creamy and soft components, create a diverse texture experience with every bite.
Foam or Espuma: A light foam adds visual intrigue and texture variety. For instance, a truffle mushroom espuma can bring lightness and elegance to the intense flavors of the steak.
Baked Celery Root or Sweet Potato Chips: Thinly sliced and baked celery root or sweet potato chips add extra crunch, providing a pleasant contrast to softer components.
Texture variety not only prevents a dish from being monotonous but also ensures that each component delivers a unique mouthfeel. The combination of creamy, crispy, soft, and firm textures keeps the dish balanced and engaging, allowing diners to experience something new with every bite.
Flavor Balance
Garnishes should balance the richness of the steak. The accompaniments served with a rich, fatty steak should complete the overall flavor profile of the plate, making the dish more balanced. Flavor balance ensures that all components work harmoniously, allowing diners to experience a range of tastes with each bite.
Tangy Coleslaw: A vinegar-based coleslaw adds a sharp contrast to fatty cuts like ribeye. Its acidic and tangy nature cuts through the steak’s richness, cleansing the palate and ensuring each bite remains fresh and balanced. Made with vinegar and mustard, a tangy coleslaw pairs excellently with fatty, intense-flavored meats.
Sweet Potato Puree: Natural sweetness pairs well with the savory taste of steak and adds balance. Sweet potato puree provides a sweet contrast to the deep, intense flavors of the steak, making the dish more intriguing. This sweetness highlights the steak’s salty and umami characteristics, making the flavors more pronounced.
Lemon Asparagus: The slightly bitter taste of asparagus combined with the fresh flavor of lemon lightens the richness of the steak and helps balance the flavors. The acidity of the lemon balances the steak’s fatty texture, refreshing the dish.
Balsamic Roasted Beets: The natural sweetness of beets pairs well with the rich flavor of steak, and the acidic touch of balsamic vinegar ensures that the flavors are layered and balanced. This garnish provides both sweet and acidic notes, adding sophistication to the dish.
Apple and Fennel Salad: Thinly sliced apple and fennel, with their light sweetness and anise flavor, provide a fresh contrast to the savory steak. The light sweetness of the apple and the sharp aroma of the fennel enrich the overall flavor profile and make the dish more interesting.
Orange and Honey Glazed Carrots: The natural sweetness of carrots, enhanced with orange and honey, creates a fruity contrast to the deep umami flavors of the steak. This type of garnish adds multiple layers of flavor, making the dish more balanced.
Flavor balance ensures that a dish is not only delicious but also that each component complements the others. The combination of acidic, sweet, sharp, and savory elements creates a balanced dish that appeals to the diner’s palate. This balance makes rich and fatty dishes like steak more approachable and enjoyable, allowing guests to discover different flavors with each bite.
Carving: Precision and Presentation
Proper carving techniques ensure that each bite of beef is tender, flavorful, and visually appealing. Understanding how to carve beef correctly can greatly influence the final presentation of the dish.
Carving Technique
Identify the Grain: The grain refers to the direction of the muscle fibers in the meat. Cutting against the grain shortens these fibers, making the meat more tender and easier to chew.
Position the Knife: Hold the knife perpendicular to the grain. This ensures that each slice is tender.
Slice Thinly: Use smooth, even strokes to cut thin slices. This technique helps to showcase the interior of the beef and makes the meat more tender.
Maintain Consistency: Ensure each slice is of uniform thickness to provide a consistent eating experience. Uniformity also enhances the visual appeal of the dish.
Presentation Techniques: Arranging the Perfect Plate
How you arrange the components on a plate significantly affects the overall impression of the dish. Effective presentation involves not just placing the food on the plate, but doing so in a way that is aesthetically pleasing and highlights the quality of the ingredients.
Neat Arrangement
Slight Overlapping: Lay the slices of beef slightly overlapping each other. This showcases the meat’s interior color and texture while creating a sense of abundance.
Balanced Plate: Distribute sides evenly around the beef. Consider color and texture harmony when placing vegetables, starches, and sauces.
Add Height: Use garnishes or stack elements to add height, making the dish more visually interesting. For instance, place the beef on a bed of mashed potatoes or layer vegetables under the meat to create dimension.
Advanced Techniques: Elevating Your Presentation
For professional chefs, mastering the basics of plating and presentation is just the beginning. Advanced techniques such as sauce pairing, creative plating styles, and contemporary trends can take your dishes to the next level.
Sauce Pairing
Pairing the right sauce with beef can significantly enhance its flavor profile and complement the dish’s overall composition.
Red Wine Reduction: Simmer red wine with beef stock, shallots, and thyme until reduced by half. Strain the sauce and swirl in butter for a glossy finish that adds depth to the beef.
Bearnaise Sauce: A rich, buttery sauce flavored with tarragon and shallots, perfect for tenderloin or filet mignon. Its creamy texture and subtle acidity complement the tenderness of the beef.
Peppercorn Sauce: Combine heavy cream, brandy, and crushed peppercorns for a creamy, spicy accompaniment that pairs well with robust cuts like ribeye or strip steak.
Contemporary Plating Techniques and Trends
Staying current with plating trends is essential for a CDP in a fine dining setting. Contemporary plating styles focus on creativity, precision, and the use of new tools and techniques to create unique dining experiences.
Minimalism and Negative Space: Modern plating often embraces minimalism, emphasizing fewer components on the plate and making effective use of negative space. This technique draws attention to the key elements, highlighting the beef as the star of the dish.
Geometric Shapes and Patterns: Utilizing ring molds, square cutters, or even custom stencils can create precise geometric shapes on the plate. Sauces can be applied in lines, circles, or dots to add a modern and artistic flair.
Layering and Stacking: Creating layers or stacks with components adds dimension and depth to the plate. For example, stacking roasted vegetables beneath the beef or using ring molds to create a compact side element can add height and visual interest.
Textures and Contrasts: Combining different textures on the plate is a key contemporary trend. Think of incorporating crispy elements, foams, gels, and creamy sauces to provide an array of mouthfeel experiences, making each bite intriguing.
Micro Herb Gardens: Instead of a simple garnish, creating a small “micro herb garden” on the plate using various herbs, edible flowers, and microgreens can make the presentation feel more alive and dynamic.
Interactive Elements: Some modern dishes incorporate interactive elements, such as sauces poured tableside or smoked cloches that release aromatic smoke when lifted. These elements add a theatrical component to the dining experience, making it memorable.
Natural and Organic Presentation: Presenting beef dishes in a natural way, such as on wooden boards, stone slabs, or slate plates, has become popular. This trend emphasizes a connection with nature and provides a rustic yet sophisticated feel.
Colorful Accents: Adding bright, contrasting colors through sauces, purees, or garnishes helps to make the dish more visually engaging. Beetroot puree, carrot gel, or green herb oils are great options for adding a pop of color.
Garnishes: Elevating the Dish
Garnishing is an art form that goes beyond mere decoration. The right garnish enhances the overall flavor, adds textural contrast, and improves the dish’s presentation, making it more appealing and appetizing.
Herb Sprigs: Fresh herbs like rosemary, thyme, parsley, or basil add a pop of color and a pleasant aroma, while also complementing the flavor profile of the steak.
Microgreens: These young, fresh greens not only add color but also offer a fresh, slightly peppery flavor that enhances the dish.
Edible Flowers: Bright-colored edible flowers like nasturtium, pansies, or violets provide a unique and attractive visual element, making the dish stand out.
Reduction Sauces: A good reduction sauce adds shine and an intense burst of flavor. Drizzling it over or around the steak can elevate the entire presentation.
Roasted Vegetables: Roasted vegetables like carrots, beets, or asparagus add color and texture, making the plate more interesting.
Toasted Nuts: Roasted nuts such as hazelnuts, almonds, or walnuts add both texture and flavor diversity to the plate, providing a crunchy contrast.
Garnishing Techniques
Placement: Strategic placement of garnishes is crucial. Herbs and greens should be placed away from the heat of the steak to prevent wilting. For example, place a rosemary sprig on the side of the plate rather than directly on the hot meat.
Quantity: Garnishes should complement the dish without overwhelming it. Use them sparingly to maintain balance and keep the focus on the steak.
Balance: Ensure that garnishes are visually and flavor-wise harmonious with the main components of the dish. For example, lightly drizzling a balsamic reduction around a filet of steak can add visual interest and a sharp contrast to the rich meat.
Plating Styles: Creating the Perfect Plate
The plating style significantly impacts the overall impression of the dish. Different plating styles reflect various presentation methods and dining experiences. Experimenting with different techniques and styles helps chefs express their creativity and make each dish special.
Classic Plating
The classic plating style offers a traditional and balanced look. This style involves arranging all components of the dish around a central point with an emphasis on symmetry. The steak is placed in the center of the plate, with garnishes arranged symmetrically around it, giving a visually organized and elegant appearance.
Center-Focused: The steak is positioned in the center of the plate, surrounded by garnishes. This arrangement emphasizes the main component of the dish.
Symmetry: Symmetrical placement of garnishes gives the plate a balanced look.
Separate Garnish Presentation: Each garnish occupies its area, making each component distinct. This provides a visually clean and easy-to-eat presentation.
Modern Plating
Modern plating focuses on minimalism and the effective use of negative space. This style offers a more sophisticated and contemporary appearance. Presenting the dish with fewer components allows the main elements to shine, creating a sleek visual aesthetic.
Use of Negative Space: Intentional use of space makes the dish appear more refined, drawing attention to the main components.
Minimalist Garnishes: Garnishes are few and carefully selected. Simple yet effective garnishes contribute to the dish’s aesthetic.
Geometric Arrangements: Geometric shapes are often used in modern plating. Sauces can be applied in lines or dots, while garnishes may be arranged using ring molds or square cutters.
Rustic Plating
Rustic plating emphasizes a natural and relaxed presentation of the dish. This style promotes generous serving sizes, creating a warm and inviting atmosphere. The more casual arrangement of components helps the dish feel homely and traditional.
Generous Presentation: The steak and garnishes are arranged to make the plate look full. This presentation offers guests a generous and satisfying dining experience.
Natural Arrangement: Garnishes and other components are placed more freely and organically, giving the dish a relaxed vibe.
Wood or Stone Plates: Wooden boards or stone plates are often used in rustic presentations. These serving elements emphasize a connection with nature and add an authentic touch to the dish.
Using Height and Layers
Height and layers can make a plate look more dynamic and engaging. This technique is often achieved by layering garnishes on or around the steak. Placing components at different heights makes the dish appear more three-dimensional and visually appealing.
Layering: Placing garnishes on top of or underneath the steak adds depth to the dish. For example, adding caramelized onions on top of the steak or placing mashed potatoes underneath makes the plate more interesting.
Adding Height: Vegetables or garnishes can be stacked to create height. This prevents the plate from looking flat and contributes to a more professional presentation.
Garnishes of Different Sizes: Using garnishes of various sizes adds visual variety to the plate. From small microgreens to large vegetable pieces, different sizes make the plate look dynamic.
Asymmetrical Plating
Asymmetrical plating involves asymmetrically placing components to create a more dynamic and intriguing presentation. This style reflects a modern and creative approach, offering a striking presentation.
Maintaining Balance: Balance is key in asymmetrical arrangements. While the components are not symmetrical, there should still be visual harmony among all elements on the plate.
Creating a Focal Point: The main component, such as the steak, can be placed at a specific corner of the plate, with garnishes distributed to support this focal point.
Sauce and Decorative Elements: Sauces and decorative garnishes play a significant role in asymmetrical plating. Sprinkling sauce on one side of the plate or applying it in dots enhances the visual dynamics.
Plating with Color and Texture Layers
Color and texture layers are used to make a plate more vibrant and interesting. This style aims to visually enrich the plate by combining components of different colors and textures.
Color Layers: Using garnishes of various colors adds depth and vibrancy to the plate. For instance, red beets, orange carrots, and green beans create an appealing contrast against the dark color of the steak.
Texture Layers: Combining creamy, crispy, soft, and firm textures keeps the dish interesting. For example, serving a creamy puree, crispy potatoes, and a fresh salad alongside the steak ensures each bite offers a unique mouthfeel.
Balanced Distribution: A balanced distribution of color and texture layers ensures the plate looks aesthetically pleasing. Each component’s color and texture should harmonize with the others.
Plating and presentation are some of the most important aspects where a chef’s creativity and skill shine in gastronomy. Careful use of elements like color contrast, texture variety, flavor balance, and different plating styles can make a steak dish not only delicious but also visually captivating. The techniques and styles discussed in this guide will help chefs enhance their plating skills and provide guests with an unforgettable dining experience.
Essential Skills
A Chef de Partie (CDP) in a fine dining restaurant must possess a combination of technical skills, creativity, and attention to detail to execute plating and presentation at the highest level. Below are essential skills and knowledge areas for a CDP:
Understanding Plating Principles
Balance and Composition: A CDP must understand how to balance different elements on the plate, considering the ratio of protein, vegetables, and starches to achieve harmony.
Color Theory: Knowledge of color theory helps in selecting components that create an attractive and vibrant plate. Using complementary colors can enhance the visual appeal.
Negative Space: The effective use of negative space can make a dish look more refined and elegant. A CDP must learn when less is more.
Advanced Knife Skills
Precision Cutting: Accurate and consistent knife cuts are crucial in a fine dining setting. This includes brunoise, julienne, and chiffonade cuts that add a polished touch to the presentation.
Carving Techniques: Knowing how to properly carve different cuts of beef is essential. Each cut has unique characteristics that require specific carving methods to enhance tenderness and presentation.
Temperature Control
Resting Meat: Understanding the importance of resting beef before slicing ensures that the juices are redistributed, leading to a more flavorful and visually appealing dish.
Heat Management: A CDP must know how to control the temperature of sauces and sides to ensure they are served at the optimal temperature without compromising the integrity of the garnishes or presentation.
Mastering Sauces and Garnishes
Sauce Consistency: The consistency of a sauce can affect its presentation. A CDP should be adept at creating sauces with the perfect texture to either drizzle or pool on the plate.
Garnish Preparation: Preparing garnishes that are not only aesthetically pleasing but also contribute to the flavor profile is key. Garnishes must be fresh and precisely cut.
Plating Tools and Techniques
Use of Tools: Familiarity with fine dining plating tools, such as squeeze bottles, tweezers, and ring molds, allows a CDP to execute intricate plating designs effectively.
Plating Under Pressure: Fine dining service can be fast-paced. A CDP must be able to plate dishes consistently under pressure, ensuring every plate looks identical and meets the restaurant’s standards.
Hygiene and Cleanliness
Clean Plating: Ensuring that plates are wiped clean of any drips or smudges before they leave the pass is critical in fine dining. A clean plate demonstrates professionalism and attention to detail.
Workstation Organization: Maintaining an organized and clean workstation is essential to ensure efficiency during plating and to avoid any contamination that could affect the presentation.
Final Tips for Professional Presentation
Experiment with Presentation: Don’t be afraid to try different arrangements, garnishes, and plating styles. Experimentation can lead to discovering new, exciting ways to present your dishes.
Taste and Adjust: Always taste your garnishes, sauces, and sides to ensure they complement the beef. Adjust seasoning or presentation elements as needed to achieve the perfect balance.
Focus on Details: Small details, such as the uniformity of cuts, the cleanliness of the plate, and the strategic placement of garnishes, can make a significant difference in the final presentation. Attention to these details sets professional chefs apart.
Poultry, such as chicken, turkey, and duck, is a staple in many diets worldwide due to its versatility and nutritional benefits. Understanding the nutritional aspects of poultry can help in making informed dietary choices and optimizing health benefits. Here’s an in-depth look at the nutritional benefits of poultry:
Nutritional Benefits
Poultry is celebrated for its nutritional profile, offering a range of benefits that make it an excellent choice for a balanced diet.
Versatility: Poultry can be prepared in numerous ways, catering to different culinary preferences and dietary needs. It fits well into a variety of dietary plans, including low-fat, high-protein, and weight management diets.
Balanced Nutrition: It provides a good balance of macronutrients (protein and fat) and is low in carbohydrates, making it suitable for low-carb and keto diets.
High-Quality Protein
Complete Protein: Poultry is a complete protein source, meaning it contains all nine essential amino acids that the body cannot produce on its own. These amino acids are crucial for muscle repair and growth, enzyme and hormone production, and overall body maintenance.
Muscle Building: Due to its high protein content, poultry is ideal for athletes and those looking to build or maintain muscle mass. For example, a 100-gram serving of chicken breast provides approximately 31 grams of protein.
Satiety: High-protein foods like poultry can help with satiety, keeping you full longer and potentially aiding in weight management by reducing overall calorie intake.
Low in Fat
Lean Cuts: Certain cuts of poultry, especially chicken and turkey breast, are particularly low in fat, making them a healthy option for those looking to reduce their fat intake. For example, a 100-gram serving of skinless chicken breast contains only about 3.6 grams of fat.
Saturated Fat: Poultry generally contains less saturated fat compared to red meat, which can be beneficial for heart health when consumed as part of a balanced diet.
Skin Removal: Removing the skin can significantly reduce the fat content. For example, removing the skin from chicken can reduce the fat content by about half.
Rich in Vitamins and Minerals
B Vitamins: Poultry is an excellent source of B vitamins, particularly B3 (niacin), B6 (pyridoxine), and B12 (cobalamin). These vitamins play essential roles in energy metabolism, brain function, and red blood cell formation.
Niacin (B3): Important for DNA repair and the metabolism of fats and sugars.
Vitamin B6: Crucial for amino acid metabolism and neurotransmitter synthesis.
Vitamin B12: Essential for nerve function and the production of DNA and red blood cells.
Minerals: Poultry provides essential minerals such as zinc, phosphorus, and selenium.
Zinc: Supports immune function, wound healing, and DNA synthesis.
Phosphorus: Important for healthy bones and teeth, as well as energy production.
Selenium: Acts as an antioxidant and plays a role in thyroid function.
Iron: While poultry contains less iron than red meat, it still provides a significant amount, particularly in dark meat. Iron is essential for transporting oxygen in the blood and preventing anemia.
Poultry is a nutritionally rich food that offers high-quality protein, is low in fat (particularly when skinless), and is packed with essential vitamins and minerals. Incorporating poultry into your diet can support muscle growth, provide sustained energy, and contribute to overall health and wellness. By understanding the nutritional benefits of poultry, you can make informed choices that align with your dietary goals and needs.
Breaking Down Poultry
Breaking down poultry is a valuable skill that allows you to get the most out of a whole bird, saving money and providing a variety of cuts for different cooking methods. Here’s a detailed guide on the key aspects of breaking down poultry, including cuts, tools, steps, tips, and safety.
Poultry Cuts
Understanding the different cuts of poultry helps in utilizing each part effectively for various recipes.
Breasts
Description: The breast is the largest cut of meat on a bird, known for its lean and tender texture.
Uses: Ideal for grilling, roasting, sautéing, and poaching. It’s often used in dishes like chicken breast fillets, stuffed chicken breasts, and chicken salads.
Thighs and Drumsticks
Description: Thighs (upper part of the leg) and drumsticks (lower part of the leg) are darker meat cuts with more fat and flavor.
Uses: Suitable for roasting, grilling, braising, and frying. These cuts are perfect for dishes like coq au vin, fried chicken, and barbecued drumsticks.
Wings
Description: Wings are small, flavorful cuts that include the drumette, wingette (flat), and wing tip.
Uses: Best for grilling, baking, and frying. Popular in appetizers and snacks like buffalo wings and honey-glazed wings.
Tools You’ll Need for Poultry Cuts
Having the right tools is essential for efficiently breaking down poultry.
Sharp Chef’s Knife or Boning Knife: A sharp, flexible knife allows for precise cuts.
Cutting Board: Use a sturdy, non-slip cutting board.
Kitchen Shears: Helpful for cutting through bone and joints.
Paper Towels: For cleaning and gripping the bird.
Towel or Damp Cloth: Placed under the cutting board to prevent slipping.
Steps for Breaking Down Poultry
Follow these steps to break down a whole bird into its primary cuts:
Step 1: Remove the Legs
Positioning: Place the bird breast-side up.
Cutting: Pull one leg away from the body and make a cut through the skin between the leg and the body.
Dislocating the Joint: Bend the leg back until the joint pops, then cut through the joint to remove the leg. Repeat with the other leg.
Separating Thigh and Drumstick: Separate the thigh from the drumstick by bending the leg and cutting through the joint.
Step 2: Remove the Wings
Pulling: Pull each wing away from the body.
Cutting: Cut through the joint where the wing attaches to the breast.
Step 3: Remove the Backbone
Positioning: Place the bird breast-side down.
Cutting: Use kitchen shears to cut along both sides of the backbone and remove it.
Step 4: Split the Breast
Positioning: Place the bird breast-side up.
Cutting: Use a knife to cut down the center of the breastbone to split the breast into two halves.
Portioning: You can further cut each half into smaller portions if needed.
Step 5: Trim and Clean
Removing Excess Fat and Skin: Trim any excess fat or skin from the pieces.
Cleaning: Clean the pieces as necessary.
Tips for Breaking Down Poultry
Use Sharp Tools: Always use sharp knives and shears to make clean cuts and reduce the risk of injury.
Stabilize Your Work Area: Ensure your cutting board is stable to prevent slipping.
Work Methodically: Follow a consistent method to ensure you get the most meat from the bird.
Practice: Breaking down poultry efficiently takes practice. Don’t be discouraged if your first few attempts are a bit messy.
Safety and Storage
Safety
Sanitize: Clean your cutting board, knives, and work surfaces thoroughly with hot, soapy water to prevent cross-contamination.
Hand Washing: Wash your hands before and after handling raw poultry.
Storage
Refrigeration: Store raw poultry in the refrigerator at or below 40°F (4°C) and use it within 1-2 days.
Freezing: For longer storage, freeze poultry. Wrap it tightly in plastic wrap, aluminum foil, or freezer bags to prevent freezer burn. Properly stored poultry can last up to 9 months in the freezer.
Labeling: Label and date all stored poultry to keep track of its freshness.
Chicken Level 2: Advanced Cooking Techniques and Proper Handling
Understanding various cooking methods for chicken, proper cooking temperatures, and the importance of resting time can help ensure that your chicken dishes are both safe to eat and delicious. Here’s a detailed guide:
Basic Cooking Methods for Chicken
Chicken is incredibly versatile and can be cooked using various methods, each bringing out different flavors and textures.
Roasting Chicken
Description: Roasting involves cooking chicken in an oven, typically at a high temperature, to achieve a crispy skin and juicy interior.
Technique:
Preheat the oven to 375°F to 450°F (190°C to 230°C), depending on the size of the chicken.
Season the chicken inside and out with salt, pepper, and herbs.
Place the chicken on a roasting rack in a pan to allow air circulation.
Roast until the internal temperature reaches 165°F (74°C) in the thickest part of the thigh.
Description: Boiling involves cooking chicken in water or broth at a rolling boil, while poaching cooks chicken gently in simmering liquid just below the boiling point.
Technique:
For boiling, bring a pot of water or broth to a rolling boil, add the chicken, and cook until done.
For poaching, bring the liquid to a gentle simmer, add the chicken, and cook until the internal temperature reaches 165°F (74°C).
Uses: Chicken for soups, salads, and sandwiches; poached chicken breasts.
Proper Cooking Temperatures for Chicken
Cooking chicken to the correct internal temperature is essential for achieving the desired doneness while ensuring the meat is safe to eat. Here are the recommended internal temperatures for chicken:
Whole Chicken and Parts (Breasts, Thighs, Drumsticks, and Wings): 165°F (74°C)
Ground Chicken: 165°F (74°C)
Importance of Resting Time
Why Rest Chicken?
Purpose: Resting allows the juices in the chicken, which have been driven to the center by the heat of cooking, to redistribute throughout the meat. This process results in a more uniformly juicy and tender meal.
Benefits: Without resting, cutting into the chicken immediately after cooking would result in a significant loss of juices, leading to a drier, less flavorful meal.
How Long to Rest Chicken
Whole Chicken: Rest for about 15-20 minutes before carving.
Chicken Parts: Rest for about 5-10 minutes before serving.
Safety and Handling
Safety
Cross-Contamination: Avoid cross-contamination by using separate cutting boards and utensils for raw and cooked chicken. Always wash hands, utensils, and surfaces with hot soapy water after they come in contact with raw chicken.
Cooking to Safe Temperatures: Use a meat thermometer to ensure chicken reaches the safe minimum internal temperature to eliminate harmful bacteria.
Storage
Refrigeration: Store raw chicken in the refrigerator at or below 40°F (4°C) and use within 1-2 days.
Freezing: For longer storage, freeze chicken. Wrap it tightly in plastic wrap, aluminum foil, or freezer bags to prevent freezer burn. Properly stored chicken can last up to 9 months in the freezer.
Thawing: Thaw frozen chicken in the refrigerator, under cold water in a sealed bag, or in the microwave if you plan to cook it immediately after thawing.
Advanced Chicken Recipes
Here are a few recipes to try your advanced chicken cooking skills:
Heat olive oil and butter in a skillet over medium-high heat.
Add the chicken breasts and sear for 5-7 minutes per side or until the internal temperature reaches 165°F (74°C).
Add fresh herbs and garlic to the pan during the last few minutes of cooking for added flavor.
Let rest for 5 minutes before serving.
Poached Chicken Breasts
Ingredients: Chicken breasts, water or chicken broth, bay leaf, peppercorns, fresh herbs (parsley, thyme), lemon slices.
Method:
Bring water or chicken broth to a simmer in a large pot.
Add bay leaf, peppercorns, fresh herbs, and lemon slices.
Add the chicken breasts and poach gently for 15-20 minutes or until the internal temperature reaches 165°F (74°C).
Remove the chicken breasts from the liquid and let rest for 5 minutes before slicing.
Proper Cooking Temperatures for Chicken
Ensuring chicken is cooked to the correct internal temperature is crucial for both safety and quality. Here’s a detailed guide on proper cooking temperatures for various cuts of chicken and how to measure them effectively.
Importance of Proper Cooking Temperatures
Safety: Cooking chicken to the proper temperature is essential to kill harmful bacteria such as Salmonella and Campylobacter, which can cause foodborne illnesses.
Quality: Achieving the right temperature also ensures that the chicken is tender and juicy. Overcooking can lead to dry, tough meat, while undercooking poses health risks.
Recommended Internal Temperatures
Whole Chicken: Cook to an internal temperature of 165°F (74°C). Measure at the thickest part of the thigh without touching the bone.
Chicken Breasts: Cook to an internal temperature of 165°F (74°C). Insert the thermometer into the thickest part of the breast.
Chicken Thighs and Drumsticks: Cook to an internal temperature of 165°F (74°C). Insert the thermometer into the thickest part of the thigh or drumstick, avoiding the bone.
Ground Chicken: Cook to an internal temperature of 165°F (74°C). This applies to patties, meatballs, and any dishes using ground chicken.
Chicken Wings: Cook to an internal temperature of 165°F (74°C). Insert the thermometer into the thickest part near the bone.
Using a Meat Thermometer
Types of Thermometers:
Digital Instant-Read Thermometer: Provides quick, accurate readings and is inserted into the thickest part of the meat.
Dial Oven-Safe Thermometer: Can be left in the chicken during roasting but takes longer to read.
Probe Thermometer with Alarm: Useful for monitoring temperature without opening the oven, as it sounds an alarm when the desired temperature is reached.
How to Measure:
Insert Correctly: Place the thermometer probe into the thickest part of the chicken without touching bone, fat, or gristle.
Multiple Spots: Check the temperature in several spots to ensure even cooking, especially for whole chickens or large pieces.
Carryover Cooking
Definition: Carryover cooking refers to the phenomenon where the meat continues to cook after being removed from the heat source.
Impact on Temperature: The internal temperature can rise by 5-10°F (3-6°C) while the chicken rests.
Adjust for Carryover: To account for carryover cooking, you can remove the chicken from heat when it reaches slightly below the target temperature (e.g., 160°F/71°C) and let it rest.
Resting Chicken
Purpose: Resting allows the juices to redistribute throughout the meat, making it more flavorful and moist.
Duration: Let the chicken rest for 5-10 minutes for small cuts and 10-20 minutes for whole birds or large pieces.
Method: Tent the chicken loosely with aluminum foil to keep it warm without trapping steam.
Turkey Level 2
Understanding the various cooking methods for turkey, maintaining safety and hygiene, and ensuring proper cooking temperatures are crucial for preparing a delicious and safe meal. Here’s a detailed guide with recipes included:
Basic Cooking Methods for Turkey
Turkey can be cooked in several ways, each bringing out different flavors and textures. Here are the most popular methods:
Roasting Turkey
Description: Roasting is a traditional method that involves cooking the turkey in an oven, typically resulting in a golden-brown, crispy skin and juicy meat.
Technique:
Preheat the oven to 325°F (163°C).
Season the turkey inside and out with salt, pepper, and your choice of herbs.
Place the turkey on a roasting rack in a pan, breast-side up.
Roast until the internal temperature reaches 165°F (74°C) in the thickest part of the thigh.
Baste occasionally with pan juices to keep the meat moist.
Roasted Turkey Recipe:
Ingredients:
1 whole turkey (12-14 lbs)
1/4 cup olive oil or melted butter
Salt and pepper
Fresh herbs (thyme, rosemary, sage)
1 lemon, quartered
1 onion, quartered
4 garlic cloves, smashed
Instructions:
Preheat the oven to 325°F (163°C).
Rinse the turkey and pat it dry with paper towels.
Rub the turkey with olive oil or melted butter, then season generously with salt and pepper.
Stuff the cavity with fresh herbs, lemon, onion, and garlic.
Place the turkey on a roasting rack in a pan, breast-side up.
Roast the turkey, basting occasionally with pan juices.
Cook until the internal temperature reaches 165°F (74°C) in the thickest part of the thigh.
Let the turkey rest for 20-30 minutes before carving.
Grilling Turkey
Description: Grilling turkey imparts a smoky flavor and can be done using a gas or charcoal grill.
Technique:
Preheat the grill to medium-high heat.
Season the turkey and oil the grill grates to prevent sticking.
Place the turkey breast-side up on the grill over indirect heat.
Grill with the lid closed, maintaining a consistent temperature, until the internal temperature reaches 165°F (74°C) in the thickest part of the thigh.
Heat oil in a large pot or turkey fryer to 350°F (175°C).
Rinse the turkey and pat it dry with paper towels. Ensure it’s completely thawed.
Rub the turkey with the dry rub all over.
Lower the turkey slowly into the hot oil using a fryer basket or rack.
Fry for about 3-4 minutes per pound, or until the internal temperature reaches 165°F (74°C) in the thickest part of the thigh.
Carefully remove the turkey and let it rest for 20-30 minutes before carving.
Spatchcocking Turkey
Description: Spatchcocking involves removing the backbone and flattening the turkey, allowing it to cook more evenly and quickly.
Technique:
Using kitchen shears, remove the backbone by cutting along both sides.
Flip the turkey breast-side up and press down firmly to flatten it.
Season and roast or grill the turkey, cooking until the internal temperature reaches 165°F (74°C).
Spatchcocked Roast Turkey Recipe:
Ingredients:
1 whole turkey (12-14 lbs)
2 tbsp olive oil or melted butter
Salt and pepper
Fresh herbs (thyme, rosemary, sage)
Instructions:
Preheat the oven to 425°F (220°C).
Using kitchen shears, remove the backbone by cutting along both sides.
Flip the turkey breast-side up and press down firmly to flatten it.
Rub the turkey with olive oil or melted butter, then season generously with salt, pepper, and fresh herbs.
Place the turkey on a roasting rack in a pan, breast-side up.
Roast the turkey until the internal temperature reaches 165°F (74°C) in the thickest part of the thigh.
Let the turkey rest for 20-30 minutes before carving.
Safety and Hygiene for Turkey
Maintaining safety and hygiene when handling turkey is essential to prevent foodborne illnesses.
Thawing
Thaw the turkey in the refrigerator, in a cold water bath (changing the water every 30 minutes), or in the microwave. Never thaw at room temperature.
Handling
Wash your hands, utensils, and surfaces thoroughly after handling raw turkey to prevent cross-contamination.
Stuffing
If stuffing the turkey, ensure the stuffing also reaches an internal temperature of 165°F (74°C).
Proper Cooking Temperatures for Turkey
Cooking turkey to the correct internal temperature is essential for ensuring both safety and optimal taste. Properly cooked turkey is juicy, flavorful, and free from harmful bacteria. Here’s a comprehensive guide on achieving the right cooking temperatures for different parts of the turkey.
Recommended Internal Temperatures
Whole Turkey: Cook to an internal temperature of 165°F (74°C) in the thickest part of the thigh, not touching the bone. This ensures the dark meat is cooked through and the juices run clear.
Turkey Breast: Cook to an internal temperature of 165°F (74°C). Insert the thermometer into the thickest part of the breast to check.
Ground Turkey: Cook to an internal temperature of 165°F (74°C). This applies to turkey burgers, meatballs, and any dish using ground turkey.
Stuffed Turkey: If cooking a stuffed turkey, ensure that the center of the stuffing also reaches 165°F (74°C) to prevent any risk of foodborne illness.
Using a Meat Thermometer
A reliable meat thermometer is the best tool to ensure your turkey reaches the proper temperature.
Types of Thermometers
Digital Instant-Read Thermometer: Provides quick and accurate readings and is easy to use.
Dial Oven-Safe Thermometer: Can be left in the turkey while it cooks, but it takes longer to read.
Probe Thermometer with Alarm: Allows you to monitor the temperature without opening the oven, sounding an alarm when the desired temperature is reached.
How to Measure
Thickest Part of the Thigh: Insert the thermometer into the thickest part of the thigh, without touching the bone. This area is the last to cook through and ensures the dark meat is fully cooked.
Thickest Part of the Breast: Check the thickest part of the breast to confirm that the white meat is also cooked to 165°F (74°C).
Stuffing: If the turkey is stuffed, insert the thermometer into the center of the stuffing to ensure it has reached 165°F (74°C).
Carryover Cooking
Definition: Carryover cooking refers to the phenomenon where the turkey continues to cook after being removed from the heat source. The internal temperature can rise by about 5-10°F (3-6°C).
Impact: To account for carryover cooking, you can remove the turkey from the oven when it reaches slightly below the target temperature (e.g., 160°F/71°C) and let it rest.
Resting Time for Turkey
Purpose: Resting the turkey allows the juices to redistribute throughout the meat, resulting in a moister and more flavorful turkey.
Duration: Let the turkey rest for 20-30 minutes after removing it from the oven. This resting period makes carving easier and ensures the meat stays juicy.
Method: Tent the turkey loosely with aluminum foil to keep it warm without trapping steam, which can make the skin soggy.
About Game Birds
Game birds are wild birds that are hunted for sport and food. They offer a distinct flavor and texture compared to domesticated poultry, often described as richer and more flavorful. Here’s an overview of various types of game birds, including their characteristics and culinary uses.
Types of Game Birds
Game birds include a variety of species, each with unique flavors and culinary potential. Here are some of the most popular game birds:
About Pheasant
Description: Pheasants are medium-sized birds with lean meat and a delicate flavor that is slightly sweet and gamey.
Characteristics: The meat is light in color, similar to chicken but with a richer taste. Pheasants have relatively little fat, which can make the meat dry if not cooked carefully.
Culinary Uses: Pheasant is often roasted, braised, or grilled. It pairs well with fruits and robust herbs. Popular dishes include pheasant stew, roast pheasant, and pheasant pie.
About Quail
Description: Quails are small birds known for their tender meat and mild, slightly gamey flavor.
Characteristics: The meat is dark and delicate, making it very tender and succulent when cooked properly. Due to their small size, they cook quickly.
Culinary Uses: Quail is typically grilled, roasted, or stuffed and baked. They are often served whole due to their size, making an elegant presentation. Popular dishes include grilled quail, quail with grape sauce, and stuffed quail.
About Duck
Description: Ducks are larger than most other game birds and have a rich, distinctive flavor due to their higher fat content.
Characteristics: Duck meat is dark and fatty, providing a rich and moist texture. The skin crisps up beautifully when cooked properly.
Culinary Uses: Duck is versatile and can be roasted, grilled, braised, or confit. It pairs well with fruit sauces, especially orange and cherry. Popular dishes include roast duck, duck à l’orange, and duck confit.
About Grouse
Description: Grouse are small, plump birds with a strong, gamey flavor.
Characteristics: The meat is dark and very lean, with a robust flavor that reflects their wild diet. Grouse meat can be quite tough and benefits from slow cooking methods.
Culinary Uses: Grouse is typically roasted or braised. It pairs well with hearty ingredients like bacon, mushrooms, and juniper berries. Popular dishes include roast grouse, grouse pie, and braised grouse.
About Partridge
Description: Partridges are small to medium-sized birds with a delicate, slightly sweet flavor.
Characteristics: The meat is light and tender, with a flavor that is less gamey compared to other game birds. Partridge has relatively low fat content.
Culinary Uses: Partridge is often roasted or braised and pairs well with fruits and light herbs. Popular dishes include roast partridge, partridge stew, and partridge with pears.
About Woodcock
Description: Woodcock are small birds with a rich, gamey flavor that is highly prized by hunters and gourmets.
Characteristics: The meat is dark and intensely flavored. Due to their small size, woodcock are usually served whole.
Culinary Uses: Woodcock is often roasted or grilled, sometimes with the head left on for traditional presentations. They are typically served with rich sauces. Popular dishes include roast woodcock and woodcock pâté.
Key Aspects of Cooking Game Birds
Cooking game birds requires an understanding of their unique characteristics to ensure the best results. Here are the key aspects of cooking game birds, focusing on their lean meat and distinct flavor profiles.
Understanding Game Bird Characteristics
Game birds differ significantly from domesticated poultry in terms of their meat composition and flavor, which influences how they should be cooked.
Lean Meat
Description: Game birds generally have less fat compared to domesticated poultry. This means their meat can dry out quickly if not cooked properly.
Implications for Cooking:
Moisture Retention: Use cooking methods that help retain moisture, such as braising, roasting with frequent basting, or cooking with added fats like bacon or butter.
Cooking Temperature: Cook at lower temperatures for longer periods to avoid drying out the meat. Quick, high-heat methods like grilling can work if the meat is marinated or basted frequently.
Resting: Allow the meat to rest after cooking to let the juices redistribute, ensuring it remains moist and tender.
Flavor Profile
Description: Game birds have a more pronounced and robust flavor compared to chicken or turkey. This is often described as gamey, which can vary from mildly to strongly flavored depending on the species and diet.
Implications for Cooking:
Complementary Ingredients: Pair game birds with ingredients that complement their strong flavors. Fruits like apples, pears, and berries, robust herbs like rosemary and thyme, and rich sauces can enhance the taste.
Marinades and Brines: Use marinades and brines to infuse additional flavors and help tenderize the meat. Ingredients like wine, citrus, garlic, and spices can complement the natural taste of game birds.
Balancing Flavors: Consider the balance of flavors in the dish. For instance, sweet and acidic elements can counterbalance the richness of the gamey flavor, making it more palatable for those not used to it.
Proper Preparation of Game Birds
Proper preparation of game birds is crucial to enhance their flavor and texture. This involves techniques such as aging, plucking and cleaning, and marinating or brining. Here’s a detailed guide on these preparation steps.
Aging
Description: Aging, or hanging, game birds allows the meat to tenderize and develop a more intense flavor. This process involves hanging the bird in a cool, dry place for a period of time.
Procedure:
Hanging: Hang the game birds by their feet in a cool environment, ideally between 35°F to 40°F (1.5°C to 4.5°C). The birds can be hung with their feathers intact to prevent the meat from drying out.
Duration: The aging period can vary depending on the bird and personal preference. Typically, birds are aged for 3 to 7 days. Pheasant, for example, benefits from longer aging, while quail may only need a few days.
Benefits: Aging helps break down the muscle fibers, making the meat more tender and enhancing the flavor profile, making it more pronounced and complex.
Plucking and Cleaning
Plucking:
Wet Plucking: Dip the bird in hot water (about 145°F/63°C) for 30 to 60 seconds to loosen the feathers. This method is effective but can be messy.
Dry Plucking: This method involves pulling out the feathers by hand without any water. It is less messy but can be more labor-intensive and time-consuming.
Procedure:
Hold the bird by the feet and work systematically from the tail toward the head.
Pluck small sections at a time to avoid tearing the skin.
Remove any remaining pin feathers with tweezers or a small knife.
Cleaning:
Evisceration: After plucking, make a small incision near the vent (anus) and carefully remove the entrails. Ensure all internal organs are removed.
Rinsing: Rinse the cavity and the exterior of the bird thoroughly with cold water to remove any remaining blood, feathers, or debris.
Drying: Pat the bird dry with paper towels. This helps in achieving crispy skin if roasting or grilling.
Marinating or Brining
Marinating:
Purpose: Marinating helps infuse the meat with additional flavors and can help tenderize the meat.
Ingredients: Common marinade ingredients include olive oil, vinegar, wine, citrus juices, garlic, herbs, and spices.
Procedure:
Place the cleaned bird in a sealable plastic bag or a shallow dish.
Pour the marinade over the bird, ensuring it is well-coated.
Refrigerate for a few hours to overnight, depending on the size and toughness of the bird. Smaller birds like quail may only need a few hours, while larger birds like pheasant can benefit from an overnight soak.
Brining:
Purpose: Brining involves soaking the bird in a saltwater solution, which helps the meat retain moisture during cooking and adds flavor.
Ingredients: A basic brine consists of water, salt, and sugar. Additional flavorings like herbs, spices, and citrus zest can be added.
Procedure:
Dissolve 1 cup of salt and 1/2 cup of sugar in 1 gallon of water. Adjust quantities based on the size of the bird and the amount of water needed to fully submerge it.
Submerge the bird in the brine solution and refrigerate. Brine time varies: smaller birds like quail may need only 1-2 hours, while larger birds like duck or pheasant may need 4-12 hours.
Rinse the bird thoroughly under cold water after brining to remove excess salt and pat dry before cooking.
Cooking Techniques for Game Birds
Game birds, with their lean meat and distinctive flavors, require specific cooking techniques to ensure they remain moist and flavorful. Here’s a comprehensive guide to various cooking techniques, moisture retention methods, and safety considerations for preparing game birds.
Roasting Game Birds
Description: Roasting is a classic method that involves cooking the bird in an oven, which allows for even cooking and a crispy exterior.
Technique:
Preheat the Oven: Set the oven to 375°F (190°C).
Season the Bird: Season the bird inside and out with salt, pepper, and herbs.
Prepare for Roasting: Place the bird on a roasting rack in a pan to allow air circulation.
Roast: Roast until the internal temperature reaches 165°F (74°C) for safety, but check for doneness at around 155°F (68°C) and allow for carryover cooking.
Rest: Let the bird rest for 10-15 minutes before carving to allow juices to redistribute.
Braising Game Birds
Description: Braising involves cooking the bird slowly in a covered pot with liquid, which helps tenderize tougher meat and infuses it with flavor.
Technique:
Brown the Bird: Season and brown the bird in a heavy pot or Dutch oven with a bit of oil or butter.
Sauté Aromatics: Remove the bird and sauté aromatics (onions, garlic, carrots) in the same pot.
Add Liquid: Return the bird to the pot, add enough liquid (stock, wine, or a combination) to partially submerge it, and cover.
Cook: Simmer on low heat or bake in a preheated oven at 325°F (163°C) until the meat is tender, typically 1.5 to 2 hours.
Grilling Game Birds
Description: Grilling imparts a smoky flavor and can quickly cook smaller birds, making it a suitable method for quail and pheasant.
Technique:
Preheat the Grill: Set the grill to medium-high heat.
Marinate: Marinate the bird if desired to add flavor and moisture.
Prepare the Grill: Oil the grill grates to prevent sticking.
Grill: Grill the bird over direct heat, turning frequently and basting with marinade or butter, until the internal temperature reaches 165°F (74°C).
Pan-Frying Game Birds
Description: Pan-frying involves cooking the bird in a skillet with a small amount of oil or butter, providing a crispy exterior and juicy interior.
Technique:
Preheat the Skillet: Heat a heavy skillet over medium-high heat.
Season the Bird: Season the bird and add oil or butter to the skillet.
Cook: Cook the bird, skin-side down, until the skin is crispy and browned, then flip and cook until the internal temperature reaches 165°F (74°C).
Rest: Let the bird rest for a few minutes before serving to allow juices to settle.
Recipes for Game Birds
Roast Pheasant
Ingredients:
1 whole pheasant
2 tbsp olive oil
Salt and pepper
Fresh herbs (thyme, rosemary, sage)
1 lemon, quartered
2 garlic cloves, smashed
Instructions:
Preheat the oven to 375°F (190°C).
Rinse and pat the pheasant dry.
Rub the pheasant with olive oil, then season with salt, pepper, and herbs.
Stuff the cavity with lemon and garlic.
Place the pheasant on a roasting rack in a pan, breast-side up.
Roast for about 45-60 minutes, or until the internal temperature reaches 165°F (74°C).
Let it rest for 10-15 minutes before carving.
Braised Duck
Ingredients:
1 whole duck
Salt and pepper
1 tbsp olive oil
1 onion, chopped
2 carrots, chopped
2 celery stalks, chopped
2 garlic cloves, minced
1 cup red wine
2 cups chicken broth
Fresh herbs (thyme, rosemary)
Instructions:
Preheat the oven to 325°F (163°C).
Season the duck with salt and pepper.
Heat olive oil in a Dutch oven over medium-high heat. Brown the duck on all sides.
Remove the duck and sauté the onions, carrots, celery, and garlic until soft.
Return the duck to the pot and add the wine, broth, and herbs.
Cover and braise in the oven for 1.5 to 2 hours, until the duck is tender.
Let it rest for 10-15 minutes before serving.
Grilled Quail
Ingredients:
4 whole quails
2 tbsp olive oil
Salt and pepper
2 tbsp balsamic vinegar
2 garlic cloves, minced
Fresh herbs (rosemary, thyme)
Instructions:
Preheat the grill to medium-high heat.
Rinse and pat the quails dry.
Rub with olive oil, then season with salt, pepper, balsamic vinegar, garlic, and herbs.
Grill the quails for 4-5 minutes per side or until the internal temperature reaches 165°F (74°C).
Let rest for 5 minutes before serving.
Pan-Fried Grouse
Ingredients:
2 whole grouse
2 tbsp olive oil
Salt and pepper
4 slices of bacon
1 cup mushrooms, sliced
1 cup chicken broth
Instructions:
Preheat a heavy skillet over medium-high heat.
Season the grouse with salt and pepper.
Add olive oil to the skillet and cook the bacon until crispy. Remove the bacon and set aside.
Brown the grouse on all sides in the skillet.
Add the mushrooms and chicken broth, then cover and simmer for 20-30 minutes, until the grouse is cooked through.
Crumble the bacon over the grouse before serving.
Safety Considerations for Cooking Game Birds
Thorough Cooking: Ensure that game birds are cooked to an internal temperature of 165°F (74°C) to kill any potential pathogens.
Cross-Contamination: Avoid cross-contamination by using separate cutting boards and utensils for raw and cooked birds. Always wash your hands, utensils, and surfaces with hot soapy water after handling raw meat.
Storage: Store raw game birds in the refrigerator at or below 40°F (4°C) and use within 1-2 days. For longer storage, freeze the birds and use within 9-12 months. Thaw frozen birds in the refrigerator or in cold water, never at room temperature.
Moisture Retention
Basting
Description: Basting involves periodically spooning or brushing pan juices, melted butter, or marinade over the bird during cooking. This helps keep the surface moist and adds flavor.
Technique:
Frequency: Baste the bird every 20-30 minutes during roasting or grilling.
Tools: Use a basting brush, spoon, or bulb baster to apply the liquid.
Liquids: Use the bird’s own juices, melted butter, oil, or a flavorful marinade. You can also use stock or wine for additional flavor.
Method: Open the oven or grill briefly, apply the basting liquid, and quickly close it to retain heat.
Bacon Wrapping
Description: Wrapping the bird in bacon adds fat, which bastes the meat as it cooks, keeping it moist and infusing it with a rich, smoky flavor.
Technique:
Preparation: Lay strips of bacon over the bird, covering it entirely or focusing on the breast and legs, which are more prone to drying out.
Cooking: Secure the bacon with toothpicks if necessary. Roast or grill as usual, allowing the bacon to crisp up and render its fat over the meat.
Variations: You can also use prosciutto or pancetta for a different flavor profile.
Using Stuffing
Description: Stuffing the cavity of the bird with a flavorful mixture helps keep the meat moist from the inside out while adding additional flavors.
Technique:
Ingredients: Use moisture-retaining ingredients like fruits (apples, pears, dried apricots), vegetables (onions, celery), and grains (rice, quinoa, breadcrumbs).
Preparation: Prepare the stuffing and loosely fill the cavity of the bird. Do not pack it tightly, as it needs room to expand and cook evenly.
Cooking: Ensure the stuffing reaches an internal temperature of 165°F (74°C) for food safety. This might mean cooking the bird slightly longer.
Additional Moisture: Add a bit of broth or melted butter to the stuffing mixture before cooking to increase moisture content.
Combining Moisture Retention Techniques
Using a combination of these techniques can further enhance moisture retention:
Basting and Bacon Wrapping: Wrap the bird in bacon and baste with pan juices or butter to keep the surface moist and flavorful.
Basting and Stuffing: Stuff the bird to retain internal moisture and baste regularly to keep the exterior moist.
Bacon Wrapping and Stuffing: Wrap a stuffed bird in bacon to ensure both internal and external moisture retention.
Cooking game birds requires understanding their unique characteristics and applying the appropriate techniques to ensure they remain moist and flavorful. By mastering methods like roasting, braising, grilling, and pan-frying, and utilizing moisture retention techniques such as basting, bacon wrapping, and stuffing, you can create delicious game bird dishes. Always prioritize food safety by cooking to the correct internal temperature and handling the meat properly.
Safety and Considerations for Game Birds
Food Safety
Internal Temperature: Always cook game birds to a minimum internal temperature of 165°F (74°C) to ensure safety and kill harmful bacteria.
Thawing: If using frozen game birds, thaw them in the refrigerator, in a cold water bath, or in the microwave. Never thaw at room temperature.
Handling
Cross-Contamination: Avoid cross-contamination by using separate cutting boards and utensils for raw and cooked game birds. Clean and sanitize all surfaces and tools after handling raw meat.
Storage: Store raw game birds in the refrigerator at or below 40°F (4°C) and use within 1-2 days. For longer storage, freeze the birds.
Considerations
Flavor Pairing: Pair game birds with complementary flavors like fruits (apples, pears, berries), robust herbs (rosemary, thyme, sage), and rich sauces.
Marinating and Brining: Consider marinating or brining game birds to enhance their flavor and tenderness. Use flavorful marinades and brines to add moisture and depth of flavor.
Pork, often referred to as “the other white meat,” is a popular and versatile ingredient in many cuisines worldwide. It comes from domesticated pigs and offers a wide variety of cuts that are suited to different cooking methods, making it a favorite among chefs and home cooks alike. Here’s an overview of pork, its key characteristics, various cuts, and some common culinary uses.
Characteristics of Pork
Flavor: Pork has a mild, slightly sweet flavor that makes it extremely adaptable to various flavor profiles, from savory and salty to sweet and spicy.
Texture: The texture of pork can vary greatly depending on the cut and cooking method. It can be tender and juicy or firm and chewy.
Fat Content: Pork’s fat content varies by cut, with some cuts like pork belly being very fatty, while others like tenderloin are lean. The fat in pork is where much of the flavor lies, making even the fattier cuts quite popular.
Nutrition: Pork is rich in essential nutrients, including high-quality protein, thiamine, selenium, zinc, vitamin B12, vitamin B6, niacin, phosphorus, and iron.
Nutritional Value of Pork
Pork is a popular meat option in many diets around the world, prized not just for its flavor but also for its nutritional content. Here’s an overview of the nutrients found in pork and how they can contribute to a balanced diet.
Macronutrients
Protein: Pork is a rich source of high-quality protein, essential for muscle maintenance and growth. The protein content varies slightly among different cuts, but on average, pork provides about 26 grams of protein per 100 grams.
Fat: The fat content in pork can vary widely depending on the cut. Leaner cuts like tenderloin can have as little as 3 grams of fat per 100 grams, whereas fattier cuts like pork belly have much higher fat content. Pork fat is composed of a mix of saturated and unsaturated fatty acids.
Calories: Due to its varying fat content, the caloric value of pork can range significantly. Lean cuts like loin or tenderloin contain fewer calories, roughly 143 calories per 100 grams, whereas fattier cuts will be significantly higher.
Micronutrients
Thiamine (Vitamin B1): Pork is one of the richest sources of thiamine, which is crucial for carbohydrate metabolism and neural function. Thiamine is particularly abundant in pork compared to other meats.
Selenium: This essential trace mineral, important for immune function and antioxidant defenses, is found in high amounts in pork.
Zinc: Important for immune function, wound healing, and DNA synthesis, zinc is plentiful in most meat, including pork.
Vitamin B12: Essential for red blood cell formation and neurological function, vitamin B12 is found in significant amounts in pork.
Niacin (Vitamin B3): Supports metabolism and skin health, and is another B-vitamin found in pork.
Phosphorus: Important for bone health and energy production, phosphorus is also abundant in pork.
Iron: Pork contains heme iron, the form of iron more easily absorbed by the body, making it important for preventing anemia, especially in diets lacking in red meat.
Pork Anatomy and Cuts
Pork is a versatile meat with numerous cuts, each with its own characteristics and culinary uses. Understanding these cuts can help you select the right piece for your cooking method and recipe. Here’s an overview of some of the most popular pork cuts:
Pork Tenderloin
Description: The pork tenderloin, also known as the fillet, is a long, thin cut that comes from the muscle that runs along the backbone. It is one of the leanest cuts of pork.
Cooking Methods: Best suited for quick cooking methods such as roasting, grilling, or sautéing. Due to its low fat content, it’s important not to overcook pork tenderloin to avoid dryness.
Culinary Uses: Ideal for slicing into medallions or making pork scallopini.
Pork Shoulder
Description: Also known as the Boston butt or pork butt, this cut comes from the upper part of the shoulder from the front leg. It is well-marbled with fat and has a lot of connective tissue.
Cooking Methods: Perfect for slow cooking methods like braising, slow roasting, or making pulled pork due to its fat content and connective tissue, which break down beautifully when cooked slowly.
Culinary Uses: Commonly used for pulled pork, stews, and slow-cooked barbecue.
Pork Loin
Description: Cut from the area of the pig between the shoulder and the beginning of the leg. It is known for its tender quality when cooked properly.
Cooking Methods: Can be roasted whole or cut into chops and grilled or fried. Pork loin benefits from brining or marinating to enhance juiciness.
Culinary Uses: Roasted whole or sliced into chops.
Pork Belly
Description: Comes from the fatty part of the animal that lies on its underside. It is rich and flavorful with layers of fat interspersed between layers of meat.
Cooking Methods: Often slow-cooked or braised to render out the fat and tenderize the meat. It can also be roasted or smoked.
Culinary Uses: Used to make bacon, roasted pork belly, or in dishes like Korean pork belly BBQ.
Pork Ribs (Spare Ribs and Baby Back Ribs)
Spare Ribs: Come from the belly side of the rib cage below the section of back ribs. They are flatter and contain more bone and fat.
Baby Back Ribs: Smaller than spare ribs, they are cut from where the rib meets the spine after the loin is removed. Leaner and more tender than spare ribs.
Cooking Methods: Both types are excellent for grilling, smoking, or baking. They benefit from long, slow cooking methods which tenderize the meat and melt the fat.
Culinary Uses: Often seasoned with dry rubs or marinated and glazed with barbecue sauce.
Pork Ham
Description: Pork ham refers to the meat that comes from the hind leg of the pig. It is a large, dense piece often cured or smoked.
Cooking Methods: Can be roasted, baked, or smoked further. Ham is typically sold fully cooked and only needs to be reheated.
Culinary Uses: Served as sliced ham for sandwiches or as a main dish during holiday feasts.
Cleaning Pork: Best Practices for Preparing Fresh Pork
Properly cleaning pork before cooking is crucial to ensure food safety and enhance the quality of your dish. Here’s a comprehensive guide on how to handle and prepare fresh pork effectively:
Fresh Pork
Inspection:
Color and Texture: Fresh pork should be pinkish-red in color with white or creamy white fat. Avoid pork that looks grayish or has a sticky or slimy texture.
Smell: Fresh pork should have a clean, fresh smell. A sour or off odor indicates spoilage.
Storage:
Refrigeration: Store fresh pork in the refrigerator at or below 40°F (4°C) if you plan to use it within 3-5 days.
Freezing: If you do not plan to use the pork within a few days, freeze it to preserve its quality. Ensure it is tightly wrapped to prevent freezer burn.
Rinse Pork Under Cold Water
Rinsing:
Modern Recommendations: Many food safety organizations, including the USDA, advise against rinsing raw pork (or any meat) under cold water. This practice can spread bacteria to your sink, countertops, and other surfaces, increasing the risk of foodborne illness.
Alternative: Instead of rinsing, simply remove the pork from its packaging and gently pat it dry with paper towels. This will help remove any excess moisture from the surface, which is beneficial for achieving a good sear or crust during cooking.
Trimming Excess Fat and Sinew
Why Trim:
Fat Management: Trimming excess fat can help manage the fat content of your dish and prevent overly greasy results.
Improved Texture: Removing sinew and silver skin improves the texture and tenderness of the meat.
How to Trim:
Fat: Using a sharp knife, trim away any unwanted fat. The amount of fat left on the meat can vary depending on the dish. For instance, some extra fat can enhance flavor and moisture when roasting or grilling.
Sinew and Silver Skin: Sinew and silver skin are tough and inedible. To remove them:
Slide a sharp knife under one end of the silver skin.
Angle the blade slightly upwards to avoid cutting into the meat.
Cut it away from the meat carefully.
Tools Needed:
Sharp Knives: Always use sharp knives for trimming. Dull knives can slip, increasing the risk of injury and resulting in poor cuts.
Cutting Board: Use a sturdy cutting board, preferably with grooves to catch juices.
Additional Tips for Handling Pork
Clean Surfaces:
Sanitization: After handling raw pork, thoroughly clean all surfaces, utensils, and your hands with hot, soapy water to prevent cross-contamination.
Temperature Monitoring:
Proper Cooking: Always cook pork to the proper internal temperatures to ensure safety. The recommended internal temperature for most pork cuts is 145°F (63°C), followed by a three-minute rest period. Use a food thermometer to accurately measure this.
Example Steps for Preparing Pork:
Remove from Packaging:
Place the pork on a clean cutting board.
Discard any packaging materials immediately to avoid contamination.
Pat Dry:
Use paper towels to pat the surface of the pork dry. This helps with browning during cooking.
Trim Excess Fat and Sinew:
Identify any large sections of fat, sinew, or silver skin.
Use a sharp knife to carefully trim these away, angling the knife upwards to avoid removing too much meat.
Sanitize Work Area:
After trimming, wash your hands, knives, cutting board, and any surfaces with hot, soapy water.
Consider using a disinfectant spray on the countertop for added safety.
Preparation for Pork
Proper preparation of pork is essential to ensure the best culinary results and maintain food safety. This guide covers marinating or seasoning pork, food safety and hygiene, proper storage, spoilage detection, cooking temperatures, and choosing the right cuts for different cooking methods.
Marinating or Seasoning Pork
Marinating:
Purpose: Adds flavor and tenderness, especially to tougher cuts.
Ingredients: Use acidic components like vinegar, lemon juice, or yogurt to help break down muscle fibers.
Method: Combine your chosen marinade ingredients in a sealable bag or container, add the pork, and refrigerate for several hours or overnight. Turn occasionally to ensure even coverage.
Seasoning:
Purpose: Enhances flavor and can help retain moisture during cooking.
Ingredients: Use salt, pepper, herbs, and spices liberally. Salt is particularly important.
Method: Season the pork thoroughly just before cooking, ensuring even distribution.
Pork Safety and Hygiene
Handling:
Handwashing: Always wash your hands before and after handling raw pork.
Separate Tools: Use separate cutting boards and utensils for raw pork to avoid cross-contamination.
Cooking:
Internal Temperature: Cook pork to an internal temperature of 145°F (63°C), followed by a three-minute rest period to ensure safety.
Meat Thermometer: Use a meat thermometer to check the internal temperature accurately.
Proper Storage of Pork
Refrigeration:
Short-Term Storage: Store pork in the refrigerator if you plan to cook it within 3-5 days. Keep it in its original packaging or rewrap it securely.
Temperature: Ensure your refrigerator is set to 40°F (4°C) or below.
Freezing:
Long-Term Storage: For longer storage, freeze pork in airtight packaging to prevent freezer burn.
Duration: Properly wrapped pork can be stored in the freezer for up to six months for best quality.
Observing for Spoilage of Pork
Signs of Spoilage:
Color: Fresh pork should be pinkish-red with white or creamy fat.
Smell: Discard pork if it has a sour or unpleasant odor.
Texture: Pork that feels slimy, tacky, or sticky should be discarded.
Safety Precautions:
Do Not Taste: Never taste raw pork to determine its safety. When in doubt, throw it out.
Pork Temperature Matters
Importance of Temperature:
Storage: Maintain the correct temperature during storage to prevent spoilage.
Cooking: Use a meat thermometer to ensure pork reaches the safe internal temperature of 145°F (63°C).
Resting Time:
Purpose: Allows juices to redistribute throughout the meat, making it more tender and flavorful.
Duration: Let pork rest for at least three minutes after cooking.
Quick Cooking Cuts of Pork
Suitable Cuts:
Tenderloin, Loin Chops, Rib Chops: These cuts are naturally tender and cook quickly, making them ideal for grilling, broiling, and pan-frying.
Method: Use high heat for short periods to avoid drying out the meat.
Slow Cooking Cuts of Pork
Suitable Cuts:
Shoulder (including Boston Butt), Ribs, Belly: These cuts have more connective tissue and fat, which break down over long cooking times to create tender, flavorful dishes.
Method: Slow cooking methods like braising, stewing, or slow roasting are ideal for these cuts. Cook at low temperatures for extended periods to achieve the best results.
Detailed Steps for Preparing Pork
Remove from Packaging:
Place the pork on a clean cutting board.
Discard any packaging materials immediately to avoid contamination.
Inspect and Trim:
Check for any discoloration or off odors.
Using a sharp knife, trim away excess fat and sinew. Be careful to leave enough fat for flavor, especially for roasting or grilling.
Marinate or Season:
For marinating, mix your marinade ingredients and submerge the pork in the mixture. Refrigerate for several hours or overnight.
For seasoning, apply salt, pepper, herbs, and spices evenly over the pork just before cooking.
Cooking Preparation:
Preheat your oven, grill, or skillet to the appropriate temperature.
For grilling, ensure the grates are clean and oiled to prevent sticking.
Cook to Proper Temperature:
Use a meat thermometer to check the internal temperature of the pork. Aim for 145°F (63°C).
Let the pork rest for at least three minutes before serving to allow the juices to redistribute.
Serve and Store:
Slice or carve the pork as needed, serving with complementary sides and garnishes.
If storing leftovers, cool the pork quickly and refrigerate within two hours. Store in airtight containers and consume within 3-4 days.
Understanding the differences between goat, lamb, and mutton is essential for selecting the right type of meat for your culinary needs. Each has distinct characteristics and culinary uses.
Goat
Definition
Goat meat comes from domesticated goats (Capra aegagrus hircus). It is a staple in many cuisines, particularly in Middle Eastern, African, Caribbean, and South Asian cultures.
Characteristics
Flavor: Goat meat has a slightly sweet, gamey flavor that varies depending on the age and diet of the goat. It is often compared to lamb but is typically leaner and less fatty. Texture: The meat is lean and can be tender or tough depending on the cut and cooking method. It has less marbling compared to lamb. Nutritional Value: Goat meat is high in protein and low in fat and cholesterol, making it a healthy option.
Culinary Uses
Goat meat is versatile and can be used in various dishes:
Curries: Popular in South Asian cuisine.
Stews: Common in African and Caribbean dishes.
Grilled or roasted: Often seen in Middle Eastern recipes.
Braised dishes: Suitable for slow cooking to tenderize tougher cuts.
Lamb
Definition
Lamb refers to meat from young sheep that are less than one year old. It is widely consumed in many parts of the world, especially in Mediterranean, Middle Eastern, and European cuisines.
Characteristics
Flavor: Lamb has a mild, slightly sweet flavor with a hint of earthiness. The flavor can be more pronounced in older lambs. Texture: The meat is tender and juicy, with more marbling than goat. It is softer and easier to chew, especially when cooked properly. Nutritional Value: Lamb is rich in protein, B vitamins, iron, and zinc. It has a higher fat content compared to goat, particularly in the form of saturated fat.
Culinary Uses
Lamb is popular in a variety of dishes:
Roast lamb: Common in European cuisines.
Lamb kebabs: A staple in Middle Eastern cuisine.
Lamb chops: Often grilled or pan-seared.
Lamb stew: Common in Mediterranean recipes.
Mutton
Definition
Mutton is meat from sheep that are over one year old, typically around two to three years old. It is more common in some cultures than lamb and has a stronger flavor.
Characteristics
Flavor: Mutton has a robust, gamey flavor that is much stronger than both lamb and goat. This is due to the animal’s age and the development of more complex flavors over time. Texture: The meat is firmer and tougher than lamb, requiring longer cooking times to tenderize. It is often marbled with fat, which adds to its richness. Nutritional Value: Mutton is high in protein and similar in nutrients to lamb but generally has a higher fat content.
Culinary Uses
Mutton is used in various traditional dishes:
Mutton curry: Popular in Indian and Pakistani cuisines.
Braised mutton: Suitable for slow-cooking methods to tenderize the meat.
Mutton stew: Common in British and Irish cuisine.
Grilled mutton: Used in certain Middle Eastern dishes.
Goat, lamb, and mutton each offer unique flavors and textures, making them suitable for different types of dishes and cooking methods. Understanding the characteristics of each type of meat can help you choose the best option for your culinary creations, ensuring delicious and satisfying results. Whether you prefer the lean, gamey taste of goat, the tender, mild flavor of lamb, or the robust, rich taste of mutton, these meats provide a range of options for diverse and flavorful meals.
Lamb Anatomy and Cuts
Understanding the different cuts of lamb and their best uses is essential for selecting the right cut for your dish. Here’s a detailed guide on the various cuts of lamb, their characteristics, and how to cook them.
Lamb Shoulder
Description: The shoulder cut comes from the upper part of the front leg and the shoulder. It includes the blade and arm portions.
Characteristics: This cut is flavorful and slightly fatty, with a mix of tender and tougher muscles.
Cooking Methods: Best suited for slow-cooking methods such as braising, roasting, and stewing to tenderize the meat.
Popular Dishes: Lamb shoulder roast, slow-cooked lamb shoulder, lamb stew, and pulled lamb shoulder.
Lamb Rack
Description: The lamb rack is cut from the rib section and includes rib bones. It is often presented as a “rack of lamb.”
Characteristics: Tender and flavorful with a good amount of fat. It is a premium cut often used for elegant dishes.
Cooking Methods: Best cooked by roasting or grilling to medium-rare or medium to preserve its tenderness and flavor.
Popular Dishes: Herb-crusted rack of lamb, roasted rack of lamb, and grilled lamb rack.
Lamb Loin
Description: The loin is located in the middle of the lamb, running along the back. It includes the loin chop and the tenderloin.
Characteristics: Very tender and flavorful, with a good balance of meat and fat.
Cooking Methods: Suitable for roasting, grilling, or pan-frying. Loin chops are often grilled or broiled.
Popular Dishes: Lamb loin chops, roasted lamb loin, and stuffed lamb loin.
Lamb Leg
Description: The leg cut comes from the hindquarters of the lamb. It can be sold whole or divided into the sirloin and shank portions.
Characteristics: Lean and tender, especially when cooked properly. It is a versatile cut suitable for various cooking methods.
Cooking Methods: Ideal for roasting, grilling, or braising. Can also be butterflied and grilled.
Popular Dishes: Roast leg of lamb, grilled butterflied lamb leg, and braised lamb leg.
Lamb Shank
Description: The shank is the lower part of the leg, both front and back. It contains a lot of connective tissue.
Characteristics: Tough and sinewy, but becomes very tender and flavorful when slow-cooked.
Cooking Methods: Best suited for braising or slow roasting to break down the connective tissue.
Popular Dishes: Braised lamb shanks, slow-cooked lamb shanks, and lamb shank stew.
Lamb Neck
Description: The neck is a lesser-known cut but is very flavorful and economical.
Characteristics: Contains a good amount of fat and connective tissue, making it ideal for slow cooking.
Cooking Methods: Suitable for braising or slow cooking to tenderize the meat and develop deep flavors.
Popular Dishes: Braised lamb neck, lamb neck stew, and lamb neck curry.
Lamb Breast and Flank
Description: The breast and flank cuts come from the lower part of the lamb, including the belly and the lower ribs.
Characteristics: These cuts are fatty and flavorful but can be tough if not cooked properly.
Cooking Methods: Best suited for slow roasting, braising, or grilling. The breast can also be used for making lamb bacon.
Popular Dishes: Stuffed lamb breast, braised lamb breast, and grilled lamb flank.
Each cut of lamb has unique characteristics that make it suitable for different cooking methods and dishes. Understanding these cuts allows you to choose the best option for your culinary needs, ensuring delicious and tender results. Whether you’re roasting a leg of lamb, grilling loin chops, or braising shanks, selecting the appropriate cut and cooking method will enhance the flavor and texture of your dish.
Cooking Lamb: Techniques and Methods
Lamb is a versatile meat that can be cooked using various methods, each bringing out different flavors and textures. Here’s a detailed guide on the key cooking techniques for lamb, including roasting, grilling, braising, stewing, pan-frying/sautéing, and broiling, along with recipes for each method.
Lamb Roasting
Description: Roasting is a dry-heat cooking method that involves cooking the lamb in an oven, resulting in a tender, juicy interior and a browned, flavorful exterior.
Technique:
Preparation: Preheat the oven to the desired temperature (typically 325°F to 375°F for most cuts). Season the lamb with herbs, spices, and a bit of oil.
Cooking: Place the lamb on a roasting rack in a roasting pan to allow even airflow. Roast until the internal temperature reaches the desired doneness (145°F for medium-rare, 160°F for medium).
Resting: Let the lamb rest for 10-15 minutes after roasting to allow the juices to redistribute.
Cuts Suitable: Leg of lamb, lamb shoulder, rack of lamb, lamb loin.
Popular Dishes: Roast leg of lamb, herb-crusted rack of lamb, roasted lamb loin.
Roasted Leg of Lamb Recipe:
Ingredients:
1 leg of lamb (about 5-6 lbs)
4 cloves garlic, sliced
1/4 cup olive oil
2 tablespoons fresh rosemary, chopped
1 tablespoon fresh thyme, chopped
Salt and pepper to taste
1 lemon, sliced
Instructions:
Preheat the oven to 350°F (175°C).
Make small incisions all over the lamb and insert garlic slices.
Rub the lamb with olive oil, rosemary, thyme, salt, and pepper.
Place the lamb in a roasting pan and surround it with lemon slices.
Roast for about 1.5-2 hours or until the internal temperature reaches 145°F (63°C) for medium-rare.
Let the lamb rest for 15 minutes before slicing.
Lamb Grilling
Description: Grilling involves cooking the lamb over direct heat, typically on a barbecue grill, which imparts a smoky flavor and charred exterior.
Technique:
Preparation: Preheat the grill to medium-high heat. Season or marinate the lamb as desired.
Cooking: Place the lamb on the grill, cooking each side until the internal temperature reaches the desired doneness. For medium-rare, cook until 145°F.
Resting: Let the lamb rest for a few minutes before serving.
Popular Dishes: Grilled lamb chops, butterflied grilled leg of lamb, grilled lamb ribs.
Grilled Lamb Chops Recipe:
Ingredients:
8 lamb chops
1/4 cup olive oil
4 cloves garlic, minced
2 tablespoons fresh rosemary, chopped
Salt and pepper to taste
Instructions:
Preheat the grill to medium-high heat.
Combine olive oil, garlic, rosemary, salt, and pepper in a bowl.
Brush the lamb chops with the mixture.
Grill the lamb chops for about 4 minutes per side or until the internal temperature reaches 145°F (63°C) for medium-rare.
Let the chops rest for a few minutes before serving.
Lamb Braising
Description: Braising is a combination cooking method that involves first browning the lamb in fat and then slowly cooking it in a covered pot with liquid.
Technique:
Preparation: Season the lamb and brown it in a heavy pot or Dutch oven with a bit of oil.
Cooking: Add aromatics (like onions, garlic, carrots) and liquid (stock, wine) to the pot. Cover and simmer on low heat or bake in a preheated oven at 325°F until the meat is tender.
Duration: Braise for 1.5 to 3 hours, depending on the cut and size.
Heat olive oil in a Dutch oven over medium-high heat. Brown the lamb shanks on all sides.
Remove the shanks and set aside. Add onion, carrots, celery, and garlic to the pot and sauté until soft.
Add red wine to deglaze the pot, scraping up any browned bits.
Return the lamb shanks to the pot and add beef broth, tomatoes, rosemary, and thyme.
Bring to a simmer, cover, and transfer to the oven. Braise for about 2.5-3 hours or until the meat is tender.
Serve the lamb shanks with the braising liquid.
Lamb Stewing
Description: Stewing involves cooking smaller pieces of lamb in liquid over low heat for an extended period, resulting in tender meat and a rich, flavorful broth.
Technique:
Preparation: Cut the lamb into bite-sized pieces and brown in a pot with a bit of oil.
Cooking: Add liquid (stock, wine) and aromatics (vegetables, herbs) to the pot. Simmer gently on the stovetop or in the oven until the meat is tender.
Popular Dishes: Irish lamb stew, lamb and vegetable stew, Middle Eastern lamb stew.
Irish Lamb StewRecipe:
Ingredients:
2 lbs lamb shoulder, cut into bite-sized pieces
2 tablespoons olive oil
1 onion, chopped
3 carrots, chopped
3 potatoes, chopped
2 cups beef broth
1 cup Guinness beer (optional)
2 tablespoons tomato paste
2 tablespoons fresh thyme, chopped
Salt and pepper to taste
Instructions:
Heat olive oil in a large pot over medium-high heat. Brown the lamb pieces on all sides.
Remove the lamb and set aside. Add onion to the pot and sauté until soft.
Add carrots and potatoes, and cook for a few minutes.
Return the lamb to the pot and add beef broth, Guinness beer, tomato paste, thyme, salt, and pepper.
Bring to a simmer, cover, and cook on low heat for 1.5-2 hours or until the lamb is tender.
Adjust seasoning as needed and serve hot.
Lamb Pan-Frying/Sautéing
Description: Pan-frying and sautéing are quick, high-heat cooking methods that result in a crispy exterior and juicy interior.
Technique:
Preparation: Preheat a heavy skillet over medium-high heat. Season the lamb and add a bit of oil to the pan.
Cooking: Cook the lamb pieces, turning occasionally, until they are browned and cooked to the desired doneness. For medium-rare, aim for an internal temperature of 145°F.
Duration: Typically 4-8 minutes per side, depending on the thickness of the meat.
Popular Dishes: Broiled lamb chops, broiled lamb steaks.
Broiled Lamb Steaks Recipe:
Ingredients:
4 lamb steaks
2 tablespoons olive oil
1 tablespoon Dijon mustard
2 tablespoons fresh thyme, chopped
Salt and pepper to taste
Instructions:
Preheat the broiler and position the oven rack about 4-6 inches from the heat source.
In a bowl, mix olive oil, Dijon mustard, thyme, salt, and pepper.
Brush the lamb steaks with the mixture.
Broil the lamb steaks for about 5 minutes per side or until the internal temperature reaches 145°F (63°C) for medium-rare.
Let the steaks rest for a few minutes before serving.
Cooking Tips for Lamb
Cooking lamb to perfection involves understanding the appropriate resting time, internal temperatures, and the best herbs and spices to use. Here’s a comprehensive guide to these essential tips for cooking lamb.
Lamb Resting Time
Description: Resting lamb after cooking allows the juices to redistribute throughout the meat, resulting in a more flavorful and tender final product.
Procedure:
Resting Period: After cooking, transfer the lamb to a cutting board or serving platter.
Covering: Loosely tent the lamb with aluminum foil to keep it warm without trapping steam, which can soften the crust.
Duration: Rest the lamb for 10-15 minutes for smaller cuts like chops and steaks, and 15-20 minutes for larger cuts like roasts and legs.
Benefits: Resting helps retain moisture, making the meat juicier and easier to carve.
Lamb Herbs and Spices
Description: Using the right herbs and spices can enhance the natural flavors of lamb, adding depth and complexity to the dish.
Popular Herbs:
Rosemary: Its pine-like aroma complements the rich flavor of lamb.
Thyme: Adds a subtle earthiness that pairs well with lamb.
Mint: Often used in sauces and marinades to add a fresh, bright contrast to the meat.
Oregano: Provides a robust, slightly bitter flavor that works well in Mediterranean dishes.
Sage: Adds a warm, savory note that enhances the flavor of roasted lamb.
Popular Spices:
Garlic: A staple in lamb seasoning, providing a strong, aromatic flavor.
Cumin: Adds a warm, earthy flavor that pairs well with lamb, especially in Middle Eastern and North African dishes.
Coriander: Its citrusy undertones complement lamb’s rich taste.
Paprika: Adds a mild sweetness and a vibrant color to lamb dishes.
Cinnamon: Often used in Middle Eastern and Mediterranean lamb recipes, adding warmth and depth.
Marinades and Rubs:
Marinades: Combine herbs, spices, oil, and acid (like lemon juice or vinegar) to tenderize and flavor the lamb. Marinate for a few hours to overnight, depending on the cut.
Rubs: Mix herbs and spices into a paste or dry rub and apply to the lamb before cooking. Let the rub sit on the meat for at least 30 minutes, or longer for deeper flavor.
Lamb Internal Temperature Guide for Doneness
Cooking lamb to the correct internal temperature is crucial for achieving the desired level of doneness and ensuring the meat is both safe and delicious. Here’s a detailed guide on the internal temperatures for different levels of doneness in lamb:
Rare Lamb
Internal Temperature: 120°F to 125°F (49°C to 52°C)
Description: Rare lamb has a cool red center. The meat is very tender and juicy with a slightly softer texture.
Procedure:
Cooking: Sear the lamb over high heat to develop a crust, then finish cooking at a lower temperature until the internal thermometer reads 120°F to 125°F.
Resting: Let the lamb rest for 10-15 minutes after cooking. The internal temperature will rise slightly during this time due to carryover cooking.
Medium-rare Lamb
Internal Temperature: 130°F to 135°F (54°C to 57°C)
Description: Medium-rare lamb has a warm red center. It is juicy and flavorful, with a firmer texture than rare.
Procedure:
Cooking: Sear the lamb over high heat, then cook it at a lower temperature until the internal thermometer reads 130°F to 135°F.
Resting: Rest the lamb for 10-15 minutes to allow the juices to redistribute and the temperature to stabilize.
Medium Lamb
Internal Temperature: 140°F to 145°F (60°C to 63°C)
Description: Medium lamb has a warm pink center. The meat is juicy and tender, with a slightly firmer texture than medium-rare.
Procedure:
Cooking: Cook the lamb until the internal thermometer reads 140°F to 145°F. This can be achieved through roasting, grilling, or pan-searing.
Resting: Allow the lamb to rest for 10-15 minutes before carving. The internal temperature will rise by a few degrees during this time.
Well-done Lamb
Internal Temperature: 160°F and above (71°C and above)
Description: Well-done lamb has a uniformly brown or gray color throughout with no pink. The meat is firmer and can be drier if not cooked carefully.
Procedure:
Cooking: Cook the lamb until the internal thermometer reads 160°F or higher. This is often achieved through slow roasting or braising to maintain moisture.
Resting: Rest the lamb for 10-15 minutes after cooking to ensure even moisture distribution.
Tips for Measuring Internal Temperature
Thermometer Placement: Insert the meat thermometer into the thickest part of the meat, avoiding bones, fat, or gristle, which can give inaccurate readings.
Multiple Checks: For larger cuts of lamb, check the temperature in multiple locations to ensure even doneness throughout the meat.
Resting: Always allow lamb to rest after cooking. This helps retain the juices, making the meat more succulent and easier to carve.
Safety for Lamb
Proper handling, storage, and cooking of lamb are crucial for ensuring food safety and maintaining the quality of the meat. Here’s a comprehensive guide to the key safety considerations for lamb, focusing on storage.
Storage for Lamb
Proper storage of lamb is essential to prevent spoilage and bacterial growth. Here are the best practices for storing lamb:
Refrigeration
Temperature: Keep lamb in the refrigerator at or below 40°F (4°C).
Packaging:
Fresh Lamb: Store fresh lamb in its original packaging if you plan to use it within a couple of days. For longer storage, rewrap it tightly in plastic wrap, aluminum foil, or place it in an airtight container.
Opened Packaging: If the original packaging has been opened, transfer the lamb to a resealable plastic bag or an airtight container to prevent contamination and moisture loss.
Duration:
Ground Lamb: Use within 1-2 days.
Lamb Chops, Steaks, and Roasts: Use within 3-5 days.
Freezing
Temperature: Freeze lamb at 0°F (-18°C) or lower.
Packaging:
Preparation: Wrap the lamb tightly in plastic wrap, aluminum foil, or freezer paper to prevent freezer burn. Alternatively, use vacuum-sealed bags for the best results.
Labeling: Label the package with the date of freezing to keep track of storage time.
Duration:
Ground Lamb: Can be frozen for up to 3-4 months.
Lamb Chops, Steaks, and Roasts: Can be frozen for up to 6-9 months.
Thawing:
Refrigerator Thawing: Thaw lamb in the refrigerator for several hours or overnight. This is the safest method and ensures even thawing.
Cold Water Thawing: Submerge the wrapped lamb in cold water, changing the water every 30 minutes. Cook immediately after thawing.
Microwave Thawing: Use the defrost setting on your microwave, but be ready to cook the lamb immediately after thawing to prevent bacterial growth.
Handling
Cross-Contamination: Avoid cross-contamination by using separate cutting boards, utensils, and surfaces for raw and cooked lamb. Wash hands, utensils, and surfaces thoroughly with hot, soapy water after handling raw lamb.
Sanitizing: Use a sanitizing solution (1 tablespoon of bleach per gallon of water) to disinfect surfaces that have come into contact with raw meat.
Marinating
Refrigeration: Always marinate lamb in the refrigerator, never at room temperature. Use a non-reactive container such as glass, stainless steel, or food-grade plastic.
Duration: Marinate for the time specified in the recipe. If marinating for more than a few hours, especially overnight, ensure the lamb is kept in the refrigerator.
Reusing Marinade: Do not reuse marinade that has been in contact with raw lamb unless it has been boiled for at least 5 minutes to kill any harmful bacteria.
Cooking
Internal Temperature: Ensure lamb is cooked to a safe internal temperature to kill harmful bacteria:
Ground Lamb: Cook to an internal temperature of 160°F (71°C).
Whole Cuts (steaks, chops, roasts): Cook to at least 145°F (63°C) for medium-rare, allowing for a 3-minute rest time.
Thermometer Use: Use a meat thermometer to check the internal temperature of the lamb, inserting it into the thickest part of the meat away from bones and fat.
Cleaning and gutting fish are essential skills for any chef to ensure the fish is safe to eat and ready for cooking. Here is a detailed guide on how to scale, gut, and fillet fish, along with tips for mastering these techniques.
Scaling Fish
Description: Scaling removes the fish’s scales, which are inedible and can interfere with cooking.
Tools Needed: Scaling tool, blunt knife, or the back of a chef’s knife.
Procedure:
Preparation:
Setup: Place the fish on a flat, stable surface like a non-slip cutting board. Ensure your workstation is clean and have a bowl of cold water nearby.
Hold the Fish: Hold the fish firmly by the tail with one hand. You can use a cloth or paper towel for a better grip.
Scaling:
Direction: Using the scaling tool or the back of a knife, scrape the scales from the tail towards the head. This direction is opposite to the natural direction of the scales.
Technique: Use firm, short strokes to lift the scales off. Be thorough, ensuring you remove scales from both sides and around the fins.
Checking: Run your hand over the fish to feel for any remaining scales, and repeat the process if necessary.
Rinsing:
Rinse the Fish: Rinse the fish under cold running water to wash away any loose scales. Ensure no scales remain on the fish or the work surface.
Gutting Fish
Description: Gutting involves removing the internal organs of the fish to make it ready for cooking.
Position the Fish: Place the scaled fish on a cutting board. Use a non-slip mat underneath the cutting board for stability.
Initial Cut: Insert the tip of the knife into the fish’s belly near the anal opening.
Cutting:
Opening the Belly: Make a shallow cut from the anal opening up to the base of the fish’s jaw. Be careful not to cut too deeply to avoid puncturing the intestines, which can release unpleasant odors and contaminants.
Removing Guts:
Extraction: Use your fingers or a spoon to pull out the internal organs. Be thorough, ensuring you remove all the entrails and membranes.
Bloodline Removal: For some fish, you may need to remove the dark red bloodline along the spine. This can be done by scraping it out with a spoon or the back of the knife.
Cleaning:
Rinse the Cavity: Rinse the cavity thoroughly under cold running water to remove any blood, bits of gut, and other residues.
Final Check: Inspect the fish to ensure all organs and blood are removed.
Filleting Fish
Description: Filleting separates the fish’s flesh from its bones, yielding boneless pieces of fish.
Tools Needed: Sharp filleting knife, cutting board, fish tweezers.
Procedure:
Preparation:
Lay the Fish: Lay the fish on its side on the cutting board. Ensure the fish is stable by using a non-slip mat under the board.
Cut Behind the Gills:
Initial Incision: Make an incision behind the gills and pectoral fin down to the backbone. This cut should be just behind the head and angled towards the head.
Cut Along the Backbone:
Long Cut: Turn the knife so the blade is parallel to the backbone. Cut along the length of the fish, from the head to the tail, keeping the blade close to the backbone to maximize the amount of meat removed.
Angle Control: Keep the knife at a slight angle to ensure you’re cutting as close to the bone as possible.
Remove the Fillet:
Lifting the Fillet: Lift the fillet off the fish in one piece. Use smooth, controlled motions to avoid tearing the flesh.
Repeat on the Other Side:
Flipping the Fish: Flip the fish over and repeat the process on the other side.
Remove Rib Bones:
Trimming the Fillet: Use the filleting knife to carefully cut away the rib bones from each fillet.
Skinning (Optional):
Skinning Setup: If you prefer skinless fillets, lay the fillet skin-side down. Hold the tail end with your non-dominant hand.
Cutting: Cut between the flesh and skin at a slight angle. Keep the blade flat and use a gentle sawing motion to separate the skin from the flesh.
Remove Pin Bones:
Tweezing: Use fish tweezers to remove any remaining pin bones from the fillets. Run your fingers over the fillet to feel for any bones and pull them out.
Additional Tips for Mastery
Practice: Like any skill, cleaning and gutting fish becomes easier with practice. Start with easier fish and progress to more challenging ones.
Sharp Tools: Always use sharp knives to ensure clean cuts and reduce the risk of injury.
Clean Workspace: Keep your workspace clean and organized to make the process smoother and more efficient.
Patience: Take your time, especially when you’re learning. Rushing can lead to mistakes and poor results.
Safety: Always cut away from your body to avoid accidents. Ensure your knife is sharp to make precise cuts and reduce slipping.
Storage: After cleaning and filleting, store the fish properly. Use ice or refrigeration to keep the fish fresh until you’re ready to cook.
Removing the Head of Fish
Removing the head of the fish is often the first step before filleting or cooking whole.
Procedure:
Preparation:
Setup: Place the scaled and gutted fish on a stable cutting board. Ensure your workspace is clean and have a bowl of cold water nearby for rinsing.
Cut Behind the Gills:
Initial Cut: Use a sharp knife to make a cut just behind the gills, angled slightly toward the head. Cut down to the backbone.
Cutting Angle: Angle the cut to maximize the amount of usable meat left on the body of the fish.
Sever the Head:
Second Cut: Turn the knife around and make a similar cut on the other side of the fish, meeting the first cut at the backbone.
Cutting Through the Backbone: Use kitchen shears or the knife to cut through the backbone and remove the head.
Remove the Head:
Complete Removal: Lift the head away from the body. Discard or save for making fish stock, which can be used to add rich flavor to soups and sauces.
Filleting Fish
Filleting separates the fish’s flesh from its bones, yielding boneless pieces of fish.
Procedure:
Preparation:
Setup: Lay the fish on its side on the cutting board. Ensure the fish is stable by using a non-slip mat under the board.
Cut Behind the Gills:
Initial Incision: Make an incision behind the gills and pectoral fin down to the backbone. This cut should be just behind the head and angled towards the head.
Cut Along the Backbone:
Long Cut: Turn the knife so the blade is parallel to the backbone. Cut along the length of the fish, from the head to the tail, keeping the blade close to the backbone to maximize the amount of meat removed.
Angle Control: Keep the knife at a slight angle to ensure you’re cutting as close to the bone as possible.
Remove the Fillet:
Lifting the Fillet: Lift the fillet off the fish in one piece. Use smooth, controlled motions to avoid tearing the flesh.
Repeat on the Other Side:
Flipping the Fish: Flip the fish over and repeat the process on the other side.
Remove Rib Bones:
Trimming the Fillet: Use the filleting knife to carefully cut away the rib bones from each fillet.
Skinning (Optional):
Skinning Setup: If you prefer skinless fillets, lay the fillet skin-side down. Hold the tail end with your non-dominant hand.
Cutting: Cut between the flesh and skin at a slight angle. Keep the blade flat and use a gentle sawing motion to separate the skin from the flesh.
Remove Pin Bones:
Tweezing: Use fish tweezers to remove any remaining pin bones from the fillets. Run your fingers over the fillet to feel for any bones and pull them out.
Skinning Fish
Removing the skin from the fillet is often desired for certain recipes.
Procedure:
Preparation:
Setup: Lay the fillet skin-side down on the cutting board. Ensure the fillet is stable.
Grip the Tail:
Hold the Tail: Hold the tail end of the fillet with one hand. Use a cloth or paper towel for a better grip if the fish is slippery.
Cut Between Skin and Flesh:
Initial Cut: Insert the knife between the flesh and the skin at the tail end, holding the blade at a slight angle.
Separate Skin from Flesh:
Sawing Motion: Use a gentle sawing motion to cut between the skin and flesh, keeping the blade flat and pulling the skin taut. Continue until the fillet is completely separated from the skin.
Deveining Shrimp
Removing the vein (digestive tract) from shrimp ensures a cleaner, more appealing presentation and taste.
Procedure:
Preparation:
Setup: Place the shrimp on a cutting board. If using whole shrimp, remove the head and shell first.
Slit Along the Back:
Initial Cut: Using a paring knife, make a shallow cut along the back of the shrimp from the head end to the tail.
Remove the Vein:
Extraction: Use the tip of the knife or your fingers to lift out the dark vein running along the back of the shrimp. Discard the vein.
Rinse:
Clean Up: Rinse the shrimp under cold running water to remove any residual bits from the vein and pat dry with a paper towel.
Cleaning and Preparing Shrimp: Shell Removal and Deveining
Properly cleaning shrimp by removing the shell and deveining them is essential for ensuring they are ready for cooking. Here’s a detailed guide on how to remove the shell and devein shrimp.
Shrimp Shell Removal
Removing the shell from shrimp is often the first step in preparing them for cooking. The shell can be removed completely or partially, depending on the recipe and personal preference.
Procedure:
Preparation:
Rinsing: Rinse the shrimp under cold running water to remove any surface dirt or debris. This initial rinse also makes the shrimp easier to handle.
Remove the Head (if attached):
Head Removal: If the shrimp still have their heads, grasp the head firmly and twist to remove it. Discard the heads or save them for making seafood stock.
Peel the Shell:
Starting at the Legs: Hold the shrimp in one hand and use your thumb and forefinger to peel off the shell starting from the underside where the legs are attached. Pull off the shell in segments, working your way from the head end towards the tail.
Leaving the Tail Intact (optional): If you prefer, you can leave the tail segment on for presentation. This is common for shrimp cocktail or certain sautéed dishes.
Remove the Shell Completely: If you want the shrimp fully peeled, including the tail, simply continue peeling until the entire shell is removed.
Deveining Shrimp
Deveining involves removing the dark vein that runs along the back of the shrimp, which is its digestive tract. This step is important for both aesthetic and hygiene reasons, as the vein can contain grit and other impurities.
Procedure:
Preparation:
Setup: After removing the shell, lay the shrimp on a cutting board. Ensure your work area is clean, and have a bowl of cold water nearby for rinsing.
Make an Incision:
Knife Method: Using a small paring knife, make a shallow cut along the back of the shrimp from the head end to the tail. Be careful not to cut too deeply.
Special Deveining Tool: Alternatively, you can use a specialized shrimp deveining tool to make the cut and lift out the vein simultaneously. This tool can be especially helpful for deveining large quantities of shrimp.
Remove the Vein:
Using the Knife: With the tip of the knife, gently lift out the dark vein running along the back of the shrimp. It should come out easily.
Using Your Fingers: You can also use your fingers to gently pull the vein out if it does not come out easily with the knife. For stubborn veins, a toothpick can also be used to coax it out.
Rinse the Shrimp:
Final Rinse: Rinse the deveined shrimp under cold running water to remove any remaining debris or grit. This final rinse ensures the shrimp are clean and ready for cooking.
Additional Tips
Handling Raw Shrimp: Always handle raw shrimp with clean hands and use clean utensils and cutting boards to prevent cross-contamination.
Storing Cleaned Shrimp: If you’re not cooking the shrimp immediately, store them in the refrigerator on ice or in a bowl covered with plastic wrap to keep them fresh.
Saving Shrimp Shells: Consider saving the shells and heads (if not used for stock) in a freezer bag. They can be used later to make a flavorful seafood broth.
Shucking Oysters and Clams, and Preparing Mussels
Properly handling shellfish such as oysters, clams, and mussels ensures they are safe to eat and ready for cooking. Here’s a detailed guide on shucking oysters and clams, and preparing and cleaning mussels.
Opening Shellfish
Shucking oysters and clams requires a bit of practice and the right tools. It’s important to handle them carefully to avoid injury and preserve the integrity of the meat.
Tools Needed:
Shucking knife (a short, sturdy knife with a blunt tip)
Protective glove or a kitchen towel
A sturdy surface
Procedure for Oysters:
Preparation: Rinse the oysters under cold running water to remove any dirt or debris.
Protect Your Hand: Use a protective glove or wrap a kitchen towel around your hand to hold the oyster firmly.
Locate the Hinge: Hold the oyster with the hinge (the pointed end) facing you. Insert the tip of the shucking knife into the hinge.
Twist the Knife: Gently twist the knife until you feel the hinge pop open. Be careful not to force it, as this can break the shell.
Slide the Knife: Slide the knife along the inside of the top shell to cut the adductor muscle that holds the shell closed.
Remove the Top Shell: Lift off the top shell, being careful to keep the oyster’s liquor (the briny liquid inside) intact.
Release the Oyster: Slide the knife under the oyster to detach it from the bottom shell. It is now ready to be served or cooked.
Procedure for Clams:
Preparation: Rinse the clams under cold running water.
Protect Your Hand: Use a protective glove or wrap a kitchen towel around your hand to hold the clam.
Insert the Knife: Hold the clam with the hinge facing you and insert the knife between the shells at the point where they are most tightly closed.
Twist the Knife: Twist the knife to pry the shell open slightly, then slide the knife along the edge to cut the adductor muscles on both sides.
Open the Shell: Open the shell fully and slide the knife under the clam to detach it from the bottom shell.
Preparing Mussels
Procedure:
Inspection: Discard any mussels with cracked shells or those that remain open when tapped (these are dead and not safe to eat).
Cleaning: Rinse the mussels under cold running water to remove surface debris.
Removing the Beard: The beard is the fibrous thread that mussels use to attach themselves to surfaces. To remove it, hold the mussel in one hand and pull the beard out with a firm tug using your other hand or a small knife.
Cleaning Mussels
Procedure:
Rinse Under Cold Water: Rinse each mussel under cold running water to remove any dirt or sand.
Scrub the Shells: Use a stiff brush to scrub the shells, removing any barnacles, dirt, or debris.
Soak in Salt Water (Optional): To help purge the mussels of any remaining sand, you can soak them in a bowl of cold water with a bit of salt for about 20 minutes. This encourages the mussels to expel any sand inside their shells.
Final Rinse: Give the mussels a final rinse under cold running water before cooking.
Properly shucking oysters and clams, as well as preparing and cleaning mussels, ensures that these shellfish are safe to eat and ready for your favorite recipes. By following these detailed steps, you can handle shellfish with confidence and achieve perfect results every time. Whether you are serving raw oysters, steaming clams, or cooking mussels, these techniques will enhance your culinary skills and ensure the best possible flavor and texture.
Preparing Squid
Squid is a versatile seafood that can be cooked in various ways, from grilling to frying to adding to stews. Proper preparation of squid involves cleaning it thoroughly and marinating it to enhance its flavor. Here’s a detailed guide on cleaning squid and marinating seafood.
Cleaning Squid
Cleaning squid involves removing the innards, beak, and skin, and preparing the body and tentacles for cooking.
Tools Needed:
Cutting board
Sharp knife
Bowl of cold water
Procedure:
Separate the Head and Tentacles: Hold the squid’s body in one hand and the head and tentacles in the other. Gently pull the head away from the body to separate them. The innards will come out with the head.
Remove the Beak: Locate the beak at the center of the tentacles. Squeeze it out and discard it.
Remove the Cartilage: Inside the body, you will find a long, thin piece of clear cartilage (the quill). Pull it out and discard it.
Remove the Innards: Use your fingers to reach inside the body and pull out any remaining innards. Rinse the body cavity under cold running water.
Remove the Skin: The squid’s skin is edible but often removed for a smoother texture. To remove the skin, grasp a piece of it at the pointed end of the body and peel it off towards the wider end. Rinse the squid again after removing the skin.
Prepare the Tentacles: Cut off the tentacles just above the eyes. Discard the head and innards, but keep the tentacles. Rinse them under cold running water.
Cut the Body: Depending on your recipe, you may want to cut the squid’s body into rings or leave it whole. For rings, slice the body crosswise into 1/2-inch pieces.
Marinating Seafood
Marinating squid and other seafood can enhance their flavor and tenderize the meat. Here’s how to marinate seafood effectively.
Ingredients for a Basic Marinade:
Olive oil
Lemon juice or vinegar
Garlic (minced)
Fresh herbs (such as parsley, cilantro, or dill)
Salt and pepper
Optional: spices (like paprika, cumin, or chili flakes)
Procedure:
Prepare the Marinade: In a bowl, combine olive oil, lemon juice or vinegar, minced garlic, chopped fresh herbs, salt, and pepper. Adjust the quantities based on the amount of seafood you are marinating. Add optional spices if desired.
Marinate the Squid:
Small Pieces: For squid rings or small pieces, place the squid in the marinade and toss to coat evenly.
Whole or Large Pieces: For whole or large pieces, ensure they are fully submerged in the marinade or coat them thoroughly.
Marinating Time:
Short Marinating Time: Squid is tender and does not require long marinating times. Marinate for 15-30 minutes to enhance flavor without over-softening the texture.
Refrigeration: Always marinate seafood in the refrigerator to prevent bacterial growth.
Cooking After Marinating:
Grilling: Marinated squid can be grilled over medium-high heat until charred and cooked through, usually about 2-3 minutes per side.
Frying: Lightly coat the marinated squid in flour or breadcrumbs and fry until golden and crispy.
Sautéing: Sauté the marinated squid in a hot pan with a little oil until cooked through.
Properly cleaning and marinating squid prepares it for a variety of delicious recipes. By following these detailed steps, you can ensure that your squid is clean and flavorful, enhancing your seafood dishes. Whether you’re grilling, frying, or sautéing, these preparation techniques will help you achieve the best results with squid and other seafood.
Selecting Seafood
Selecting fresh seafood is crucial to ensure that you get the best flavor and quality. Here are detailed guidelines for selecting seafood, focusing on freshness indicators and specific criteria for fresh fish.
Freshness Indicators
When selecting seafood, look for signs that indicate freshness to ensure you get the best quality.
Bright, Clear Eyes: Fresh fish have clear, bright, and bulging eyes. Cloudy, sunken, or dull eyes are signs that the fish is past its prime.
Red or Pink Gills: The gills should be bright red or pink and free of slime. Brown, gray, or greenish gills indicate that the fish is not fresh.
Firm Flesh: Fresh fish have firm, elastic flesh that springs back when pressed. Soft, mushy flesh is a sign of spoilage.
Shiny, Metallic Skin: The skin should be shiny and metallic, not dull or discolored. Scales should be intact and adhere tightly to the skin.
Mild, Ocean-like Smell: Fresh fish should have a clean, mild scent, reminiscent of the sea. A strong, fishy, or ammonia-like odor is a sign that the fish is old or spoiled.
Selecting Fresh Fish
When selecting fresh fish, focus on specific parts of the fish to assess its freshness. Here are the key areas to examine:
Fish Eyes
Appearance: Look for eyes that are clear, bright, and slightly bulging. They should not appear cloudy, sunken, or dull.
Indicator: Clear, bright eyes are a strong indicator of freshness, while cloudy or sunken eyes suggest the fish is not fresh.
Fish Gills
Color: Check the gills by lifting the gill cover. Fresh fish gills should be bright red or pink.
Texture: Gills should be moist and free of slime. Avoid fish with brown, gray, or greenish gills, as these colors indicate spoilage.
Fish Skin and Scales
Appearance: The skin should have a shiny, metallic luster and the scales should be intact and firmly attached.
Texture: Run your fingers over the skin. It should feel smooth and firm, not slimy or sticky. Intact scales are a sign of proper handling and freshness.
Fish Flesh
Firmness: Press the flesh gently with your finger. Fresh fish flesh should be firm and bounce back, not leaving an indentation.
Color: The flesh should be moist and have a natural color, which varies by species. Look for any signs of discoloration or dryness, which indicate aging or spoilage.
Fish Smell
Scent: Fresh fish should have a clean, mild smell, reminiscent of the sea or a fresh cucumber. Avoid fish with a strong, fishy, sour, or ammonia-like odor.
Indicator: A strong or unpleasant odor is a clear sign that the fish is not fresh and should be avoided.
Additional Tips for Selecting Seafood
Buy from Reputable Sources: Purchase seafood from trusted markets or suppliers known for their high-quality and fresh products.
Seasonality: Be aware of the seasons for various types of fish. Fish caught in season are often fresher and of better quality.
Frozen Options: If fresh fish is not available, frozen fish can be a good alternative. Look for flash-frozen fish that has been frozen at peak freshness.
Shellfish: When selecting shellfish such as shrimp, oysters, clams, or mussels, ensure they are alive if buying fresh. Shells should be closed or close when tapped, and they should smell like the ocean.
Selecting fresh seafood involves careful inspection of the fish’s eyes, gills, skin, scales, flesh, and smell. By focusing on these freshness indicators, you can ensure you choose high-quality, fresh fish that will provide the best flavor and texture for your dishes. Always buy from reputable sources and be mindful of seasonality to get the best seafood available.
Selecting Shellfish and Mollusks
Choosing fresh shellfish and mollusks is crucial for ensuring their quality, safety, and flavor. Here are detailed guidelines on selecting shellfish, mollusks, and specific types of clams.
Selecting Shellfish
When selecting shellfish such as shrimp, crabs, and lobsters, consider the following indicators to ensure freshness and quality:
Selecting Clams
Clams are a popular type of mollusk, and selecting fresh clams is essential for ensuring their quality and safety. Here’s how to select different types of clams:
Types of Clams
Hard Shell Clams: Includes littlenecks, cherrystones, and quahogs. These clams have tightly closed shells and are often used for steaming, grilling, or raw consumption.
Soft Shell Clams: Includes steamers and razor clams. These clams have slightly open shells with a protruding siphon and are commonly used for steaming and frying.
Origin
Local and Seasonal: Whenever possible, choose clams that are local and in season, as they are likely to be fresher and more sustainable.
Certified Sources: Purchase clams from reputable suppliers who source their seafood from certified and sustainable fisheries.
Storage
Refrigeration: Store clams in the refrigerator at a temperature between 35°F to 40°F (1.5°C to 4.5°C). Place them in a bowl covered with a damp cloth. Do not store clams in airtight containers, as they need to breathe.
Before Cooking: Rinse clams under cold running water to remove any sand or debris. For sand removal, soak clams in salted water (about 1/3 cup salt per gallon of water) for 20-30 minutes before rinsing again.
Selecting fresh shellfish and mollusks involves paying close attention to their appearance, smell, and condition. For clams, consider their type, origin, and proper storage methods to ensure they are fresh and safe to eat. By following these guidelines, you can choose high-quality seafood that will provide the best flavor and texture for your dishes. Always buy from reputable sources and handle seafood with care to maintain its freshness and safety.
Selecting Mussels, Oysters, and Crustaceans
Choosing fresh mussels, oysters, and crustaceans is essential for ensuring high quality and safety in your seafood dishes. Here are detailed guidelines on selecting each type of seafood.
Selecting Mussels
Mussels are popular and versatile shellfish, but it’s crucial to select fresh ones to ensure the best flavor and safety.
Appearance and Condition:
Shells: Mussels should have tightly closed shells. If the shells are slightly open, they should close when tapped. Discard any mussels with cracked shells or that remain open.
Beards: Mussels often have fibrous threads called beards. While these are removed before cooking, the presence of beards indicates the mussels are fresh.
Size: Mussels should be relatively uniform in size to ensure even cooking.
Smell:
Freshness: Fresh mussels should have a clean, briny smell, reminiscent of the ocean. Avoid mussels with a strong, fishy odor.
Storage:
Refrigeration: Store mussels in the refrigerator at a temperature between 35°F to 40°F (1.5°C to 4.5°C). Place them in a bowl covered with a damp cloth to keep them moist. Do not store mussels in airtight containers, as they need to breathe.
Before Cooking: Rinse mussels under cold running water to remove any dirt or sand. Remove the beards by pulling them off or cutting them with a knife.
Selecting Oysters
Oysters come in various types, each with unique flavors. Selecting fresh oysters involves understanding these types and proper storage.
Types of Oysters:
Pacific Oysters: Known for their mild, sweet flavor and small size.
Atlantic Oysters: Larger and brinier than Pacific oysters, with a robust flavor.
Kumamoto Oysters: Small, deep-cupped oysters with a sweet, buttery flavor.
Olympia Oysters: Small and rare, with a distinctive sweet and coppery flavor.
Origin:
Local and Seasonal: Choose oysters from reputable sources and in season for the freshest taste. Oysters are best enjoyed in months with an “R” (September to April) to avoid the spawning season.
Appearance and Condition:
Shells: Oysters should have tightly closed shells. If slightly open, they should close when tapped. Discard any oysters with cracked shells or that remain open.
Liquor: Fresh oysters should contain clear, briny liquid (the “liquor”) inside their shells.
Smell:
Freshness: Oysters should have a clean, ocean-like smell. Avoid oysters with a strong, fishy, or sour odor.
Storage:
Refrigeration: Store oysters in the refrigerator at a temperature between 35°F to 40°F (1.5°C to 4.5°C). Place them cup-side down in a container covered with a damp cloth. Do not store oysters in airtight containers.
Before Serving: Rinse the oysters under cold running water and scrub the shells with a stiff brush to remove any dirt or debris.
Selecting Crabs, Lobsters, Shrimp, and Cephalopods
Selecting fresh seafood is essential to ensure the best flavor, quality, and safety. Here are detailed guidelines on selecting crabs, lobsters, shrimp, and cephalopods.
Selecting Crabs
Crabs are a popular seafood choice, and selecting the right type and ensuring freshness is key.
Types of Crabs:
Blue Crabs: Found along the Atlantic coast, known for their sweet and tender meat.
Dungeness Crabs: Found along the Pacific coast, known for their rich, buttery flavor.
King Crabs: Found in colder waters, known for their large size and succulent meat.
Snow Crabs: Found in the North Atlantic and North Pacific, known for their sweet, delicate flavor.
Origin:
Choose crabs from reputable sources and those caught in clean, unpolluted waters to ensure safety and quality.
Appearance and Condition:
Live Crabs: Should be active and responsive. Look for crabs that are lively and moving, with intact shells.
Cooked Crabs: Should have bright red shells and firm, white meat. Avoid crabs with black spots or discoloration on the shells.
Frozen Crabs: Look for crabs that are frozen solid with no ice crystals inside the packaging, which can indicate thawing and refreezing.
Smell:
Fresh crabs should have a clean, ocean-like smell. Avoid crabs with a strong, fishy, or ammonia-like odor.
Storage:
Live Crabs: Store in a cool, moist environment, such as a well-ventilated container with damp newspaper or seaweed. Keep them in the refrigerator and cook within 24 hours.
Cooked Crabs: Store in the refrigerator and consume within 2-3 days.
Frozen Crabs: Store in the freezer for up to 6 months. Thaw in the refrigerator or under cold running water before cooking.
Selecting Lobsters
Lobsters are a delicacy, and selecting fresh lobsters ensures a premium dining experience.
Types of Lobsters:
Maine Lobsters: Also known as American lobsters, found along the North Atlantic coast, known for their sweet, tender meat.
Spiny Lobsters: Found in warmer waters, such as the Caribbean and Pacific, known for their firm, flavorful meat but lack of claws.
Origin:
Choose lobsters from reputable suppliers, and opt for those caught in clean waters to ensure safety and quality.
Appearance and Condition:
Live Lobsters: Should be active and responsive, with hard, intact shells. Look for lobsters that are lively and moving.
Cooked Lobsters: Should have bright red shells and firm, white meat. Avoid lobsters with discolored shells or meat.
Frozen Lobsters: Look for lobsters that are frozen solid with no ice crystals inside the packaging.
Smell:
Fresh lobsters should have a clean, ocean-like smell. Avoid lobsters with a strong, fishy, or ammonia-like odor.
Storage:
Live Lobsters: Store in the refrigerator wrapped in damp newspaper or seaweed. Cook within 24 hours.
Cooked Lobsters: Store in the refrigerator and consume within 2-3 days.
Frozen Lobsters: Store in the freezer for up to 6 months. Thaw in the refrigerator or under cold running water before cooking.
Selecting Shrimp
Shrimp are a versatile seafood option, and selecting fresh shrimp ensures the best quality and flavor.
Types of Shrimp:
White Shrimp: Known for their mild, sweet flavor and firm texture.
Brown Shrimp: Have a slightly stronger, more pronounced flavor.
Pink Shrimp: Known for their sweet, tender meat.
Tiger Shrimp: Larger shrimp with a firm texture and mild flavor.
Appearance and Condition:
Fresh Shrimp: Should have firm, translucent flesh and intact shells. Avoid shrimp with black spots or discoloration on the shells.
Frozen Shrimp: Look for shrimp that are frozen solid with no ice crystals inside the packaging.
Smell:
Fresh shrimp should have a clean, slightly briny smell. Avoid shrimp with a strong ammonia smell.
Storage:
Fresh Shrimp: Store in the coldest part of the refrigerator and use within 1-2 days. For longer storage, freeze them.
Frozen Shrimp: Store in the freezer for up to 6 months. Thaw in the refrigerator or under cold running water before cooking.
Cephalopods are a popular seafood choice, known for their unique texture and flavor.
Appearance and Condition:
Skin: Should be smooth and intact. Fresh squid, octopus, and cuttlefish should have a slightly shiny appearance.
Flesh: Should be firm and elastic. Avoid cephalopods with slimy or mushy flesh.
Eyes: Should be clear and bright, not cloudy or sunken.
Smell:
Fresh cephalopods should have a clean, ocean-like smell. Avoid any with a strong, fishy, or sour odor.
Storage:
Fresh Cephalopods: Store in the refrigerator and use within 1-2 days. For longer storage, freeze them.
Frozen Cephalopods: Store in the freezer for up to 6 months. Thaw in the refrigerator or under cold running water before cooking.
Selecting fresh crabs, lobsters, shrimp, and cephalopods involves careful inspection of their appearance, smell, and condition. Proper storage is also crucial to maintain their freshness and quality. By following these guidelines, you can ensure that you choose high-quality seafood that will provide the best flavor and texture for your dishes. Always buy from reputable sources and handle seafood with care to maintain its freshness and safety.
Cooking Methods for Seafood
Seafood is versatile and can be cooked using various methods, each bringing out different flavors and textures. Here’s a detailed guide on grilling, broiling, poaching, steaming, sautéing, pan-frying, baking, and roasting seafood.
Grilling and Broiling Seafood
Grilling and broiling are high-heat cooking methods that impart a smoky flavor and create a delicious crust on the seafood.
Grilling Seafood:
Preparation: Preheat the grill to medium-high heat. Clean and oil the grates to prevent sticking.
Seasoning: Lightly coat the seafood with oil and season with salt, pepper, and herbs or spices.
Cooking:
Fish Fillets: Place fillets skin-side down and grill for 3-5 minutes per side, depending on thickness.
Shrimp and Scallops: Thread onto skewers and grill for 2-3 minutes per side until opaque.
Whole Fish: Stuff with herbs and lemon, and grill for 6-8 minutes per side, depending on size.
Tips: Avoid overcooking by using a meat thermometer. Fish should reach an internal temperature of 145°F (63°C).
Broiling Seafood:
Preparation: Preheat the broiler and position the oven rack about 4-6 inches from the heat source.
Seasoning: Lightly oil and season the seafood.
Cooking:
Fish Fillets: Broil fillets skin-side down for 4-5 minutes per side, depending on thickness.
Shrimp and Scallops: Broil for 2-3 minutes per side until opaque.
Lobster Tails: Split tails, brush with butter, and broil for 6-8 minutes until opaque.
Tips: Use a broiler pan or a baking sheet lined with aluminum foil for easy cleanup.
Poaching and Steaming Seafood
Poaching and steaming are gentle cooking methods that preserve the delicate texture and moisture of seafood.
Poaching Seafood:
Preparation: Use a large, shallow pan and enough poaching liquid (water, broth, wine, or a combination) to cover the seafood.
Seasoning: Add aromatics like herbs, lemon slices, garlic, and peppercorns to the liquid.
Cooking:
Fish Fillets: Simmer the poaching liquid over low heat and cook fillets for 5-7 minutes until opaque.
Shrimp: Poach for 3-5 minutes until pink and opaque.
Scallops: Poach for 2-4 minutes until opaque.
Tips: Avoid boiling the liquid, as this can make the seafood tough.
Steaming Seafood:
Preparation: Use a steamer basket or a colander set over a pot of simmering water.
Seasoning: Season the seafood with salt and herbs or spices.
Cooking:
Fish Fillets: Steam for 6-8 minutes until opaque and flaky.
Shrimp and Scallops: Steam for 3-5 minutes until opaque.
Mussels and Clams: Steam for 5-7 minutes until shells open.
Tips: Arrange seafood in a single layer in the steamer basket for even cooking.
Sautéing and Pan-Frying Seafood
Sautéing and pan-frying are quick cooking methods that create a crispy exterior while keeping the seafood moist.
Sautéing Seafood:
Preparation: Preheat a skillet over medium-high heat and add a small amount of oil or butter.
Seasoning: Season the seafood with salt, pepper, and herbs or spices.
Cooking:
Fish Fillets: Sauté fillets for 3-4 minutes per side until golden brown and opaque.
Shrimp and Scallops: Sauté for 2-3 minutes per side until opaque.
Calamari: Sauté for 1-2 minutes until just cooked through.
Tips: Avoid overcrowding the pan to ensure even cooking and crispiness.
Pan-Frying Seafood:
Preparation: Preheat a skillet over medium-high heat and add enough oil to cover the bottom.
Breading: Optional—dredge seafood in flour, egg, and breadcrumbs for a crispy coating.
Cooking:
Fish Fillets: Fry for 3-4 minutes per side until golden brown and opaque.
Shrimp and Scallops: Fry for 2-3 minutes per side until golden brown and opaque.
Tips: Drain cooked seafood on paper towels to remove excess oil.
Baking and Roasting Seafood
Baking and roasting are versatile methods that allow for even cooking and the addition of various flavors.
Baking Seafood:
Preparation: Preheat the oven to 375°F (190°C) and lightly grease a baking dish.
Seasoning: Season the seafood with salt, pepper, and herbs or spices. Add lemon slices or other aromatics if desired.
Cooking:
Fish Fillets: Bake for 12-15 minutes until opaque and flaky.
Shrimp and Scallops: Bake for 8-10 minutes until opaque.
Stuffed Clams: Bake for 15-20 minutes until the stuffing is golden brown.
Tips: Use a meat thermometer to check that the fish reaches an internal temperature of 145°F (63°C).
Roasting Seafood:
Preparation: Preheat the oven to 425°F (220°C) and line a baking sheet with parchment paper.
Seasoning: Season the seafood with salt, pepper, and herbs or spices. Drizzle with oil or melted butter.
Cooking:
Whole Fish: Roast for 20-30 minutes, depending on size, until the flesh is opaque and flakes easily.
Fish Fillets: Roast for 10-12 minutes until opaque and flaky.
Lobster Tails: Roast for 12-15 minutes until opaque.
Tips: Add vegetables to the baking sheet for a complete meal.
Seafood Flavor Pairings
Pairing the right herbs and spices with seafood can elevate your dishes by enhancing the natural flavors and adding complexity. Here’s a detailed guide on using herbs and spices to complement various types of seafood.
Herbs and Spices for Seafood
Herbs for Seafood
1. Dill with Seafood
Description: Dill has a fresh, slightly sweet flavor with hints of anise and lemon.
Pairing: Dill pairs exceptionally well with salmon, trout, shrimp, and scallops. It’s often used in sauces, marinades, and dressings.
Dishes: Dill sauce for salmon, dill and lemon shrimp, dill and cucumber salad with seafood.
2. Parsley with Seafood
Description: Parsley has a bright, clean, and slightly peppery flavor.
Pairing: Parsley complements most seafood, especially white fish, shellfish, and crustaceans. It’s used in garnishes, sauces, and marinades.
Dishes: Garlic and parsley butter for lobster, parsley pesto for fish, chimichurri with grilled shrimp.
3. Cilantro (Coriander) with Seafood
Description: Cilantro has a fresh, citrusy flavor with a slight peppery bite.
Pairing: Cilantro is ideal for seafood dishes with Asian, Latin American, or Caribbean influences. It works well with shrimp, scallops, and fish tacos.
Dishes: Cilantro-lime shrimp, fish tacos with cilantro slaw, Thai cilantro and lime fish.
4. Tarragon with Seafood
Description: Tarragon has a subtle licorice or anise flavor with a hint of sweetness.
Pairing: Tarragon pairs well with shellfish, particularly lobster and crab, as well as delicate white fish.
Dishes: Tarragon butter lobster, tarragon and lemon crab cakes, tarragon cream sauce for fish.
5. Basil Seafood
Description: Basil has a sweet, slightly peppery flavor with hints of clove and mint.
Pairing: Basil complements a variety of seafood, particularly Mediterranean dishes. It’s great with shrimp, scallops, and fish.
Dishes: Basil pesto shrimp, tomato-basil fish stew, basil and garlic grilled scallops
Spices for Seafood
1. Paprika (Sweet and Smoked) with Seafood
Description: Sweet paprika has a mild, sweet flavor, while smoked paprika has a deeper, smoky taste.
Pairing: Both types of paprika pair well with a variety of seafood, enhancing the flavor without overpowering it. They’re excellent for grilled, roasted, and fried seafood.
Description: Saffron has a distinctive, earthy flavor with a slight bitterness and sweet undertones.
Pairing: Saffron is perfect for seafood dishes that have a rich, flavorful base, such as paella, bouillabaisse, and risotto.
Dishes: Saffron seafood paella, saffron and seafood risotto, bouillabaisse with saffron.
3. Cayenne and Chili Flakes with Seafood
Description: Cayenne and chili flakes add heat and spice to dishes, with cayenne being more intense.
Pairing: These spices are great for adding a kick to seafood dishes, especially those with bold flavors. They pair well with shrimp, fish, and calamari.
Dishes: Spicy cayenne shrimp, chili flake calamari, spicy fish tacos.
4. Fennel Seeds with Seafood
Description: Fennel seeds have a sweet, anise-like flavor that is both aromatic and slightly spicy.
Pairing: Fennel seeds complement a variety of seafood, particularly in Mediterranean and Indian cuisines. They work well with fish, shrimp, and scallops.
Dishes: Fennel seed-crusted fish, shrimp with fennel seed and garlic, fennel and tomato seafood stew.
Classic Sauces for Seafood
Sauces can elevate seafood dishes by adding richness, flavor, and a complementary taste profile. Here are some classic sauces that pair beautifully with various types of seafood.
Lemon Butter Sauce
Description: Lemon butter sauce is a simple yet luxurious sauce made from butter, lemon juice, and sometimes garlic and herbs.
Ingredients:
1/2 cup unsalted butter
2 tablespoons fresh lemon juice
1 teaspoon lemon zest
1 garlic clove, minced (optional)
Fresh parsley, chopped (optional)
Salt and pepper to taste
Procedure:
Melt Butter: In a small saucepan, melt the butter over medium heat.
Add Garlic (Optional): Add the minced garlic and sauté for about 1 minute until fragrant.
Add Lemon: Stir in the lemon juice and zest. Season with salt and pepper.
Finish: Remove from heat and stir in chopped parsley if desired.
Pairing: Ideal for drizzling over grilled or pan-seared fish, shrimp, scallops, and lobster.
Tartar Sauce
Description: Tartar sauce is a creamy, tangy sauce made from mayonnaise, pickles, capers, and herbs, commonly served with fried seafood.
Ingredients:
1 cup mayonnaise
1 tablespoon Dijon mustard
2 tablespoons finely chopped pickles or relish
1 tablespoon capers, drained and chopped
1 tablespoon lemon juice
1 tablespoon chopped fresh dill or parsley
Salt and pepper to taste
Procedure:
Combine Ingredients: In a bowl, mix together the mayonnaise, mustard, pickles, capers, lemon juice, and herbs.
Season: Add salt and pepper to taste.
Chill: Refrigerate for at least 30 minutes before serving to allow the flavors to meld.
Pairing: Excellent with fried fish, fish sticks, shrimp, and crab cakes.
Marinara Sauce
Description: Marinara is a classic tomato-based sauce with garlic, onions, and herbs, often used in Italian cuisine.
Ingredients:
2 tablespoons olive oil
1 small onion, finely chopped
3 garlic cloves, minced
1 can (28 ounces) crushed tomatoes
1 teaspoon dried oregano
1 teaspoon dried basil
Salt and pepper to taste
Fresh basil leaves, chopped (optional)
Procedure:
Sauté Vegetables: In a large skillet, heat the olive oil over medium heat. Add the onion and cook until soft, about 5 minutes. Add the garlic and cook for 1 minute.
Add Tomatoes: Stir in the crushed tomatoes, oregano, and basil. Season with salt and pepper.
Simmer: Bring to a simmer and cook for about 20 minutes, stirring occasionally, until the sauce has thickened.
Finish: Stir in fresh basil if using.
Pairing: Ideal for serving with seafood pasta, shrimp, calamari, and baked fish.
Aioli (Garlic Mayonnaise)
Description: Aioli is a creamy, garlicky mayonnaise sauce that adds richness and depth to seafood dishes.
Ingredients:
1 cup mayonnaise
2-3 garlic cloves, minced
1 tablespoon lemon juice
1 teaspoon Dijon mustard
Salt and pepper to taste
Procedure:
Combine Ingredients: In a bowl, mix together the mayonnaise, garlic, lemon juice, and Dijon mustard.
Season: Add salt and pepper to taste.
Chill: Refrigerate for at least 30 minutes before serving to allow the flavors to meld.
Pairing: Perfect with grilled shrimp, crab cakes, fish tacos, and roasted fish.