

2201 Knife Skills Level 1
Mastering knife skills is essential for every chef and can greatly enhance efficiency, safety, and precision in the kitchen. Understanding the anatomy of a knife, the different types of knives, their maintenance, and proper handling techniques are crucial for consistent results.
Disclaimer
This article provides comprehensive guidance on knife skills, but it is essential that users exercise caution and prioritize safety when handling knives and other sharp kitchen tools. This information is intended for adults only.
Disclaimer of Liability
- Training and Supervision: Ensure that you receive appropriate training before using any knife or sharp tool. Beginners should practice under the supervision of a qualified instructor.
- Proper Use and Maintenance: Use knives only for their intended purpose and maintain them in good condition to minimize the risk of injury.
- Work Environment: Use knives on stable, appropriate cutting surfaces in well-lit areas and maintain a clean, organized workspace to reduce the risk of accidents.
- Safety Gear: Wear personal protective equipment like cut-resistant gloves when handling knives or performing tasks that could lead to injury.
- Report Hazards: Report any broken or faulty knives to a supervisor or manager, and do not use them until they are repaired or replaced.
CAIBOK assumes no responsibility or liability for accidents, injuries, or damages that may occur as a result of following the practices or using the equipment described in this article. Users should consult additional safety resources or certified instructors and understand the risks associated with handling knives and sharp tools.
Knife Anatomy
A knife consists of several distinct parts that each play a role in how it functions and is used:
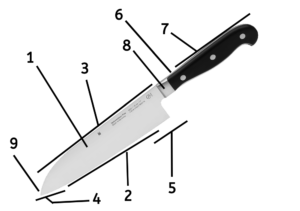
Understanding the anatomy of a knife is crucial for using it effectively. Here’s a detailed overview:
- Blade: The main cutting surface of the knife. Typically made from stainless steel, carbon steel, or ceramic. The material determines the knife’s sharpness, durability, and maintenance needs.#
- Edge: The sharp side of the blade that runs from the tip to the heel and comes into contact with food. The edge can be straight, serrated, or otherwise shaped depending on the knife’s purpose.#
- Spine: The unsharpened top of the blade, opposite the edge. It is thicker and provides weight and balance, which can also be used for cracking or crushing ingredients.#
- Tip: The front part of the blade used for delicate tasks like mincing garlic or deveining shrimp. It provides precision for intricate cutting.#
- Heel: The rear part of the blade, near the handle. It’s the thickest and strongest part, suitable for tasks requiring force, like chopping through bone.#
- Tang: The extension of the blade into the handle. A full tang, which runs the entire length of the handle, provides balance and durability.#
- Handle: Where the knife is held. Handles can be made from wood, plastic, or metal, and should offer a comfortable grip even when wet.#
- Bolster: The thick junction between the blade and handle, offering balance and preventing the hand from sliding onto the blade. Often found in chef’s knives.#
- Rivets: Metal pins that secure the handle to the tang, typically found in knives with wooden handles.#
- Point: The very end of the tip, used for piercing and fine cuts.#
Knife Edge Types
Different knives have specific edge types suited to their intended uses:
- Tapered Ground Edge:
- A gradual taper from the spine to the cutting edge for versatile cutting.
- Scalloped Edge:
- Hollowed grooves along the blade edge, reducing drag and preventing sticking.
- Serrated Edge:
- Jagged, saw-like teeth cut through tough or crusty surfaces like bread.
- Granton Edge:
- Indented dimples along the blade that create air pockets, reducing sticking.
- Single Ground Edge:
- An edge sharpened on only one side, common in Japanese knives.
Types of Knives
Each type of knife serves a specific purpose in the kitchen:
- Chef’s Knife:
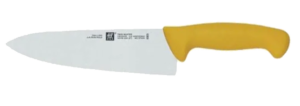
- The versatile chef’s knife is suitable for slicing, dicing, and chopping.
- Paring Knife:
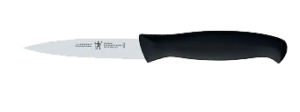
- A small knife for peeling and fine tasks, such as cutting fruit.
- Utility Knife:
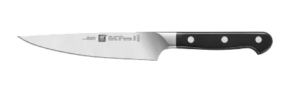
- A midsize knife that is versatile for both small and large cutting tasks.
- Boning Knife:
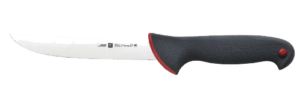
- A thin, flexible blade designed for removing bones from meat and poultry.
- Carving Knife / Slicing Knife:

- A long, thin knife for slicing cooked meats thinly.
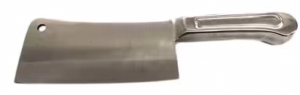
- Cleaver:
- A heavy knife for chopping through bones and tougher ingredients.
- Bread Knife:

- A long, serrated blade ideal for slicing bread and cakes.
- Filet Knife:

- A long, flexible blade for filleting fish.
Knife Maintenance
Proper knife maintenance is crucial for safety and longevity:
- Clean Your Knife After Use:
- Wash knives by hand with warm, soapy water and dry immediately.
- Use Proper Cutting Surfaces:
- Always use cutting boards made of wood or plastic to protect the blade.
- Store Knives:
- Store knives in a knife block, magnetic strip, or protective sleeves.
- Keep Knives Dry:
- Moisture can corrode blades over time. Dry knives thoroughly before storage.
- Use Proper Storage:
- Avoid loose storage or drawers to prevent dulling and accidental cuts.
- Avoid Harsh Chemicals:
- Don’t use bleach or harsh chemicals that could damage the blade and handle.
- Using Cutting Boards:
- Cutting boards should be stable and provide enough surface area to work safely.
Knife Skills
Proper grip and cutting techniques ensure efficiency and safety:
Mastering the Proper Grip on a Kitchen Knife
A proper grip on a kitchen knife is crucial for effective and safe cutting techniques. Whether you’re a professional chef or a home cook, mastering the proper way to hold a knife not only improves precision in your cuts but also enhances your overall safety and comfort during food preparation. Here’s how to achieve a proper grip on your kitchen knife.
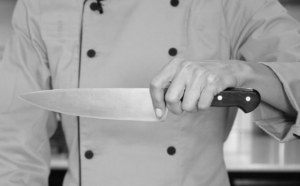
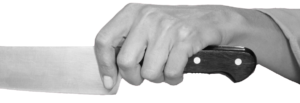
The Pinch Grip: A Standard for Precision
The pinch grip is widely recommended for its control and stability, making it the preferred grip among culinary professionals.
Steps to Achieve the Pinch Grip:
- Position Your Hand: Start by pinching the blade itself, not just the handle, between your thumb and the side of your index finger. This pinch should be at the base of the blade, just in front of the handle, near the bolster if your knife has one. This part of the blade is often referred to as the “choil.”
- Wrap Your Fingers: After pinching the blade, curl your remaining fingers around the handle of the knife. Ensure that your middle, ring, and little fingers are comfortably wrapped around the handle, providing support and additional control.
- Align the Knife: The pinch grip aligns the knife with your forearm, providing better control and reducing stress on your wrist and arm. This alignment allows for more efficient movement during cutting.
Benefits of the Pinch Grip:
- Control: This grip gives you superior control over the blade, allowing for more precise cuts, which is essential for tasks like mincing herbs, slicing vegetables, or fabricating meats.
- Safety: By having a firm grip on both the blade and the handle, the knife is less likely to slip from your hand, reducing the risk of cutting yourself.
- Reduced Fatigue: The pinch grip distributes the force more evenly across your hand, which can minimize fatigue during long cooking sessions.
- A good grip enhances control and minimizes fatigue.
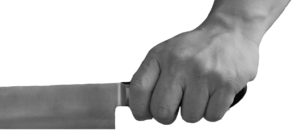
Mastering the Handle Grip on a Kitchen Knife
The handle grip, while less commonly recommended than the pinch grip for professional chefs, is still widely used and particularly useful for certain culinary tasks and for those new to cooking. It offers a comfortable and secure way to handle a knife, especially when precise control over the blade is less critical. Here’s how to properly execute the handle grip and when to use it.
How to Properly Use the Handle Grip
- Grasping the Knife:
- Hold the knife by wrapping all four fingers around the handle. Your fingers should be comfortably curled with the thumb resting along one side of the handle, not wrapped underneath.
- Ensure your grip is firm but relaxed to avoid fatigue. The knife should feel like an extension of your hand.
- Positioning the Thumb:
- Place your thumb along the side of the handle opposite your fingers. This provides stability and control. Avoid placing the thumb on the spine of the blade, as this can lead to less control and potential discomfort.
- Handling the Knife:
- Use this grip for tasks that require less precision and more force, such as chopping nuts, slicing herbs, or cutting through large, less dense vegetables and fruits.
Advantages of the Handle Grip
- Safety: For those less experienced with knives, the handle grip offers a safer option as it keeps fingers further from the blade.
- Comfort: This grip can be more comfortable for long periods of chopping, especially for home cooks who may not require the precision a professional chef needs.
- Ease of Use: It’s intuitive and requires less technique and practice to master than the pinch grip, making it accessible for beginners.
Best Practices and Tips
- Knife Type: The handle grip is best used with lighter knives, such as paring knives or utility knives, where the balance of the knife does not heavily rely on the blade.
- Cutting Task: Use this grip for straightforward cutting tasks that don’t require the finesse of dicing or julienning. It’s ideal for slicing vegetables or fruits where perfect cuts are not critical.
- Practice Good Form: Keep your wrist firm and aligned with your forearm to prevent strain. Make sure your other hand, the guiding hand, uses the “claw technique” to hold the food securely and protect your fingers.
When to Avoid the Handle Grip
- Precision Cutting: For tasks that require high precision, such as mincing garlic or finely chopping herbs, the pinch grip offers better control and accuracy.
- Heavy Knives: For heavier knives like chef’s knives, the pinch grip might provide better balance and control, especially for fine or delicate cutting tasks.
Mastering the Pinch Grip on a Kitchen Knife
The pinch grip is a fundamental knife handling technique favored by professional chefs for its superior control and precision. This grip enhances stability and allows for more accurate, safer knife work. Here’s a detailed guide on how to properly execute the pinch grip and the advantages it offers in the kitchen.
How to Properly Use the Pinch Grip
- Positioning Your Hand:
- Pinch the Blade: Use your thumb and the side of your index finger (just below the first knuckle) to pinch the blade itself, not just the handle. This should be done at the base of the blade near the bolster (if your knife has one) for optimal control.
- Placement: The exact spot to pinch can vary slightly based on the size of the knife and what feels most balanced in your hand. Generally, it’s just in front of the handle.
- Wrapping the Fingers:
- Curl Your Fingers: After pinching the blade, curl your remaining three fingers (middle, ring, and pinky) around the handle of the knife. These fingers will rest naturally on the handle, providing stability and strength.
- Ensure Comfort: Adjust the grip as needed to ensure it feels secure and comfortable in your hand. The knife should feel like an extension of your arm, balanced and easy to control.
Advantages of the Pinch Grip
- Enhanced Control: This grip offers superior control over the knife, allowing for more precise cuts. It aligns the knife with your forearm, giving you better maneuverability.
- Increased Safety: By securing the blade between your fingers, you have better control, which reduces the risk of the knife slipping during use.
- Reduced Fatigue: The pinch grip helps distribute the force more evenly through your hand and arm, reducing strain and fatigue during prolonged use.
Best Practices and Tips
- Knife Type: The pinch grip is especially effective with larger knives like chef’s knives or santoku knives. These types of knives benefit from the added control and stability the grip provides.
- Cutting Tasks: Use this grip for tasks that require precision, such as mincing, dicing, and slicing. It’s particularly useful for fine cuts where accuracy is crucial.
- Skill Development: Practice this grip regularly to build your comfort and proficiency. Initially, it may feel awkward, but with continuous practice, it will become more natural.
Practical Application and Exercises
- Practice Makes Perfect: Begin by practicing cutting soft foods like tomatoes or mushrooms, which require precision and a gentle touch. This will help you get used to the feel and motion of the knife with the pinch grip.
- Progress to Harder Foods: Once comfortable, move on to harder foods like carrots or potatoes. This will allow you to practice applying more pressure while maintaining control.
Claw technique - Continuous Learning: Observe how different blade lengths and weights affect your control and adjust your grip as needed. Each knife may feel different, and adapting your grip can improve your cutting technique.
- Pinch the blade just ahead of the handle with the thumb and index finger for precise control.
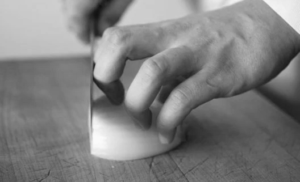
Mastering the Claw Technique
The claw technique is a fundamental knife skill that enhances safety and precision when chopping or slicing. It involves a specific way of holding the food item being cut, which not only protects the fingers but also helps achieve uniform cuts. Here’s how to master the claw technique in your kitchen prep work.
How to Properly Use the Claw Technique
- Positioning Your Fingers:
- Curl your fingers inward, forming a claw-like shape. Your fingertips should point downwards, slightly tucked under.
- Keep your thumb tucked behind your fingers. This protects it from the blade as it’s the most vulnerable to accidental cuts.
- Guiding the Knife:
- Let the side of the knife blade rest against the first knuckles of your curled fingers. This alignment guides the knife and helps maintain straight, even cuts.
- Ensure that the knife is always in contact with your knuckles, which serve as a guide for the blade as you slice through the food.
- Using the Technique:
- Start with the knife blade touching your knuckle, your fingers safely curled away, and the thumb tucked back.
- As you slice, move your fingers backward in small increments, using your knuckles as the guide. This movement helps you control the size of the slices and ensures your fingers stay clear of the blade.
Benefits of the Claw Technique
- Enhanced Safety: By keeping the fingertips away from the cutting path and the thumb behind the fingers, the claw technique significantly reduces the risk of cutting yourself.
- Uniform Cuts: This technique helps achieve consistent cut sizes, which is crucial for cooking food evenly and presenting it neatly.
- Improved Speed and Efficiency: With practice, the claw technique can increase your cutting speed and efficiency because it allows for quick, repetitive motion without frequent stops to reposition your hands.
Best Practices and Tips
- Practice with Soft Foods: Start practicing the claw technique with softer foods, such as tomatoes or mushrooms, which require less force to cut through. This allows you to focus on your hand positioning without much resistance.
- Progress to Firmer Foods: As you gain confidence and skill, move on to firmer foods like carrots or potatoes. This will challenge your ability to maintain proper technique under more pressure.
- Keep Your Knife Sharp: A sharp knife is safer and more effective. It requires less force, which makes it easier to control and less likely to slip.
Common Mistakes to Avoid
- Overextending the Fingers: Ensure your fingertips are truly curled and not stretched out towards the blade.
- Losing Contact Between Knife and Knuckles: Always maintain slight contact between the knife and your knuckles for guidance; losing this contact can lead to uneven cuts or slips.
- Forgetting the Thumb: Keep reminding yourself to keep your thumb tucked back. It’s a common mistake to let it creep forward, especially when focused on the other fingers.